Crochet Shorts: A Simple Step-by-Step Guide to Making Your Own Summer Shorts
Crochet shorts are a fun and comfortable handmade clothing project, perfect for warm days, holidays, and relaxed everyday outfits. With soft yarn, simple stitches, and a pretty striped design, you can create a lovely pair of shorts that fits your body and personal style.
What Are Crochet Shorts?
Crochet shorts are handmade bottoms created by using a crochet hook and yarn. They can be made in different lengths, styles, colors, and sizes. Some designs are loose and relaxed, while others have a closer fit with a stretchy waistband.
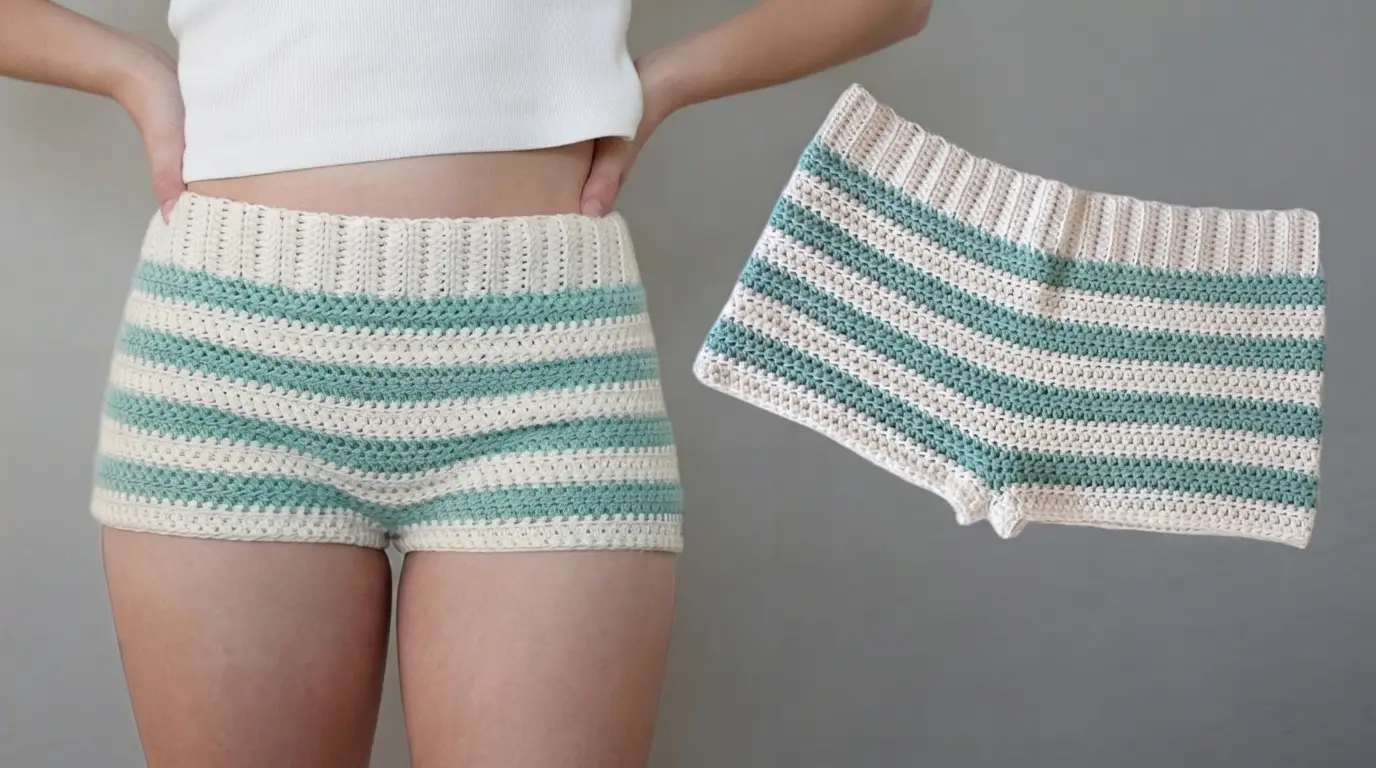
This crochet shorts design features a comfortable high-waisted shape, a wide ribbed waistband, and a simple striped pattern. The main body has alternating cream and soft sage-green rows, giving the shorts a fresh and relaxed summer look.
The stitch texture adds a little detail without making the design too complicated. The short legs provide comfortable coverage while keeping the finished piece light and easy to wear.
These shorts can be paired with a simple tank top, a cropped T-shirt, or a loose summer blouse. They are also a lovely handmade gift for someone who enjoys comfortable crochet clothing.
Materials Needed for Crochet Shorts
Choosing the right materials is important because crochet shorts need to be comfortable, breathable, and strong enough for regular wear.
Yarn: Choose a soft cotton or cotton-blend yarn. Cotton is a good choice for summer clothing because it feels comfortable against the skin and is breathable. A cotton blend with a little stretch can also work well. You will need a main color, such as cream or off-white, and a second color, such as sage green.
Crochet Hook: Use the hook size recommended on your yarn label as a starting point. The correct size will depend on your personal tension and the fabric you want to create.
Scissors: A small pair of sharp scissors will help you cut the yarn neatly when changing colors or finishing the project.
Yarn Needle: You will need a yarn needle to sew the waistband seam, join any necessary sections, and weave in loose ends.
Stitch Markers: These are useful for marking the beginning of rounds, side positions, and the crotch area.
Measuring Tape: A measuring tape helps you check your waist, hips, thigh area, and desired shorts length.
Choosing the Right Yarn and Colors
Yarn choice makes a big difference when making crochet clothing. Since shorts are worn directly against the body, choose yarn that feels soft and comfortable.
Cotton yarn is a popular option because it is breathable and suitable for warm weather. It also holds its shape reasonably well when the correct stitch tension is used. However, cotton can have less natural stretch than some other fibers, so it is important to make a comfortable waistband.
A cotton-acrylic blend is another option if you prefer a slightly softer feel. Avoid very heavy yarn because it can make the shorts thick and less comfortable.
For this striped design, cream and sage green create a gentle color combination. You can also try white and blue, beige and brown, pink and white, or any two colors that match your wardrobe.
Before starting, make sure you have enough yarn in both colors. The amount needed will depend on your size, yarn thickness, hook size, and shorts length.
Crochet Stitches and Techniques to Know
You do not need advanced crochet skills to make a simple pair of crochet shorts. A few basic techniques will help you complete this project.
Chain Stitch (ch): This stitch is used to create the foundation chain. It is also useful when making the waistband and connecting sections around the crotch.
Single Crochet (sc): Single crochet creates a firm and neat fabric. It is useful for edges and areas where you want a little extra structure.
Half Double Crochet (hdc): Half double crochet creates a slightly taller stitch than single crochet. It is a good choice for the main body because it works up quickly and creates a comfortable fabric.
Slip Stitch (sl st): Slip stitches are useful for joining rounds and finishing seams.
Back Loop Only (BLO): Working into the back loop creates a ribbed texture. This technique is especially useful for making the stretchy-looking waistband.
Color Changing: To create the horizontal stripes, change yarn colors at the end of selected rounds. Always finish the final stitch of the old color with the new color for a cleaner transition.
You can use half double crochet for the main body and back-loop-only single crochet for the waistband. These stitches create a simple fabric with a neat appearance.
Step-by-Step Guide to Making Crochet Shorts
The following instructions explain a basic construction method for creating striped crochet shorts with a ribbed waistband. The measurements and stitch counts should be adjusted to your own body and crochet tension rather than treated as a fixed-size pattern.
Step 1: Take Your Measurements
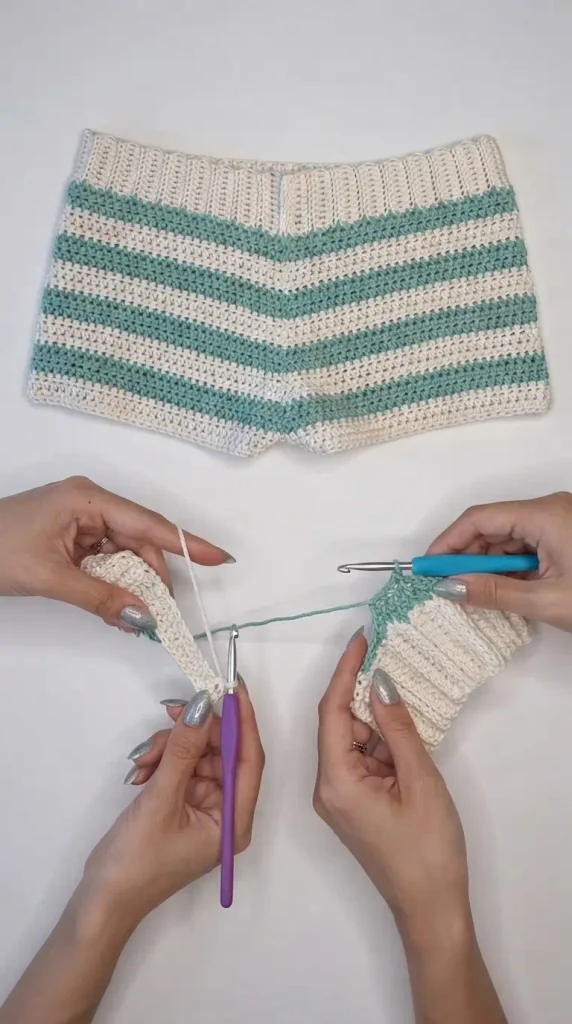
Before picking up your crochet hook, take a few measurements. This is one of the most important steps because handmade shorts should fit comfortably around your waist, hips, and thighs.
Measure around your natural waist and the fullest part of your hips. Also measure the distance from your waist to your crotch to determine the rise of the shorts.
Next, decide how long you want the shorts to be. A shorter summer style can finish higher on the thigh, while a longer design can provide more coverage.
Write down your measurements so you can check your progress as you crochet.
Remember that crochet fabric can stretch differently depending on the yarn and stitches. Do not rely only on the number of stitches. Make a small gauge swatch first and compare its measurements with your desired fabric size.
Step 2: Make the Ribbed Waistband
Start by creating the waistband with your cream-colored yarn.
Make a foundation chain that gives you the desired waistband height. Turn your work and crochet single crochet stitches into the back loops only across the row.
Chain one and turn your work. Continue making single crochet stitches through the back loops only until the band reaches the length needed to fit comfortably around your waist.
The back-loop technique creates raised vertical lines that give the waistband its ribbed appearance.
Check the waistband around your body as you work. It should fit securely without feeling too tight. Remember that the band should stretch enough to allow you to put the shorts on comfortably.
Once the desired length is reached, join the two short ends using slip stitches or a yarn needle. This creates a circular waistband.
Step 3: Begin the Main Body
After completing the waistband, you can start crocheting the main body of the shorts.
Attach your cream-colored yarn to the lower edge of the waistband. Work half double crochet stitches evenly around the band.
Make sure the stitches are distributed evenly. If you add too many stitches, the fabric may become loose and wavy. If you add too few, the waistband may pull and create unwanted folds.
Join the round with a slip stitch if you are working in joined rounds. Place a stitch marker at the beginning so you can easily follow your progress.
Continue working rounds until you have reached the upper hip area. Try the work on occasionally to check the fit.
Step 4: Create the Striped Pattern
Now it is time to add the soft green stripes that give the shorts their lovely summer appearance.
After completing a cream round, change to your sage-green yarn. Work the next round using the same stitch pattern.
Continue alternating between cream and green according to the stripe width you prefer. You can make each stripe one round wide or add more rounds to create wider bands.
Keep the yarn tension consistent when changing colors. Tight stitches in one color and loose stitches in another can make the fabric look uneven.
When changing colors, complete the final yarn-over of the last stitch with the new color. This helps create a neater color transition.
If you carry the unused yarn along the inside, make sure it does not pull the fabric or create uncomfortable loops. Alternatively, cut the yarn after each stripe and weave in the ends carefully.
Step 5: Work Toward the Crotch Area
Continue crocheting the striped body until it reaches the crotch area.
At this point, the shorts need to be divided into two sections to create separate leg openings.
Lay the work flat and identify the front and back sections. Use stitch markers to mark the center positions and the areas where the legs will be divided.
The exact placement depends on your hip measurements and desired fit. Leave enough room for comfortable movement and sitting.
The crotch area should not be too tight. If it is too short, the shorts may pull uncomfortably when worn.
Step 6: Shape the Two Leg Openings
Once the upper body is ready, divide the stitches into two sections, one for each leg.
Work the first leg by joining the appropriate front and back stitches. Use a short chain bridge at the inner crotch where needed to connect the sections and provide enough room for movement.
Continue crocheting around the first leg opening. Keep following your cream-and-green stripe pattern so the colors match the rest of the shorts.
Work until the leg reaches your preferred length. Finish with a neat edge using a round of single crochet or another simple border.
Repeat the same process for the second leg. Try to keep both legs the same length and make sure the stripe placement looks balanced.
Take your time with this section because neat leg openings make a big difference to the finished appearance.
Step 7: Add a Neat Leg Edge
The bottom edges of the shorts should look clean and comfortable.
A simple single crochet border is a good option. Work evenly around each leg opening without pulling the stitches too tightly.
If you want a slightly firmer finish, you can add another round. However, avoid making the edge too tight because it may press against your thighs.
Use the cream yarn for the border to create a simple frame around the striped fabric.
Check both leg openings before finishing. They should look similar and feel comfortable when worn.
Step 8: Add an Elastic Waistband if Needed
The ribbed crochet waistband may provide enough support on its own, depending on the yarn and stitch tension.
However, if you want extra security, you can add a soft elastic band inside the waistband.
Measure the elastic around your waist and choose a length that feels comfortable without squeezing. Join the elastic ends securely, then place it inside the waistband and attach it with small stitches.
Another option is to crochet a small channel through which the elastic can be threaded.
Make sure the elastic is not twisted and that it does not create uncomfortable pressure.
Step 9: Finish and Weave in the Loose Ends
When both legs and the waistband are complete, cut the yarn and secure the final loops.
Use a yarn needle to weave in all loose ends. Move the needle through several stitches on the inside of the shorts so the ends stay secure.
Avoid leaving long yarn pieces inside the garment because they may become uncomfortable against your skin.
Check the seams, color changes, waistband, and leg edges. Make any small corrections before wearing the shorts.
Tips for Making Comfortable Crochet Shorts
One important tip is to check your measurements throughout the project. Crochet fabric can behave differently after several rounds, so trying on the shorts occasionally helps you notice fitting problems early.
Do not make the waistband too tight. It should stay comfortably around your waist without leaving marks on your skin. If the yarn has little stretch, consider adding elastic.
Keep your stitches even when changing colors. Consistent tension will help the cream and green stripes line up neatly.
Pay special attention to the crotch area. This part needs enough space for walking, sitting, and bending. A little extra room is usually more comfortable than a tight fit.
Choose a yarn that feels soft against your skin. A beautiful design will not be enjoyable to wear if the material feels rough or too heavy.
If you are new to making clothing, practise the main stitch pattern on a small swatch before starting. This helps you understand how the fabric stretches and how many stitches you need.
How to Style Your Crochet Shorts
These handmade shorts are easy to style for different summer occasions.
For a relaxed everyday outfit, wear them with a plain white tank top or a fitted T-shirt. The simple top allows the striped crochet design to stand out.
You can also pair them with a loose cotton shirt for a comfortable holiday look. Sandals, simple slippers, or canvas shoes work well with this style.
For a matching handmade outfit, create a crochet crop top using the same cream and sage-green yarn. Matching colors can make the outfit look coordinated without needing complicated details.
If you prefer a more casual appearance, wear the shorts with an oversized shirt and a small shoulder bag.
How to Wash and Care for Crochet Shorts
Handmade crochet clothing needs gentle care to maintain its shape and appearance.
Check the yarn label before washing because different fibers have different care requirements. For cotton yarn, gentle hand washing in cool or lukewarm water is often a suitable choice.
Use a mild detergent and avoid twisting or squeezing the shorts too hard. Excessive pulling can stretch the stitches and change the shape.
After washing, gently press out extra water with a clean towel. Lay the shorts flat on a dry towel and reshape the waistband and leg openings.
Allow them to dry completely before storing. Avoid hanging wet crochet shorts because their weight can stretch the fabric.
Keep them folded in a clean, dry place when not in use.
Common Mistakes to Avoid
One common mistake is choosing a hook that creates fabric that is too loose. If the stitches have large gaps, the shorts may not provide enough coverage. Make a gauge swatch and adjust your hook size if needed.
Another mistake is ignoring hip measurements. The waistband may fit perfectly, but the shorts can still feel uncomfortable if the hip area is too small.
Uneven color changes can also affect the finished look. Take care when switching yarn and avoid pulling the new color too tightly.
Do not rush the crotch shaping. A poorly fitted crotch can make the entire garment uncomfortable, even when the rest of the shorts looks beautiful.
Finally, avoid skipping the finishing stage. Loose yarn ends and uneven edges can make handmade clothing look unfinished.