Crochet Jumper: How to Make a Beautiful, Cozy, and Stylish Crochet Sweater
A crochet jumper is a lovely handmade clothing project that combines comfort, style, and creativity. With soft yarn, simple stitches, and beautiful color changes, you can create a relaxed, oversized jumper with a wide neckline and cozy sleeves for everyday wear.
What Is a Crochet Jumper?
A crochet jumper is a handmade sweater created by using a crochet hook and yarn. It is a comfortable clothing piece that can be worn during cool weather, layered over a top, or styled with jeans, skirts, and leggings. Unlike knitted sweaters, crochet jumpers are made using different crochet stitches to create a unique fabric texture.
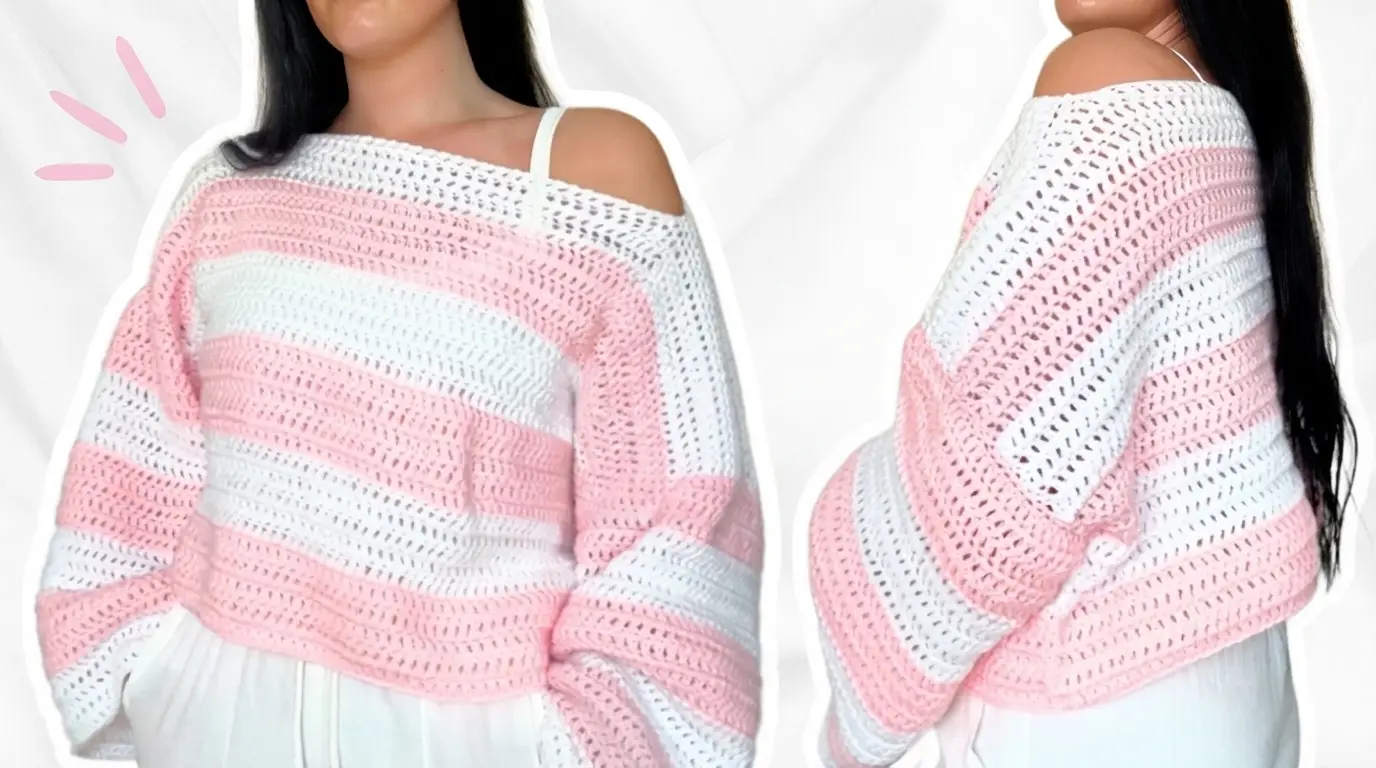
One beautiful style is an oversized striped crochet jumper with a relaxed fit, wide neckline, and long sleeves. Soft pink and white stripes give it a sweet, fresh appearance, while the loose shape makes it comfortable for everyday use.
This type of crochet jumper is especially suitable for people who enjoy simple crochet projects with stylish results. You can customize the colors, length, sleeve size, and neckline to match your personal taste.
Materials Needed for a Crochet Jumper
Choosing the right materials is an important part of making a comfortable crochet jumper. The yarn should feel soft against your skin and provide enough flexibility for easy movement.
Yarn: Choose a soft, lightweight yarn that is suitable for making clothing. DK or worsted-weight yarn can work well, depending on the fabric thickness you want. Cotton, acrylic, and cotton-acrylic blends are useful choices. For a striped jumper, choose two or more colors, such as baby pink and white.
Crochet Hook: Use a crochet hook that matches your yarn and desired fabric texture. Check the yarn label for a recommended hook size. A slightly larger hook may help create a softer, more flexible fabric, but always make a small sample first.
Scissors: Keep a sharp pair of scissors nearby for cutting the yarn after finishing each section.
Yarn Needle: A yarn needle is useful for sewing the jumper panels together and hiding loose yarn ends.
Measuring Tape: Use a measuring tape to check your bust, body length, sleeve length, and arm measurements.
Stitch Markers: Stitch markers help you identify important points, such as sleeve openings, shoulder areas, and panel corners.
Crochet Techniques Used in This Jumper
This crochet jumper can be made using beginner-friendly techniques. You do not need complicated stitches to create an attractive striped design.
The chain stitch is used to create the foundation chain and begin each panel. It provides the starting base for the rest of your crochet work.
The double crochet stitch is a useful choice for making the main body. It creates a fabric that grows quickly and has a comfortable texture. It also gives the jumper a slightly open appearance.
The single crochet stitch is useful for adding neat edges around the neckline, sleeve cuffs, and bottom hem. It creates a firmer finish that helps the edges look clean.
Slip stitches are used to join rounds, connect sections, and finish certain edges. They are also helpful when moving between different parts of a project.
Color changing is another important technique. To create pink and white stripes, finish the final yarn-over of the last stitch in one color using the new color. Continue crocheting with the new yarn to create a neat transition.
How to Make a Crochet Jumper Step by Step
Making an oversized crochet jumper is easier when you divide the project into smaller sections. The body can be made from two large panels, while the sleeves are created separately and attached afterward.
Step 1: Take Your Body Measurements
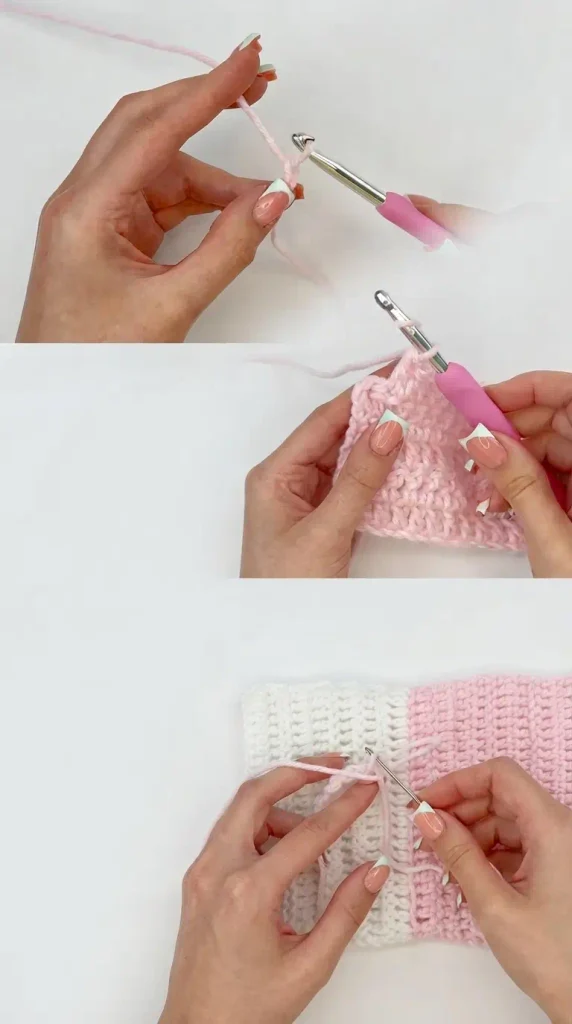
Before starting, measure your bust, desired jumper length, shoulder width, and sleeve length. These measurements will help you decide how wide and long each crochet section should be.
For an oversized jumper, add extra width to your body measurements to create a loose and relaxed fit. The amount of extra width depends on how oversized you want the finished garment to look.
Think about the neckline too. A wide neckline gives the jumper a relaxed appearance and allows it to sit slightly off one shoulder. Make sure the opening is not too large if you want the jumper to stay comfortably in place.
Step 2: Choose Your Yarn Colors
Select soft yarn in colors that look good together. Pink and white are lovely choices for a feminine striped jumper. You can also try cream and beige, lavender and white, or blue and gray.
Choose yarns with similar thickness and care instructions. This helps the finished jumper maintain a more even texture.
Before beginning the main project, crochet a small sample using your chosen yarn and hook. Wash and dry the sample according to the yarn care instructions if possible. This helps you understand how the fabric behaves after washing.
Step 3: Create a Crochet Gauge Swatch
A gauge swatch is a small square of crochet fabric that helps you check the size of your stitches.
Make a foundation chain and work several rows using the stitch you plan to use for the jumper. Measure the number of stitches and rows within a specific area.
Compare your results with your desired measurements. If your stitches are too tight, try a larger hook. If they are too loose, try a smaller hook.
This step is important because a small difference in stitch size can make a big difference when creating a full-size jumper.
Step 4: Crochet the Front Panel
Begin by making a foundation chain based on the desired width of your jumper. Work the first row using your chosen stitch, such as double crochet.
Continue working back and forth in rows until the panel reaches your desired length. Keep the sides as straight as possible by counting your stitches at the end of every row.
To create the striped appearance, crochet several rows in pink, followed by several rows in white. Repeat this color pattern until you reach the required length.
You can make the stripes equal in width or experiment with different stripe sizes. Keep the yarn changes consistent to create a balanced appearance.
Step 5: Make the Back Panel
The back panel should have approximately the same width and length as the front panel. Repeat the same stitch pattern and color arrangement to create a matching piece.
Count your stitches regularly so both panels have similar measurements. If the panels are different sizes, the finished jumper may twist or fit unevenly.
For a simple oversized jumper, the front and back panels can be made as rectangles. This construction is beginner-friendly and does not require complicated shaping.
Step 6: Create the Wide Neckline
The neckline gives this style its relaxed and attractive appearance. Before joining the body panels, decide how wide you want the opening to be.
Place the front and back panels together and mark the shoulder areas. Leave enough space between the shoulders to create a wide neckline.
Sew the shoulder sections together using a yarn needle and matching yarn, leaving the middle area open. Try the garment on carefully to check the neckline position before completing the remaining seams.
A wide boat-style neckline can sit across the shoulders and may be worn slightly off one shoulder. If you prefer more coverage, leave a smaller opening.
Step 7: Crochet the Sleeves
The sleeves are made separately before being attached to the body. For a relaxed oversized look, create sleeves that are comfortably wide around the upper arms.
Start with a foundation chain that fits the desired sleeve width. Work in rows using the same main stitch as the body.
Continue crocheting until the sleeve reaches your preferred length. You can use the same pink and white stripe arrangement to match the body.
For a slightly tapered sleeve, gradually decrease a small number of stitches toward the wrist. For a loose sleeve, keep the width almost the same from the upper arm to the cuff.
Make a second sleeve using the same measurements and color pattern.
Step 8: Attach the Sleeves to the Jumper
Lay the front and back panels flat with the shoulder seams joined. Position each sleeve along the side of the body, making sure the center of the sleeve aligns with the shoulder seam.
Use a yarn needle to sew the sleeves into place. Work slowly and check that the fabric is not stretched or gathered unevenly.
Once both sleeves are attached, fold the jumper so the front and back panels are together. Sew the side seams from the bottom edge toward the underarm area, then continue along the sleeve seams toward the cuffs.
Leave the neckline and bottom opening unfinished for the final edging.
Step 9: Add the Neckline, Cuffs, and Bottom Border
A neat border can make a crochet jumper look more complete. Use single crochet stitches around the neckline to create a clean edge.
Be careful not to make the neckline too tight. Work evenly around the opening and check that the fabric remains flat.
For the sleeve cuffs, add a few rows of single crochet or another simple border stitch. You can also use ribbing made with back-loop-only crochet stitches for a slightly stretchy finish.
Finish the bottom edge in the same way. A simple border in white or pink can complement the striped body and create a polished look.
Step 10: Finish and Check Your Crochet Jumper
After joining all the sections, weave in the loose yarn ends using a yarn needle. Hide each end inside the stitches so it does not come loose during regular wear.
Check all the seams, especially around the shoulders, underarms, and sleeves. Make sure there are no gaps or loose connections.
Try on your jumper to check the overall fit. If the sleeves feel too long, you can adjust the cuffs. If the neckline feels too wide, a small additional border may help improve the fit.
Tips for Making a Beautiful Crochet Jumper
Keeping your stitch tension consistent is one of the best ways to improve your finished jumper. If some rows are tighter than others, the fabric may look uneven. Try to hold your yarn comfortably and avoid pulling it too tightly.
Always count your stitches after completing each row. This simple habit helps prevent accidental increases or decreases that can change the shape of your panels.
Choose soft yarn for clothing projects. A beautiful jumper should feel comfortable, not scratchy or stiff. If possible, touch the yarn before buying it to make sure you like its texture.
When changing colors, avoid leaving long loose strands at the edges. You can weave in the ends afterward or carefully carry the unused yarn along the side when the color changes are close together.
Do not rush the sewing process. Neat seams make a big difference in how professional your crochet jumper looks. Take your time when attaching the sleeves and joining the body panels.
How to Customize Your Crochet Jumper
One of the best things about making your own crochet jumper is the freedom to change the design. You can use different colors, adjust the length, or make the sleeves wider depending on your preferences.
For a soft and romantic appearance, choose pastel shades such as pink, lavender, cream, and baby blue. If you prefer a simple everyday style, try black and white or beige and brown stripes.
You can also experiment with the stripe arrangement. Wide stripes create a bold appearance, while narrow stripes give the jumper a more detailed look.
The neckline is another feature you can customize. A wide boat neckline creates a relaxed look, while a smaller round neckline provides more coverage.
For a cropped crochet jumper, reduce the length of the front and back panels. If you prefer a longer sweater, simply continue crocheting additional rows until you reach your desired length.
You can also make the sleeves longer or shorter depending on the season and your personal style.
How to Care for Your Crochet Jumper
Taking proper care of your handmade jumper helps it stay attractive for a long time. Always check the yarn label before washing because different fibers require different care methods.
Hand washing is a gentle option for many crochet garments. Use cool or lukewarm water with a mild detergent that is suitable for the yarn.
Avoid twisting or squeezing the jumper too hard because this can stretch the crochet stitches and change its shape. Instead, gently press out excess water using a clean towel.
Lay the jumper flat on a dry towel and reshape it carefully. Allow it to dry naturally before wearing or storing it.
Avoid hanging a wet crochet jumper because the weight of the water can stretch the fabric. Store it folded in a clean, dry place to help maintain its shape.
Common Mistakes to Avoid When Crocheting a Jumper
One common mistake is choosing a hook that creates fabric that is too tight. A stiff crochet jumper may feel uncomfortable and may not drape nicely. Always make a gauge swatch before starting.
Another mistake is making the neckline too small or too large. Since a wide neckline is an important part of this design, check its size before sewing the shoulder seams completely.
Using different amounts of yarn for the two sleeves can also create an uneven appearance. Measure both sleeves as you work to keep their length and width similar.
Do not forget to check the yarn quantity before starting. Running out of one color halfway through the project can make it difficult to maintain consistent stripes.
Finally, avoid skipping the finishing process. Weaving in yarn ends, checking seams, and adding neat borders help your handmade jumper look clean and ready to wear.