Crochet Throw Blanket: A Cozy and Textured Blanket for Your Home
A crochet throw blanket is a lovely way to add warmth, comfort, and handmade beauty to your home. With its thick yarn, beautiful raised texture, and soft feel, this cozy blanket is perfect for relaxing on the sofa or decorating your favorite space.
What Is a Crochet Throw Blanket?
A crochet throw blanket is a smaller decorative blanket that can be used on sofas, beds, armchairs, or even outdoors on cool evenings. Unlike large bed blankets, throw blankets are usually made in a convenient size that is easy to carry, fold, and store.
One of the nicest things about making a crochet throw blanket is the freedom to choose your own colors, yarn, and stitch patterns. You can create something simple with basic stitches or add textured details to make the finished blanket look more interesting.
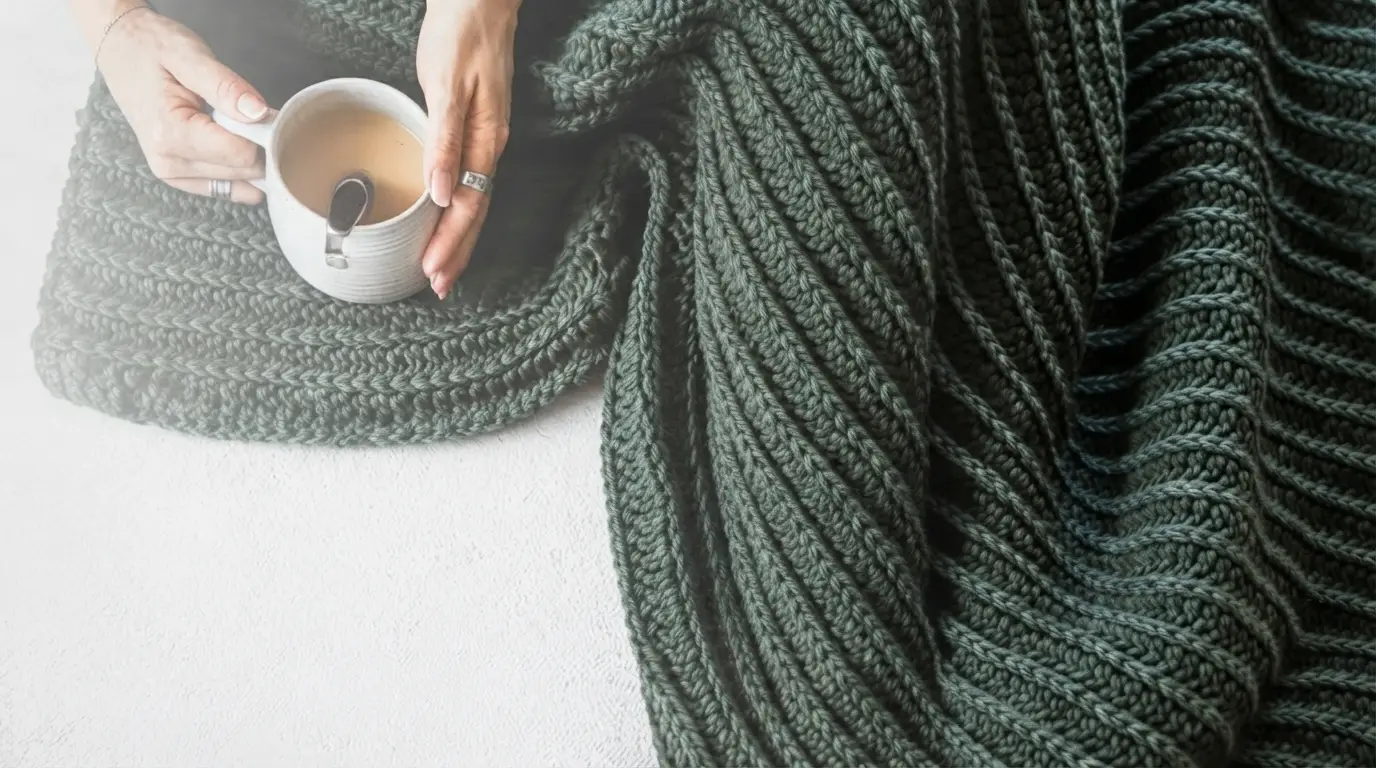
For a cozy and stylish design, a deep sage green or muted forest green shade works beautifully. Thick yarn combined with raised crochet stitches creates a lovely textured surface with soft, rope-like lines running along the blanket. This type of design looks warm, modern, and elegant without needing extra decorations.
Materials Needed for a Crochet Throw Blanket
Choosing the right materials is important because they affect the blanket’s softness, weight, and final appearance.
Yarn: Medium-weight or bulky yarn is a good choice for a warm and comfortable throw. Acrylic yarn is affordable, easy to care for, and available in many colors. Wool offers natural warmth, while cotton creates a breathable blanket with a different texture. For a thick, cozy finish, choose a soft bulky yarn that feels comfortable against your skin.
Crochet hook: Select a hook size that works with your yarn. A larger hook usually creates a softer, more flexible fabric, while a smaller hook produces tighter stitches. Check the yarn label for a recommended hook size and make a small test square before starting.
Scissors: Use sharp scissors to cut the yarn neatly when finishing your work.
Yarn needle: A blunt yarn needle helps you weave loose yarn ends into the stitches so they stay secure.
Stitch markers: These are useful for marking the beginning of a row, especially when working with textured stitches.
Measuring tape: Use a measuring tape to check the width and length of your blanket as you work.
Choosing the Best Yarn and Color
The yarn you choose will make a big difference in how your crochet throw blanket looks and feels. Since this style focuses on a thick, raised texture, choose yarn with good stitch definition. Smooth yarn makes it easier to see the individual stitches and gives the textured columns a neat appearance.
Acrylic and acrylic-blend yarns are popular choices because they are easy to wash and suitable for everyday blankets. If you prefer natural fibers, wool is a lovely option for colder weather. Cotton can be used for a lighter throw, especially if you want something suitable for a warmer home.
Color is another important part of the design. Sage green, olive, charcoal, cream, beige, and dusty blue are all beautiful choices. Dark green gives a calm and natural appearance, while neutral shades create a simple and timeless look.
Before buying all your yarn, make a small swatch. This helps you see how the color and texture look together and gives you a better idea of how much yarn you will need.
Understanding the Crochet Stitches
You do not need to know many complicated stitches to make a beautiful throw blanket. A combination of basic stitches and raised post stitches can create a lovely textured surface.
Chain stitch (ch): This is the starting stitch used to create the foundation chain. Make a yarn loop on your hook, yarn over, and pull through the loop.
Half double crochet (hdc): Yarn over, insert the hook into the stitch, yarn over and pull up a loop. Yarn over again and pull through all three loops on the hook.
Front post double crochet (FPdc): Yarn over, insert the hook from the front of the fabric around the post of the stitch below, bring the hook back to the front, yarn over and pull up a loop. Complete the double crochet by working through two loops twice. This stitch creates a raised line on the surface.
Back-loop-only crochet (BLO): Instead of inserting the hook under both loops of a stitch, work into the back loop only. This creates a ribbed texture that is useful for blanket borders and other decorative details.
These stitches can be combined to create a blanket with beautiful raised columns and a soft, thick appearance.
How to Crochet a Textured Throw Blanket Step by Step
This simple textured pattern uses half double crochet stitches and raised front post double crochet columns. It is a useful starting point for creating a cozy rectangular throw blanket.
The finished size depends on your yarn, hook, tension, and starting chain. You can adjust the width and length to suit your needs.
Step 1: Make a Small Crochet Swatch
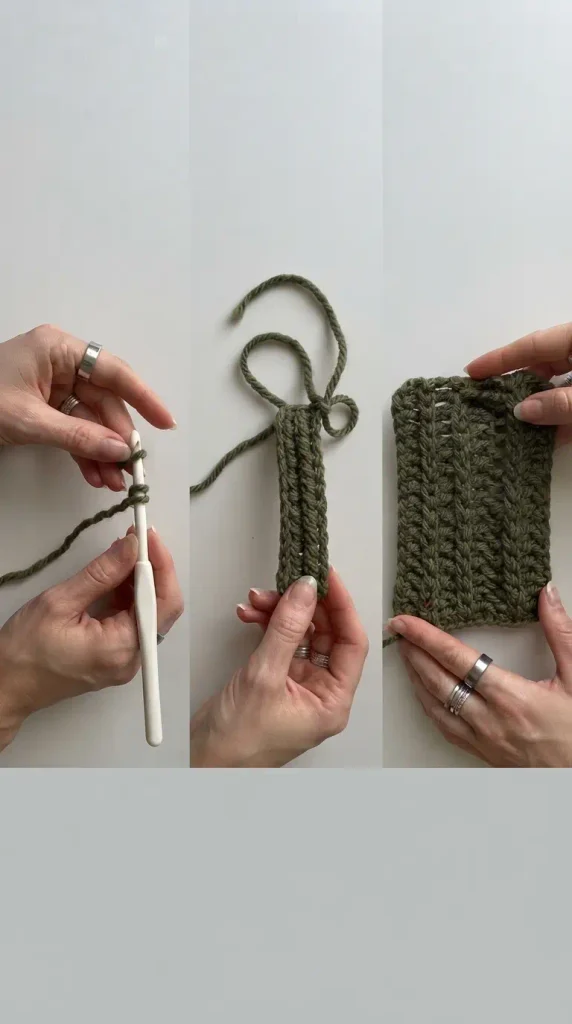
Before starting the full blanket, make a small sample using your chosen yarn and hook.
Work a few rows of half double crochet and front post double crochet to see how the stitches look together. Check whether the fabric feels soft and flexible. If it feels too tight, try a larger hook. If the stitches look too loose, use a smaller hook.
A swatch also helps you estimate the number of stitches needed for your desired blanket width.
Step 2: Create the Foundation Chain
Start by making a slip knot and placing it on your crochet hook.
Make a foundation chain that is a multiple of four, plus two extra chains. For example, you can begin with 122 chains for a wider sample blanket. You can increase or decrease the number of chains depending on the size you want.
Keep the chain stitches relaxed and even. If your foundation chain is too tight, the bottom edge of your blanket may pull inward.
Step 3: Work the First Row
Yarn over and insert your hook into the third chain from the hook.
Work one half double crochet into that chain. Continue making one half double crochet in each remaining chain until you reach the end.
Chain two and turn your work.
This first row creates a simple base for the textured pattern. Make sure the stitches are even because they will help keep the following rows straight.
Step 4: Create the Raised Texture
Now it is time to make the raised vertical lines that give the blanket its beautiful appearance.
Work three half double crochet stitches into the first three stitches. Then make one front post double crochet around the next stitch from the previous row.
Repeat this pattern across the row: three half double crochet stitches followed by one front post double crochet.
If you have a small number of stitches remaining at the end, work half double crochet stitches into them.
The front post stitches will stand out from the fabric and create raised lines. These lines give the blanket a thicker and more decorative appearance.
Step 5: Work the Next Row
After completing the textured row, chain two and turn your work.
Make one half double crochet into every stitch across the row. When you reach a raised front post stitch, work into its top loops just as you would with a regular stitch.
This row creates a smooth foundation for the next textured row.
Keep your stitch count the same throughout the process. Missing a stitch or accidentally adding an extra one can make the sides uneven.
Step 6: Repeat the Textured Rows
Continue alternating between the textured row and the plain half double crochet row.
The textured row creates the raised columns, while the plain row helps build the blanket’s thickness and structure.
As you work, you will start seeing long raised lines running along the length of the blanket. Keep the front post stitches in the same positions from one textured row to the next.
Try not to pull the yarn too tightly around the post stitches. They should stand out clearly without making the blanket stiff.
Step 7: Continue Until You Reach the Desired Length
Keep repeating the two-row pattern until your blanket reaches the length you want.
Lay the blanket flat occasionally and measure it from one end to the other. This helps you avoid making it too short or too long.
A throw blanket can be made in different sizes depending on how you plan to use it. A smaller one is suitable for covering your lap, while a larger throw can be draped across a sofa or used as an extra layer on a bed.
Remember that the yarn may relax slightly after washing or blocking, so leave room for this when deciding the final measurements.
Step 8: Add a Neat Border
Once the main blanket is finished, add a simple border to give it a clean and polished appearance.
Start by working single crochet stitches evenly around the edges. Place one stitch in each suitable stitch along the top and bottom edges. Along the sides, space the stitches evenly so the border does not become too tight or wavy.
At each corner, work three single crochet stitches into the same corner space. This helps the border turn neatly without pulling.
For a ribbed finish, you can work additional rows of single crochet through the back loop only. This creates a soft, raised edge that matches the textured body of the blanket.
You can also keep the border simple if you prefer a clean, modern finish.
Step 9: Fasten Off and Weave in the Ends
When the border is complete, cut the yarn and leave a small tail.
Pull the yarn through the final loop to secure it. Thread the remaining tail onto a yarn needle and weave it through several stitches on the wrong side of the blanket.
Repeat this process for any other loose yarn ends.
Avoid cutting the ends too close before weaving them in securely. This helps prevent the stitches from coming undone after regular use and washing.
Step 10: Shape and Finish Your Blanket
Lay the finished blanket flat and gently arrange its edges.
If the yarn allows it, lightly block the blanket according to the fiber’s care instructions. Blocking can help improve the shape and make the edges look more even.
Avoid using excessive heat or water, especially with fibers that may shrink or lose their shape. Always check the yarn label before washing or blocking.
Your textured crochet throw blanket is now ready to use!
Tips for Making a Beautiful Crochet Throw Blanket
Keeping your tension consistent is one of the most important things when making a textured blanket. If some rows are tight and others are loose, the finished fabric may look uneven. Try to hold the yarn comfortably and use the same movements throughout your project.
Choose a yarn that shows the stitches clearly. Very fluffy or fuzzy yarn can hide the raised columns, making the texture less noticeable. Smooth yarn is often easier to work with when you want a defined ribbed or raised design.
Do not forget to count your stitches at the end of each row. It is much easier to correct a mistake immediately than to discover it several rows later.
If you are new to front post stitches, practice them on a small piece first. Once you understand where to insert your hook, the movement becomes easier.
Take short breaks while crocheting. A large blanket can take several hours or even days to complete, depending on its size and stitch pattern. Relaxing your hands and wrists will make the project more comfortable.
How to Customize Your Crochet Throw Blanket
One of the best things about this project is that you can change the design to match your home.
For a simple and elegant look, choose one solid color. Sage green, dark olive, and charcoal gray are lovely options for a cozy living room. Cream and beige are excellent choices if you prefer a lighter appearance.
You can also experiment with different textures. Use wider spaces between the raised columns for a simpler design, or place the columns closer together for a more detailed surface. Just remember to adjust the stitch repeat and foundation chain to match your chosen pattern.
Another idea is to make the blanket using two complementary colors. You could use a darker shade for the main section and a lighter shade for the border. This gives the finished blanket a different look without requiring complicated techniques.
If you want a thicker blanket, choose a bulky yarn and an appropriate hook. Keep in mind that a thicker yarn will also make the finished blanket heavier and may require more yarn than a lighter version.
Common Mistakes to Avoid
One common mistake is choosing a hook that is too small for the yarn. This can make the blanket stiff and difficult to fold. Always check your fabric after making a few rows to see whether it has the flexibility you want.
Another problem is placing front post stitches in the wrong position. If the raised stitches do not line up, the columns may look uneven. Pay attention to the previous textured row and keep the same stitch placement throughout the blanket.
Uneven edges can also happen when stitches are missed at the beginning or end of a row. Count your stitches regularly and make sure your turning chain is handled consistently.
Finally, avoid pulling the yarn too tightly when changing between stitches. The raised columns should have a natural shape, and the fabric should remain comfortable and flexible.
How to Care for Your Crochet Throw Blanket
Proper care will help your handmade blanket stay beautiful for a long time.
The best washing method depends on the yarn you use. Acrylic blankets can often be machine washed on a gentle cycle, but always follow the care instructions on the yarn label. Wool may need hand washing or a special wool cycle to avoid shrinking and felting.
Use a mild detergent and avoid strong chemicals that may damage the fibers. If machine washing is suitable, placing the blanket inside a large laundry bag can help protect its stitches.
After washing, gently remove excess water without twisting or stretching the blanket. Lay it flat on a clean, dry surface to dry when the yarn care instructions recommend it.
Store the blanket in a clean, dry place when it is not being used. Folding it neatly helps protect the textured stitches and keeps it ready for your next relaxing evening.
Where to Use Your Crochet Throw Blanket
A handmade throw blanket is useful in many parts of the home. Place it over the back of a sofa to add color and texture to your living room. You can also fold it neatly over an armchair to create a cozy reading corner.
During cooler weather, keep it nearby for extra warmth while watching television, reading, or enjoying a cup of coffee. It can also be placed at the end of a bed as a decorative extra layer.
The raised crochet texture makes this style especially attractive when draped loosely over furniture. Its handmade appearance adds a warm and welcoming feeling to both modern and traditional spaces.