Crochet Summer Tops: A Beautiful Handmade Halter Top With a Flower and Mesh Design
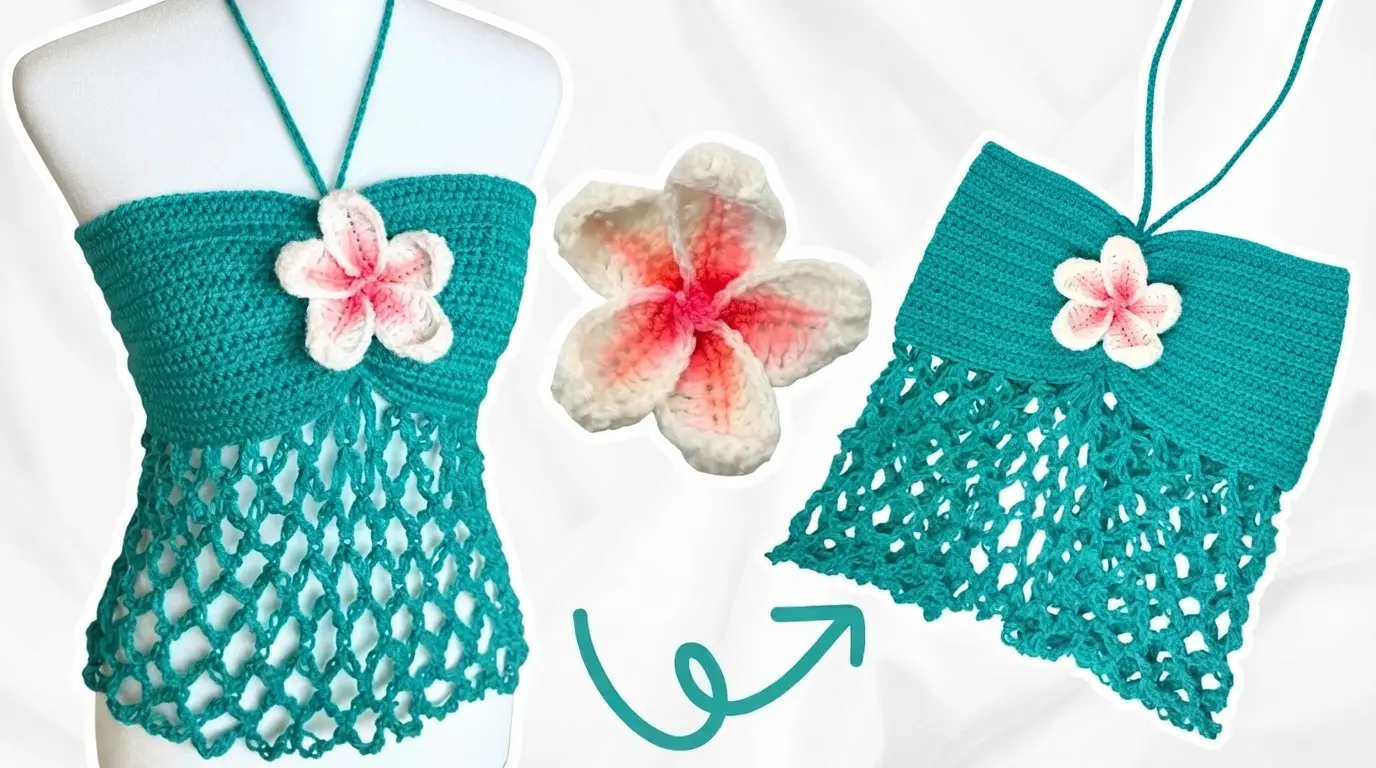
A crochet summer top is a lovely handmade piece for warm days, beach trips, and casual outfits. This beautiful halter-style design combines a solid crochet bodice, an airy mesh bottom, and a pretty flower decoration for a fresh summer look.
What Makes This Crochet Summer Top Special?
This crochet summer top has a charming design that combines simple stitches with beautiful decorative details. The upper part features a fitted bodice made with closely worked crochet stitches, creating a neat and comfortable shape around the chest.
The lower section has an open mesh pattern that gives the top a light and breezy appearance. Its loose net-style design makes it perfect for warm weather because it allows more air to pass through the fabric.
Another lovely detail is the small crochet flower attached to the front of the top. The flower adds a soft, feminine touch and makes the finished piece look more interesting.
The halter neckline uses long crochet straps that tie around the neck. This creates an adjustable fit and gives the top a beautiful summer style. You can make it in turquoise, teal, white, pink, yellow, or any color that matches your personal taste.
Materials Needed for Crochet Summer Tops
Before starting your crochet summer top, prepare all the materials you need. Having everything nearby will make the project easier and more enjoyable.
Cotton yarn: Cotton yarn is a good choice for summer clothing because it feels breathable and comfortable against the skin. Choose a medium-weight or lightweight cotton yarn depending on how thick you want the finished top to be. A rich teal or turquoise shade works beautifully for this design.
Small amount of pink and white yarn: These colors are useful for making the decorative flower. You can also choose different shades to create your own floral style.
Crochet hook: Select a hook that works well with your chosen yarn. Check the yarn label for a suggested hook size and make a small sample to see whether the stitches have the right tension.
Scissors: Use sharp scissors to cut the yarn neatly when finishing your work.
Yarn needle: A yarn needle helps you sew the flower onto the bodice and hide loose yarn ends.
Measuring tape: You will need this to measure your bust, desired top length, and halter straps.
Stitch markers: These are helpful for marking the sides, center points, and important sections while crocheting.
Crochet Stitches and Techniques to Know
You do not need to know many complicated stitches to make this crochet summer top. A few basic techniques are enough to create its main features.
Chain stitch (ch): This stitch creates the starting chain and is also used to make the open mesh section. It is one of the most important stitches for this project.
Single crochet (sc): Single crochet creates a firm and closely worked fabric. It is useful for making the solid upper bodice.
Half double crochet (hdc): This stitch is slightly taller than single crochet and can help you create a smooth fabric with a little more height.
Double crochet (dc): Double crochet is useful for decorative sections and open mesh patterns. It creates a taller stitch with a light appearance.
Slip stitch (sl st): Slip stitches help join crochet sections, finish edges, and attach decorative pieces.
Chain-space mesh: This technique combines crochet stitches with chain spaces to create an open net-like pattern. It gives the lower section its airy appearance.
If you are a beginner, practice these stitches with a small piece of yarn before starting the actual top.
Step-by-Step Guide to Making a Crochet Summer Top
Step 1: Take Your Body Measurements
Start by measuring your bust with a measuring tape. Make sure the tape sits comfortably around your body without being too tight.
Next, decide how long you want the top to be. This particular style has a solid upper section followed by a longer, open mesh section. You can adjust the length of both parts to suit your preference.
Measure the distance from the neckline to the desired bottom edge. Also consider how much coverage you want from the solid bodice.
Write down your measurements before crocheting. This will help you make a top that fits your body instead of relying on a standard size.
Step 2: Make a Crochet Gauge Swatch
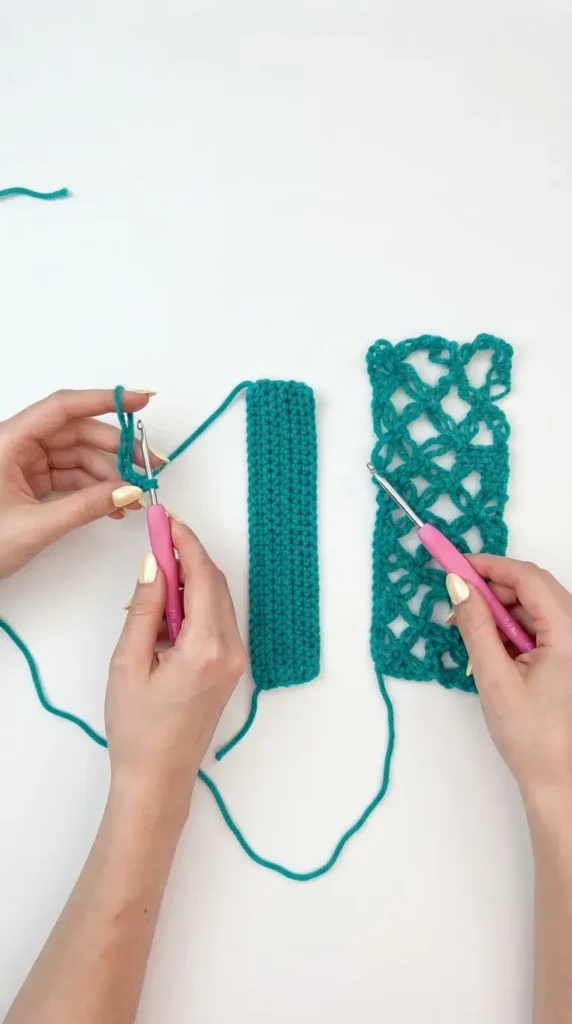
Before making the bodice, crochet a small square using your selected yarn and hook.
Use the same stitches that you plan to use for the upper section. Measure the swatch to see how many stitches and rows fit into a specific area.
This step is important because everyone crochets with a slightly different tension. If your stitches are too loose, the top may become larger than expected. If they are too tight, the fabric may feel stiff.
Adjust your hook size if necessary until you get a fabric that feels comfortable and has a nice appearance.
Step 3: Create the Solid Upper Bodice
Begin by making a foundation chain based on your measurements. The chain should provide enough width for the upper bodice.
Work rows of single crochet or half double crochet stitches to create a firm, even fabric. Continue making rows until the piece reaches your desired height.
Keep your stitches consistent so the edges remain straight. Count your stitches occasionally to avoid accidentally increasing or decreasing the width.
For a similar design, the upper section should have a neat rectangular shape with enough width to cover the bust comfortably. Depending on your preferred fit, you can create separate front panels or work a wider piece and shape it to your body.
If you are making separate panels, join them carefully at the sides while leaving the appropriate openings for the neckline and arms.
Step 4: Shape the Upper Section for a Comfortable Fit
Once the main bodice is ready, check its width and coverage. Hold it against your body or a suitable measuring surface to see whether it matches your measurements.
Make small adjustments if necessary. You can add or remove rows to change the height, or adjust the number of stitches to change the width.
The upper section should feel secure without being uncomfortably tight. Remember that cotton yarn has less stretch than some other yarn types, so it is better to check the fit before moving forward.
Step 5: Start the Open Mesh Bottom
The mesh bottom is one of the most attractive parts of this crochet summer top. It creates a beautiful contrast with the closely stitched upper bodice.
To begin, attach your yarn to the lower edge of the bodice. Work a row of evenly spaced stitches along the edge to create a neat foundation.
Next, start making chain spaces between crochet stitches. For example, you can work a double crochet stitch followed by a few chain stitches, then skip a small section before making the next double crochet.
Repeat this pattern across the row. On the following rows, work into the chain spaces to build the open mesh design.
Continue repeating the pattern until the lower section reaches your preferred length.
Step 6: Create the Diamond-Like Mesh Pattern
To make the mesh look more decorative, arrange the chain spaces so the openings form a net-like or diamond-shaped pattern.
You can achieve this by working into the chain spaces from the previous row rather than placing every stitch directly above the previous stitch.
Keep the spaces relatively even throughout the project. If the openings are too large, the fabric may become too loose. If they are too small, the mesh will look crowded.
A balanced pattern gives the lower part a soft drape while maintaining its overall shape.
Step 7: Finish the Bottom Edge
When your mesh section reaches the desired length, finish the bottom edge with a neat crochet border.
A row of single crochet stitches can help create a more even finish. You can also add small decorative picot details if you want a slightly more detailed look.
Check the edge to make sure it does not curl too much or become uneven. A simple finishing border is often enough to make the entire top look polished.
Step 8: Make the Halter Neck Straps
The halter straps are another important part of this design. They allow the top to stay in place while giving it a stylish neckline.
Attach the yarn to the upper corners of the bodice. Make a long chain for each strap, adjusting the length according to your body measurements.
You can work slip stitches or single crochet stitches back along the chain to make the straps stronger and more comfortable.
Make sure both straps have similar lengths. Leave enough extra length for tying a secure bow or knot around your neck.
If you prefer a different style, you can make adjustable ties or add stronger finished edges around the neckline.
Step 9: Crochet the Decorative Flower
A handmade flower makes this summer top extra special. For this design, use white yarn for the main petals and pink yarn for the inner details.
Start with a small center ring using a magic ring or a few chain stitches joined with a slip stitch.
Work several stitches into the center to create a base for the petals. To make each petal, use a combination of chain stitches and taller crochet stitches worked into the center or designated spaces.
Repeat the process until you have a flower with approximately five petals. The exact stitch combination can be adjusted depending on the size and shape you want.
For a two-color effect, work the main petals in white and add pink stitches or embroidery near the center of each petal.
Once finished, gently arrange the petals with your fingers to give the flower a natural shape.
Step 10: Attach the Flower to the Bodice
Place the finished flower near the center of the upper bodice. Choose a position that looks balanced and does not interfere with the neckline or straps.
Use a yarn needle and matching yarn to sew the flower securely in place.
Avoid making the stitches too tight because this can pull the bodice fabric and change its shape. Make sure all the petals are attached well so they do not fold or hang loosely.
You can also make smaller flowers and attach them to other parts of the top if you want a more decorative design.
Step 11: Weave in the Loose Ends
After completing all the crochet sections, use your yarn needle to weave in the loose ends.
Pass each yarn tail through several nearby stitches on the wrong side of the fabric. Trim the extra yarn carefully after securing it.
Check the side joins, flower attachment, straps, and bottom border. Make sure everything is neat and secure.
Step 12: Check the Fit and Finish
Try on the finished top and check whether the bodice provides enough coverage. Adjust the straps if necessary and make sure the mesh section hangs comfortably.
If the lower section feels too long, you can carefully remove a few rows. If the bodice feels too loose, consider adding a suitable closure or adjusting the side seams.
Wash and dry your finished crochet top according to the yarn care instructions. Gently reshape it while damp and allow it to dry completely before wearing.
Helpful Tips for Making Beautiful Crochet Summer Tops
Choose breathable yarn. Cotton yarn is a practical option for summer clothing. It is comfortable, easy to work with, and helps create a lightweight finished piece.
Keep your tension consistent. Uneven tension can make the bodice look wavy or cause the mesh pattern to lose its shape. Take your time and check your stitches regularly.
Measure as you go. Do not wait until the end to check the size. Measuring the bodice and straps during the process can save time and prevent unnecessary changes.
Practice the mesh pattern first. The open net design may look complicated at first, but it becomes easier once you understand how the chain spaces connect. Make a small sample before working directly on the top.
Secure the flower properly. The flower is a decorative feature, so make sure it is attached firmly without pulling the fabric underneath.
Choose colors carefully. Teal and turquoise create a fresh summer appearance, while cream, peach, lavender, and soft pink can give the top a different look.
Check coverage and lining. Open mesh crochet is naturally see-through. Consider wearing a suitable camisole, bralette, or swimwear underneath. You can also add a fabric lining to the upper bodice if you prefer more coverage.
How to Style Your Crochet Summer Top
This handmade crochet summer top is easy to style with different outfits. For a relaxed daytime look, pair it with high-waisted denim shorts and comfortable sandals.
You can also wear it with a long skirt for a soft and feminine outfit. A flowing white skirt looks especially beautiful with a turquoise crochet top.
For beach days, the top can be worn over suitable swimwear as a lightweight cover-up. The open mesh section creates a breezy appearance that works well for seaside outfits.
Simple accessories can complete the look. Try small earrings, a lightweight bracelet, or a woven beach bag. Since the crochet flower already adds decoration, you do not need too many extra accessories.
Easy Ways to Customize Your Crochet Summer Top
One of the best things about handmade crochet clothing is that you can change the design to match your style.
You can make the solid bodice slightly longer if you want more coverage. You can also shorten the mesh section to create a cropped style or extend it for a longer, more relaxed appearance.
Changing the yarn color is another easy way to create a different look. Bright orange, sunny yellow, sky blue, and coral are lovely choices for summer. If you enjoy colorful projects, try using one shade for the bodice and another for the flower.
You can also experiment with the flower size. A large flower creates a noticeable decoration, while a small flower gives the top a simple and delicate appearance.
For a different neckline, adjust the strap placement or create a wider halter shape. Just make sure the finished straps provide enough support for comfortable wearing.
Common Mistakes to Avoid
One common mistake is choosing a crochet hook without checking the yarn thickness and gauge. This can make the finished top too stiff or too loose.
Another mistake is making the mesh section without checking its width. Open chain spaces can change the overall shape of the fabric, so keep measuring as you work.
Do not make the neck straps too short. They need enough length to tie comfortably without pulling the bodice upward.
It is also important not to skip the finishing steps. Loose yarn ends, uneven borders, and poorly attached decorations can make an otherwise beautiful handmade top look unfinished.