Crochet Bottoms: A Step-by-Step Guide to Making Stylish Crochet Shorts
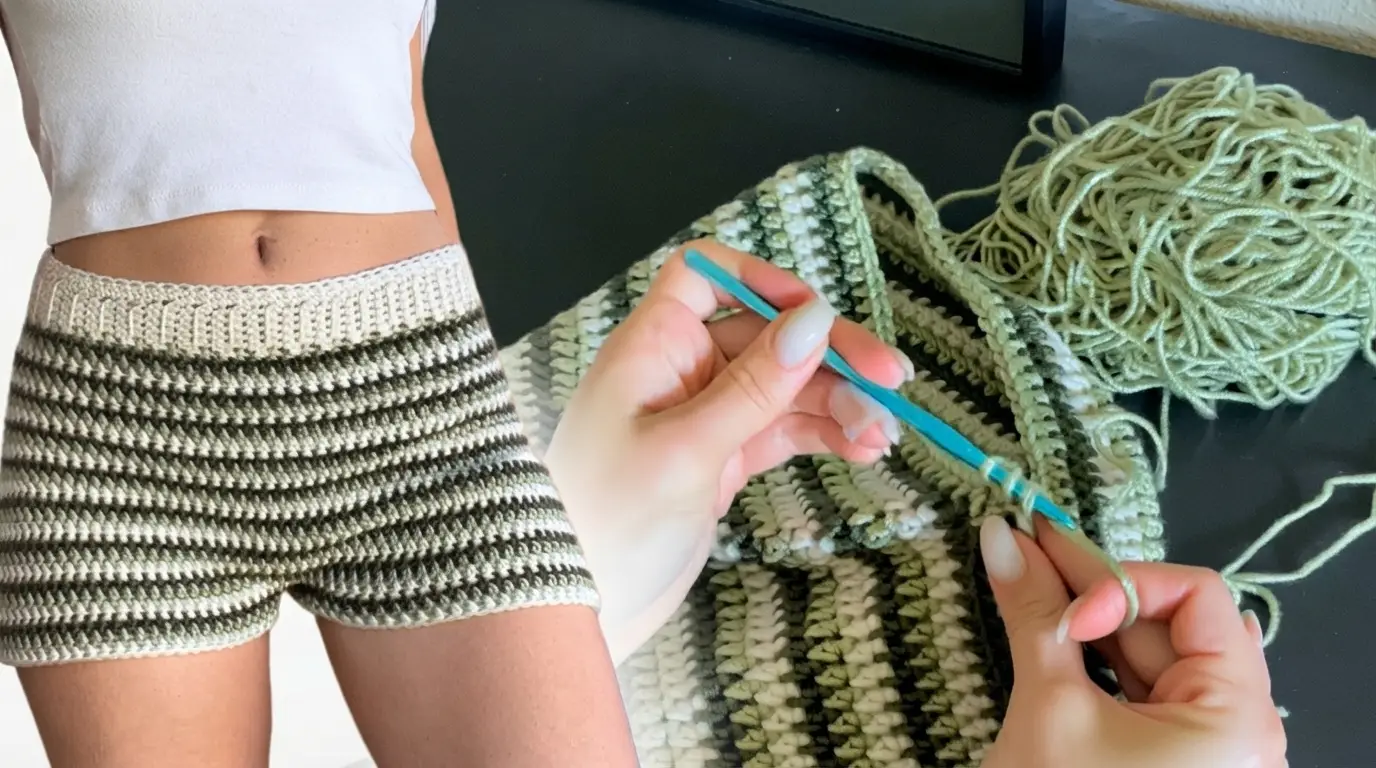
Crochet bottoms are a fun and stylish way to add handmade clothing to your wardrobe. These comfortable crochet shorts feature beautiful horizontal stripes, a stretchy waistband, and a relaxed fit, making them perfect for summer days, holidays, and casual outfits.
What Are Crochet Bottoms?
Crochet bottoms are handmade garments created with yarn and a crochet hook. They come in many styles, including shorts, skirts, trousers, and beachwear. One popular choice is crochet shorts because they are comfortable, easy to style, and suitable for warm weather.
Striped crochet shorts are especially attractive because they combine simple stitches with beautiful color changes. A design using cream, sage green, and dark olive green creates a natural, earthy look. The horizontal stripes give the shorts a lovely pattern without requiring complicated crochet techniques.
The design can also be adjusted to suit different body shapes and sizes. You can make the shorts shorter or longer, change the waistband height, or use different colors to create your own style.
Materials You Need to Make Crochet Bottoms
Before starting your crochet shorts, gather all the materials you need. Choosing the right yarn and tools will help you create comfortable bottoms that hold their shape.
Yarn: Choose a soft, lightweight yarn that feels comfortable against your skin. Cotton yarn is a good option for summer crochet bottoms because it is breathable and easy to care for. Cotton blends can also work well. You can use three colors, such as cream, sage green, and dark olive green, to create a striped design.
Crochet Hook: Choose a hook size that works with your yarn and helps you achieve a neat, comfortable fabric. Check the yarn label for a suggested hook size and make a small test piece before beginning.
Scissors: Keep a sharp pair of scissors nearby for cutting yarn when changing colors and finishing your work.
Yarn Needle: A yarn needle is useful for joining the pieces, weaving in loose ends, and making the finished garment look tidy.
Stitch Markers: These help you mark important stitches, the beginning of rounds, and the places where the leg openings will be created.
Measuring Tape: Use a measuring tape to check your waist, hips, thigh circumference, and desired shorts length.
Choose the Right Yarn and Colors
Yarn selection is important when making crochet clothing. Since crochet bottoms are worn directly against the body, you should choose yarn that feels soft and comfortable.
Cotton is a popular choice because it allows airflow and works well for warm-weather garments. It also gives good stitch definition, which makes striped patterns look clean and attractive.
For a natural striped design, choose three colors that work well together. Cream creates a soft base, sage green adds a fresh touch, and dark olive green gives the pattern more depth.
You can use the colors in alternating rows to create even horizontal stripes. Keep the color changes consistent throughout the body of the shorts for a balanced appearance.
Understand the Crochet Stitches
You do not need advanced crochet skills to make simple striped shorts. A few basic stitches and techniques are enough to create a comfortable design.
Chain stitch is used to create the starting foundation and can also be used when making the waistband.
Single crochet creates a firm fabric with small, neat stitches. It is useful for waistbands and areas where you want a little more structure.
Half double crochet creates a fabric with a little more height than single crochet. It is a useful option for the main body because it helps the work grow without making the fabric too open.
Slip stitch is used to join rounds, move across stitches, and finish edges neatly.
You can choose the stitch that gives you the fabric you like best. Just remember that a very loose stitch pattern may create more gaps, while a tighter fabric can feel less breathable.
Take Your Measurements Before Starting
Good measurements are the secret to making crochet bottoms that fit comfortably. Crochet fabric can stretch differently depending on the yarn, stitch, and tension, so do not depend only on standard clothing sizes.
Measure around your natural waist and the fullest part of your hips. Also measure around your thigh and decide how long you want the shorts to be.
Write down these measurements before beginning. Your hip measurement is especially important because the shorts need enough room to pass over your hips when you put them on.
Make a small crochet gauge swatch using your chosen yarn and stitch. Measure how many stitches and rows fit into a particular area. This will help you calculate how many stitches you need for your desired size.
If your fabric stretches easily, make sure the finished shorts are not too loose. If it has very little stretch, allow enough room for comfortable movement.
Step 1: Make the Waistband
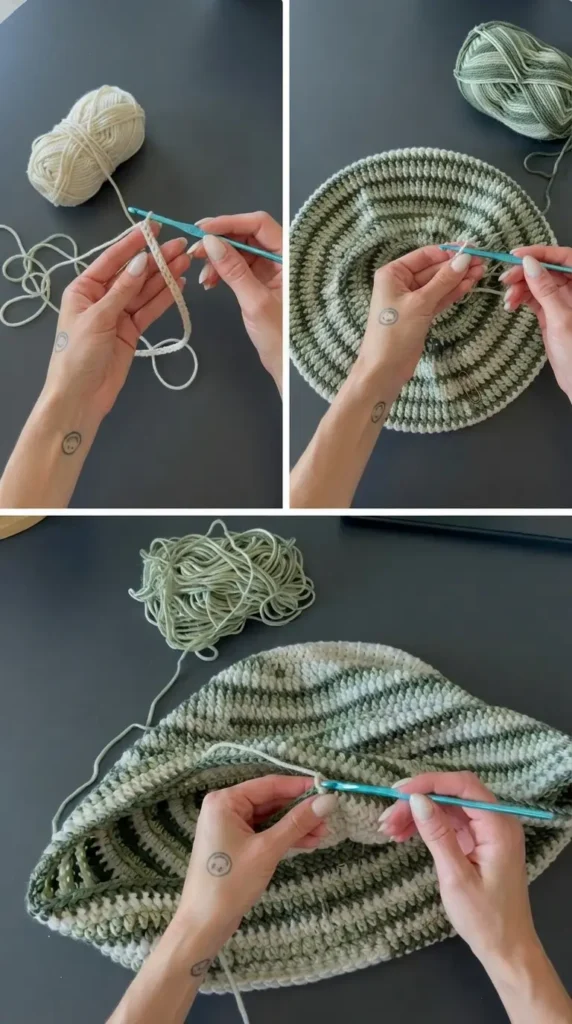
Start by making the waistband. A comfortable waistband helps the shorts stay in place and gives the finished garment a clean appearance.
Begin with a foundation chain that matches the waistband height you want. For a ribbed appearance, you can work rows of single crochet through the back loop only. This creates raised lines that look like knitted ribbing.
Continue working back and forth until the waistband strip reaches the length needed for your waist. Remember to consider the stretch of the finished fabric. The waistband should feel secure without becoming uncomfortable.
Join the two short ends using slip stitches or a yarn needle to create a loop. Make sure the seam is neat and does not create a bulky area.
If you prefer a simpler construction, you can also crochet the waistband directly in rounds. The ribbed method is a lovely choice when you want a defined waistband that stands out from the striped body.
Step 2: Start Crocheting the Main Body
Once the waistband is ready, begin working on the main body of the shorts.
Attach your first yarn color to the waistband and crochet evenly around its lower edge. Make sure your stitches are spread evenly so the fabric does not become too tight or start curling.
Work the first round carefully and place a stitch marker at the beginning. Continue crocheting in rounds, following your chosen stitch pattern.
For the striped design, begin with cream yarn, then introduce sage green and dark olive green in alternating rounds. You can make each stripe a few rounds wide depending on the appearance you want.
Keep your stitch count consistent as you work. If you accidentally add too many stitches, the shorts may become wider than planned. If you miss stitches, the fabric may pull inward.
Try the work on occasionally or compare it with your measurements. Continue until the upper body reaches the desired length before creating the leg openings.
Step 3: Create the Striped Pattern
The striped pattern is one of the most attractive parts of these crochet bottoms. It gives a simple garment a beautiful handmade finish.
To change colors, complete the final stitch of the current round using the new color during the last yarn-over. This helps the next round begin neatly with the new shade.
Carry the unused yarn carefully along the inside of the work if the stripes are close together. However, avoid carrying several long strands across the fabric because they can become uncomfortable or create extra bulk.
You can also cut the yarn at each color change and weave in the ends later. This takes more finishing time but may give a cleaner result.
Keep the stripe widths similar throughout the shorts. Alternating light and dark colors creates a balanced pattern and makes each section easy to see.
Step 4: Divide the Work for Two Leg Openings
When the main body reaches the required length, it is time to create the two leg openings.
First, lay the shorts flat and identify the center points at the front and back. Divide the stitches into two sections of similar size. These sections will become the two legs.
Use stitch markers to mark where each leg begins and ends. Make sure the division is centered so the shorts look balanced when worn.
You will now work on one leg opening at a time. Join the yarn to the first section and crochet around it in rounds. Continue until the leg reaches your preferred length.
Once the first leg is finished, attach the yarn to the second section and repeat the same process.
Check that both leg openings have a similar number of stitches and the same length. This will help the finished shorts look even.
Step 5: Crochet the Leg Edges
The leg edges should look neat and feel comfortable against your thighs.
You can use single crochet for a simple, firm border. Work evenly around each opening without pulling the yarn too tightly.
If you want a softer finish, use the same stitch pattern as the main body. You can also add a narrow contrasting stripe to match the waistband or the colors used throughout the shorts.
Try the shorts on before completing the final edge. The openings should allow comfortable movement without feeling too tight or too loose.
Avoid adding too many stitches around the leg openings because this can make the edges wavy. If the fabric begins to flare, check your stitch count and adjust it carefully.
Step 6: Join and Finish the Shorts
After both legs are complete, inspect the center joining area. This is an important part of the garment because it needs to be strong enough for regular movement.
Use a yarn needle to secure any loose sections and reinforce the joining area if necessary. Make sure there are no large gaps between the legs.
Weave in all loose yarn ends on the inside of the shorts. Pass the yarn through several stitches in different directions so the ends stay secure.
Check the waistband, leg edges, and side areas for uneven stitches. Small finishing adjustments can make a big difference to the overall appearance.
If you want extra support around the waist, you can add a soft elastic cord or a crocheted drawstring. Make sure it is comfortable and does not dig into your skin.
Step 7: Try On and Adjust the Fit
Before considering your crochet bottoms complete, try them on and check the fit carefully.
The waistband should sit comfortably around your waist without slipping down. The hip area should have enough room for sitting, walking, and moving naturally.
Check the length of both legs and make sure they are even. If one leg is longer than the other, adjust the edge before finishing.
If the shorts feel too tight, you may need to add more stitches or make changes to the construction. If they feel too loose, a properly fitted waistband or a suitable drawstring can help.
Remember that different yarns behave differently. Some crochet fabrics stretch after wearing, while others hold their original shape. Give your finished garment time to settle before making major adjustments.
Tips for Making Beautiful Crochet Bottoms
One useful tip is to make a gauge swatch before starting the actual shorts. This small step helps you understand how your chosen yarn and hook work together. It can also prevent sizing problems later.
Keep your tension consistent throughout the project. If some rows are tight and others are loose, the stripes may look uneven and the garment may lose its shape.
Choose colors that complement each other. Soft natural shades are lovely for everyday clothing, while brighter colors can create a playful summer look.
Always count your stitches at the end of important rounds. This is especially helpful when making the waistband, body, and leg openings.
Try not to use very heavy yarn for fitted summer shorts. A lighter yarn usually creates a more comfortable garment and is easier to wear in warm weather.
If you are new to crochet clothing, take your time with the leg division. Marking the stitches before separating the two openings can help prevent mistakes.
How to Make Your Crochet Shorts Fit Better
Fit is one of the most important things to consider when making crochet bottoms. A beautiful pattern will not be comfortable if the shorts are too tight around the hips or thighs.
Use your actual measurements instead of following a size chart without checking it. Crochet sizing can change depending on stitch choice, yarn thickness, and personal tension.
For a relaxed fit, allow enough room around the hips and thighs. For a closer fit, use a suitable stitch pattern and yarn combination that provides some flexibility.
You can also change the shorts length to match your preference. A shorter design is great for beachwear, while a slightly longer version can be more suitable for everyday outfits.
How to Care for Handmade Crochet Bottoms
Proper care will help your handmade shorts last longer. Always check the yarn label before washing because different fibers require different care methods.
Cotton crochet garments can often be washed gently, but avoid using very hot water or harsh washing products. Hand washing is a gentle option, especially if the garment has delicate details.
After washing, remove excess water carefully without twisting or stretching the fabric. Lay the shorts flat on a clean towel or drying surface and reshape them while damp.
Avoid hanging wet crochet shorts because the weight of the water can stretch the stitches. Let them dry completely before storing them.
Keep your crochet bottoms folded in a clean, dry place. This helps them maintain their shape and keeps the yarn in good condition.
How to Style Crochet Bottoms
Crochet shorts are easy to style because they work well with many simple outfits. For a relaxed summer look, pair them with a plain white crop top or a comfortable tank top.
You can also wear them with an oversized shirt for a casual beach-inspired outfit. Sandals, simple jewelry, and a small bag can complete the look without taking attention away from the crochet pattern.
For a matching handmade outfit, try creating a crochet top using the same yarn colors. Repeating the same stripes in both pieces can give your outfit a coordinated appearance.
If you prefer a more subtle style, choose neutral colors and pair the shorts with a solid-colored top.