Crochet Top Pattern: How to Make a Stylish Crochet Crop Top With a Lace-Up Back
A crochet top is a lovely handmade piece that combines comfort, style, and creativity. This crochet top pattern features a textured front panel, slim shoulder straps, and a beautiful crisscross lace-up back, making it perfect for summer outfits, beach days, and casual wear.
About This Crochet Top Pattern
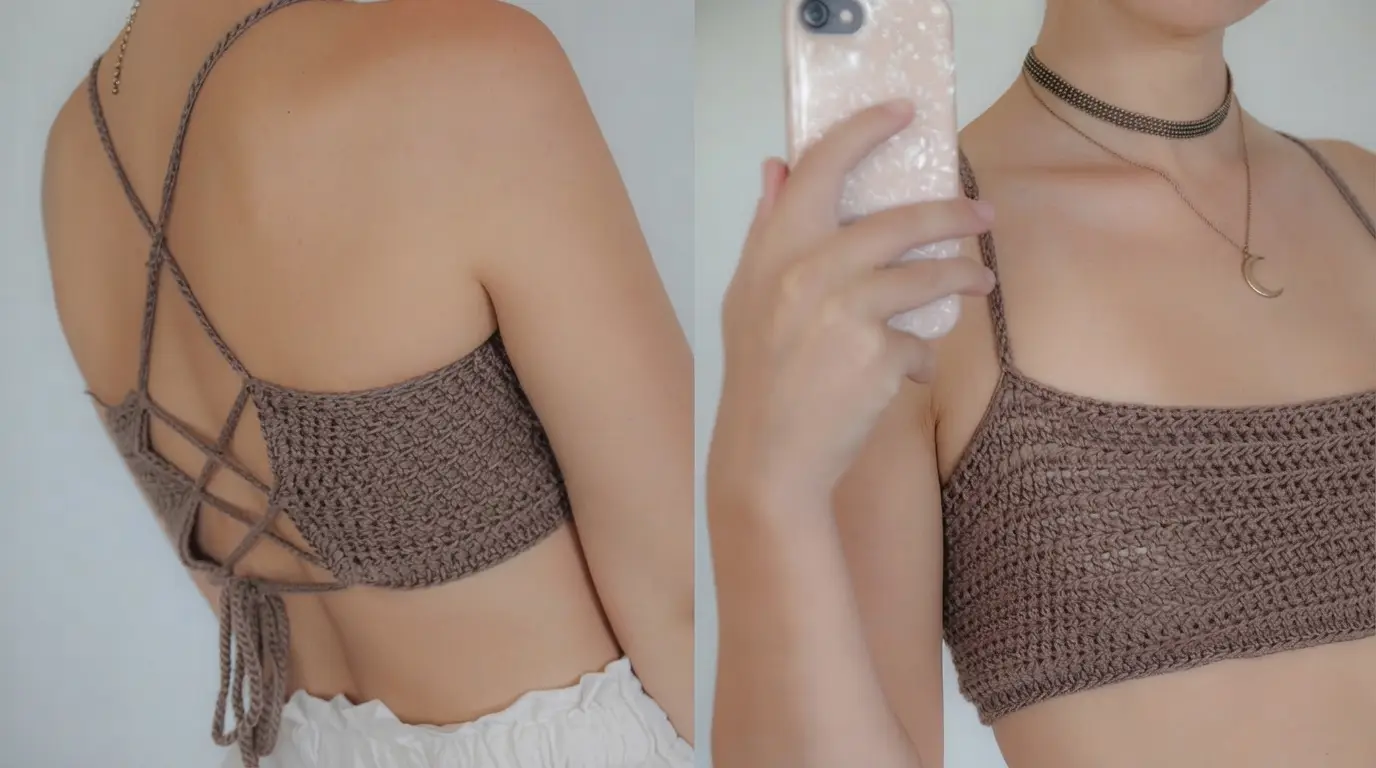
This crochet top pattern is designed for anyone who loves making stylish and wearable crochet clothing. It features a simple crop-top shape with a beautiful textured stitch pattern across the front. The design has a close-fitting body, thin shoulder straps, and an attractive open back with adjustable crisscross ties.
The front section has a slightly curved upper edge and a neat lower finish. Its textured stitches create a thick yet flexible fabric that provides good coverage while keeping the top comfortable. The back is the special part of this design. Instead of a fully closed back, it uses thin crochet cords that cross over one another to create a decorative lace-up look.
A neutral brown or taupe yarn gives the top a natural, elegant appearance. However, you can choose almost any color that matches your personal style. This crochet top works beautifully with high-waisted jeans, skirts, shorts, and summer trousers.
Materials Needed for the Crochet Top
Choosing the right materials is important because the yarn, hook, and stitch tension affect the final shape and fit of your crochet top.
For this project, lightweight cotton yarn is a good choice. Cotton is breathable, comfortable against the skin, and suitable for warm weather. It also holds its shape well, which is helpful when making a fitted top with adjustable straps. Cotton blends can also work if you prefer a softer and more flexible finish.
Choose a yarn in a medium-light or lightweight thickness, depending on the look and coverage you want. A brown, mocha, taupe, beige, cream, or black shade will create a simple and stylish appearance.
You will also need a crochet hook that matches your yarn. A hook around 3.5 mm to 4.5 mm may work well for many lightweight cotton yarns, but always check your yarn label and make a small sample first.
Keep a pair of scissors, a yarn needle, measuring tape, and stitch markers nearby. These basic tools will help you measure the top, finish the edges, and attach the straps neatly.
Understanding the Stitches and Techniques
This crochet top pattern uses basic crochet techniques, making it suitable for beginners who already understand a few common stitches. You should know how to make a slip knot, chain stitch, single crochet, and double crochet before starting.
The main body uses a textured crochet stitch. You can create a similar woven appearance by working a combination of stitches into the spaces between stitches from the previous row. This produces a slightly raised fabric with small openings and a lovely handmade texture.
The exact stitch pattern can be adjusted according to your skill level. A simple combination of single crochet and double crochet can create an attractive textured surface without requiring complicated techniques.
You will also use increases or decreases if needed to shape the upper edges. Finally, the shoulder straps and back ties are made with narrow chains or crocheted cords.
Before beginning, check your stitch tension. The fabric should feel firm enough to provide coverage but flexible enough to sit comfortably against your body.
Step-by-Step Crochet Top Pattern
Step 1: Take Your Measurements
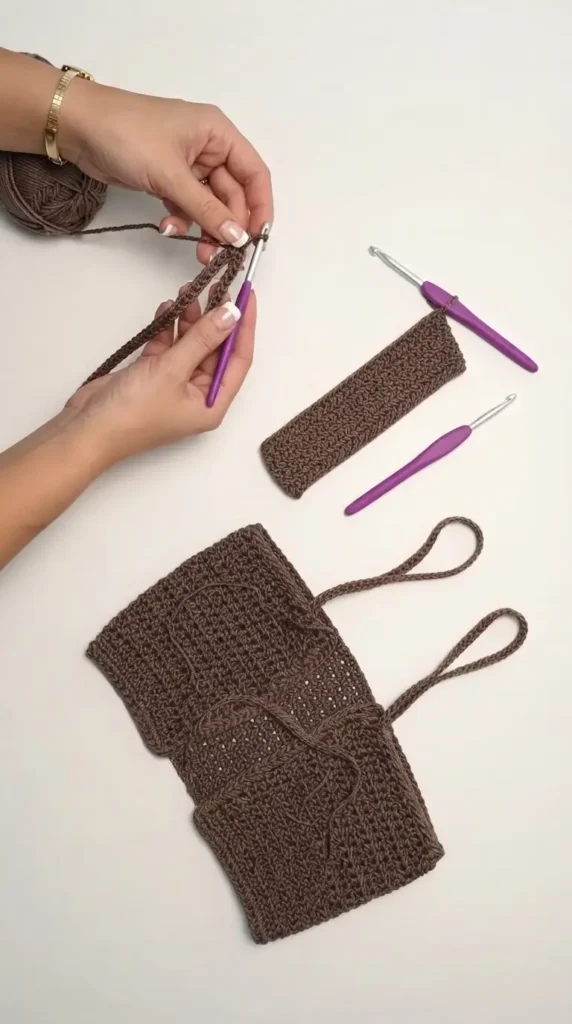
Start by measuring your bust, underbust, and desired crop-top length. These measurements will help you decide how wide and long the front panel should be.
Measure around the fullest part of your bust for the main body width. Then measure from just below your bust to the length you want the top to reach. You can make it a short crop top or extend it slightly for more coverage.
It is also helpful to measure your shoulder-to-bust distance so you can plan the strap length. Since this design has an adjustable lace-up back, you do not need to make the back panel completely closed.
Remember that crochet fabric can stretch, especially when made with certain yarns and stitches. Avoid making the front panel too tight. A small amount of comfortable ease will make the finished top easier to wear.
Step 2: Make a Small Gauge Swatch
Before crocheting the main piece, create a small sample using your chosen yarn and hook. Work several rows of your selected textured stitch pattern.
Measure the width and height of the sample after gently laying it flat. This will help you estimate how many stitches and rows you need for your measurements.
If your stitches are too loose, try a smaller hook. If the fabric feels too stiff, use a slightly larger hook. The goal is to create a comfortable fabric that holds its shape without feeling heavy.
This step is especially useful when making clothing because even a small difference in stitch size can change the final fit.
Step 3: Crochet the Front Panel
Begin with a foundation chain that matches your desired front width. The chain should be long enough to cover the front of your bust comfortably.
Work your first row using your chosen stitch pattern. For a simple textured finish, you can alternate single crochet and double crochet stitches across the row. Continue following the same pattern in the next rows, placing stitches consistently to maintain an even texture.
Keep checking the width as you work. The front panel should cover the bust without pulling tightly at the sides.
Continue crocheting until the panel reaches your desired crop-top length. You can hold it against your body occasionally to check the fit. If you want additional coverage, simply add a few more rows.
Keep the edges as straight as possible. Even edges make it easier to add the straps and finish the top neatly.
Step 4: Shape the Upper Edge
Once the front panel reaches the required length, focus on creating a neat upper edge.
The neckline can be kept relatively straight or slightly shaped depending on your preference. If you want a softer neckline, you can gradually reduce the number of stitches near the outer edges.
Work a simple finishing row using single crochet stitches. This creates a cleaner and more stable edge for attaching the shoulder straps.
Make sure both sides look even. Uneven edges can make the straps sit at different heights, so take your time with this part.
Step 5: Create the Lower Edge
The bottom of the crochet top should have a clean and comfortable finish. Work a row of single crochet along the lower edge to make it look more polished.
If you prefer a slightly decorative finish, you can add a simple border using slip stitches or another small crochet stitch.
Avoid making the lower border too tight because it may cause the top to curl or pull upward. Keep your tension relaxed and consistent.
Step 6: Make the Shoulder Straps
The thin shoulder straps give this crochet top its delicate appearance. You can make them using foundation chains or narrow crocheted cords.
First, decide where you want the straps to sit. Attach yarn to the front panel near each upper corner and create a chain long enough to reach comfortably over your shoulders.
For a stronger strap, work back along the chain using slip stitches or single crochet stitches. This creates a more durable cord than leaving a loose chain on its own.
Adjust the length before fastening off. The straps should hold the top in place without digging into your shoulders.
Attach the other ends securely at the back or prepare them to connect with the lace-up design, depending on your preferred construction.
Step 7: Create the Lace-Up Back
The lace-up back is one of the most attractive features of this crochet top pattern. It gives the design a fashionable appearance while allowing you to adjust the fit.
To make the back ties, crochet several long, narrow cords using chain stitches followed by slip stitches or single crochet stitches. The cords should be strong enough to handle gentle pulling.
Attach the cords securely to the back-side edges of the front section or to small reinforced attachment points. Arrange them so they can cross over one another at the back.
You can lace the cords in a crisscross pattern, moving from one side to the opposite side as you work downward. Leave enough space between the crossed sections to create the open-back effect.
Tie the ends into a bow or secure them with a neat knot. Make sure the cords are not too tight because you want the top to remain comfortable when worn.
The adjustable design makes it easier to accommodate small differences in body measurements.
Step 8: Join and Secure All Parts
After completing the front panel, straps, and back ties, check all the connections carefully.
Use a yarn needle to weave in loose yarn ends. Reinforce the areas where the straps and cords connect to the body because these sections receive the most tension during wear.
Try the top on and adjust the ties until the front panel sits comfortably. The neckline should feel secure, while the back should remain flexible enough for movement.
If any part feels loose, add a few stitches or reinforce the attachment point. A well-finished crochet top should look neat from both the front and back.
Step 9: Finish and Shape Your Crochet Top
The final step is to gently shape your finished crochet top. Lay it flat and check that the edges are straight and the straps are even.
If necessary, lightly block the fabric according to the yarn manufacturer’s care instructions. Cotton crochet can benefit from gentle shaping, but avoid stretching it too much.
Do not apply excessive heat, especially if you are using synthetic or blended yarn. Always test your care method on a small swatch first.
Allow the top to dry completely before wearing it. Once finished, your handmade crochet crop top is ready to style with your favorite summer clothes.
Tips for Making a Beautiful Crochet Top
One of the most useful tips is to maintain consistent stitch tension throughout the project. Uneven stitches can make the front panel look wavy or cause one side to become wider than the other. Take your time and check your work after every few rows.
Choose soft yarn that feels comfortable against your skin. Since this crochet top is worn close to the body, rough or scratchy yarn may become uncomfortable after a few hours.
Pay special attention to the straps and back ties. These parts should be strong enough to support the top without stretching too much. Reinforcing the attachment points can help prevent unwanted loosening.
If you are a beginner, practice the textured stitch pattern before starting the main panel. This will help you understand the stitch placement and create a more even finish.
How to Customize Your Crochet Top Pattern
You can easily change this crochet top pattern to suit your personal style. If you prefer a longer design, add more rows to the front panel. For a shorter summer crop top, reduce the body length.
Color is another simple way to make the design unique. Warm brown shades create a natural look, while white, cream, and pastel colors give the top a softer summer feel. Black or dark green can create a more modern appearance.
You can also change the back lacing. Use thinner cords for a delicate appearance or slightly thicker cords for a more noticeable crisscross design.
If you want extra coverage, choose a denser stitch pattern and use a suitable yarn. You may also wear a comfortable lining or suitable undergarment underneath, depending on your preferred level of coverage.
How to Style Your Handmade Crochet Top
This crochet top looks beautiful with high-waisted denim shorts, wide-leg trousers, or a simple summer skirt. The textured front creates visual interest, while the open lace-up back adds a stylish detail.
For a relaxed beach outfit, pair it with linen shorts, sandals, and a lightweight cover-up. You can also wear it with jeans and simple jewelry for a casual everyday look.
A brown crochet top works especially well with cream, white, beige, and denim shades. If you prefer a coordinated outfit, match the top with a skirt or shorts in a similar neutral color.
Remember that crochet tops can have different levels of coverage depending on the stitch pattern and yarn thickness. Choose suitable undergarments or lining to feel comfortable and confident.
How to Care for Your Crochet Top
Proper care will help your handmade crochet top maintain its shape and texture. Always follow the washing instructions provided with your yarn.
For many cotton crochet projects, gentle hand washing in cool or lukewarm water is a suitable option. Avoid twisting or pulling the fabric while washing because this can stretch the stitches.
After washing, gently remove excess water with a clean towel. Lay the top flat to dry and reshape the edges and straps while it is still slightly damp.
Store the finished top flat instead of hanging it for long periods. Hanging can stretch the straps and body, especially if the yarn is heavy.