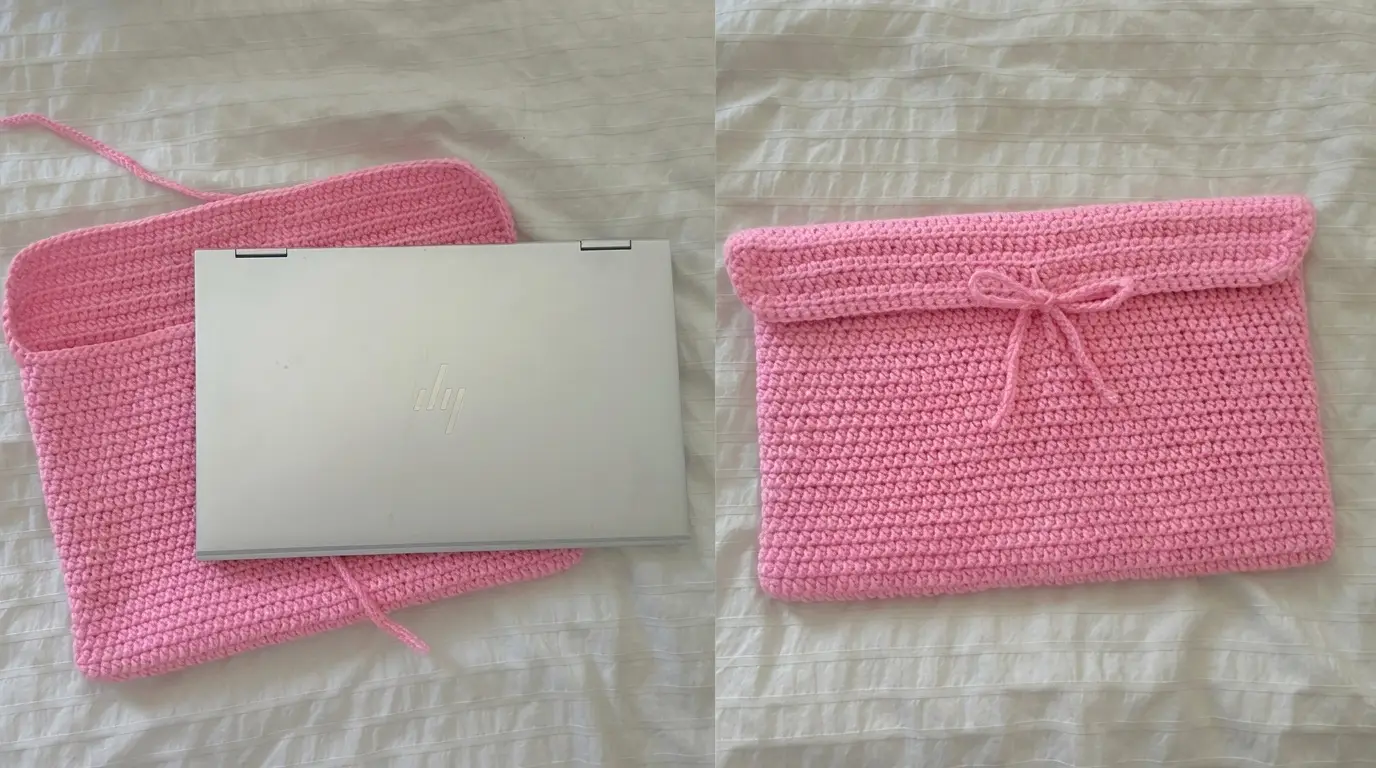
How to Make a Simple Crochet Laptop Case
Create a handmade, pretty, and practical laptop sleeve with this easy, beginner-friendly crochet pattern designed to fit any laptop size perfectly.
Materials Needed
To create your custom laptop case, gather your chosen yarn, a matching crochet hook, a darning needle, scissors, and a couple of stitch markers to keep track of your rounds and shaping.
Crocheting the Base
Begin by making a slip knot: twist your yarn to form a loop, grab the tail end to pull through, insert your hook, and pull tight. Chain the width needed to cover your laptop. For example, chaining 52 stitches creates a solid foundation that measures exactly enough to cover the width.
Working into the second chain from the hook, skip the chain on the hook and begin working half double crochets. Use a stitch marker to mark your very first stitch. Continue working one half double crochet into every chain. When you reach the very last chain, work a total of three half double crochets into it to form the curve for the base.
Continue working along the other side into the underlying chains with one half double crochet in each chain. As you work on this side, crochet around the tail end of the yarn to bury it as you go, saving time on weaving ends later. Work three half double crochets into the very first skipped chain at the start of the round. This results in a total of 106 stitches. End the round with a slip stitch into the top of the first half double crochet, then gauge the base against your laptop to ensure a proper fit.
Crafting the Body
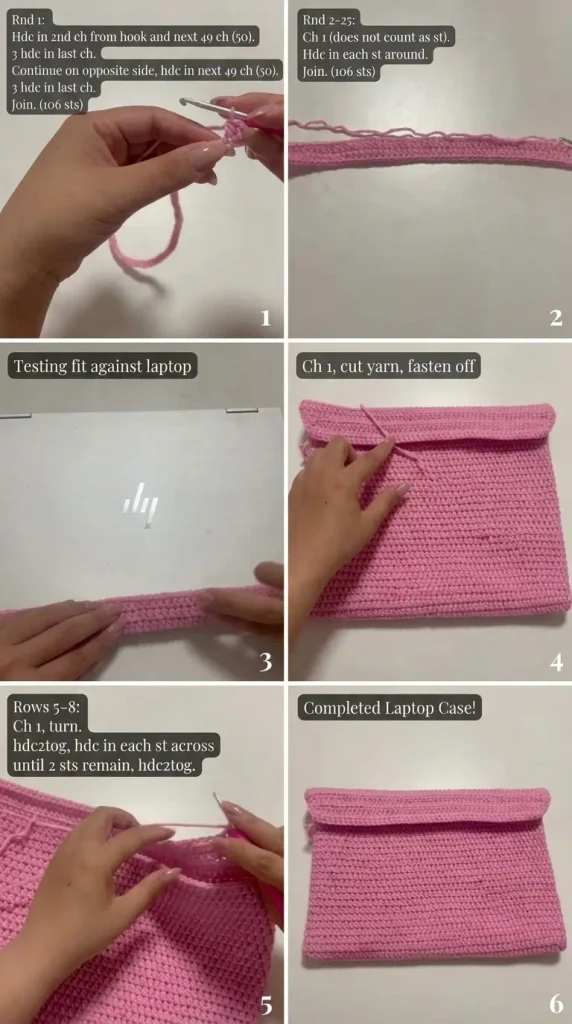
Start the body of the case by chaining one, which does not count as a stitch. Work a half double crochet into the first stitch, marking it with your stitch marker. Continue working one half double crochet in every single stitch all the way around.
At the end of the round, you will have a total of 106 stitches. End the round by removing the stitch marker and making a slip stitch on top of the first half double crochet. The work will naturally begin to fold upwards to cover your laptop since no increases are used.
Repeat this exact round-by-round process as many times as needed until the body covers the entire height of your laptop. A total of 24 rows of the body provides a snug, neat fit that covers the laptop nicely. Fasten off by cutting the yarn, chaining one, and pulling through.
Designing the Flap and Decreases
Use stitch markers to guide where the flap begins and ends, aligning it from one corner all the way to the other corner. Insert your hook into the first stitch marker on the right, pull up a loop, chain one (does not count as a stitch), and work a half double crochet into that same stitch. Continue working half double crochets across the top while burying the yarn tail until you reach the second stitch marker.
To create additional rows, chain one, turn your work, and work half double crochets into the stitches below, skipping the turning chain. After completing four straight rows of the flap, introduce decreases on each side to create a nice, curved shape.
To make a decrease, yarn over, insert your hook into the first stitch to pull up a loop, yarn over again, insert your hook into the next stitch, pull up a loop (leaving five loops on the hook), yarn over, and pull through all five loops. Repeat this decrease technique at both the beginning and the end of the rows for three additional rows until the flap reaches a length you love.
Adding Borders and Drawstrings
Add a neat, polished border by working a round of single crochets all along the sides of the flap and the top of the case. Chain one from where you left off, insert your hook into a stitch, pull up a loop, yarn over, and pull through two loops. Bury any remaining yarn tails underneath your single crochets as you work around. Finish the border with a slip stitch into the starting chain one, cut the yarn, chain one, and pull through.
To create the functional drawstring closure, place your laptop inside and use stitch markers to locate the middle of the third row of the flap and three rows down from where the flap ends on the body. Insert your hook at the marker, pull up your yarn, and chain 50 stitches. Leave a longer tail before cutting so you can test the length. Repeat the process on the other side. Tie the drawstrings together like a shoelace to secure the case, weave in all remaining ends securely from the inside using a darning needle, tie a small knot to secure, and trim close.
Always check your gauge and test-fit your laptop inside the case at multiple stages during construction to ensure the sizing remains accurate.
Burying your yarn tails underneath active stitches as you crochet along saves considerable time and keeps the final interior looking clean without requiring extensive needle weaving at the end.
Block or gently press your finished sleeve if needed to help the half double crochet stitches settle into a uniform and polished shape.