DIY Crochet Wallet: Easy Step-by-Step Tutorial for Beginners
Handmade accessories combine everyday practicality with personal charm. This guide explores crafting a neat, compact crochet wallet featuring a lovely blush body, contrasting borders, and secure fasteners.
Materials Needed for Your Project
Creating this project requires a few simple supplies that are easy to find at most craft stores. You will need about twenty-five grams of number three light moisturized cotton yarn in a soft blush color for the main body. A contrasting cream yarn works wonderfully for the decorative border.
Along with the yarn, prepare a two-and-a-half millimeter crochet hook, two stitch markers to keep track of your stitches, a darning needle for weaving in loose tails, and a pair of sharp scissors. For the closure, small snap fasteners provide a neat finish without adding bulk, though you can choose alternatives based on your preference.
Getting Started with the Foundation Chain
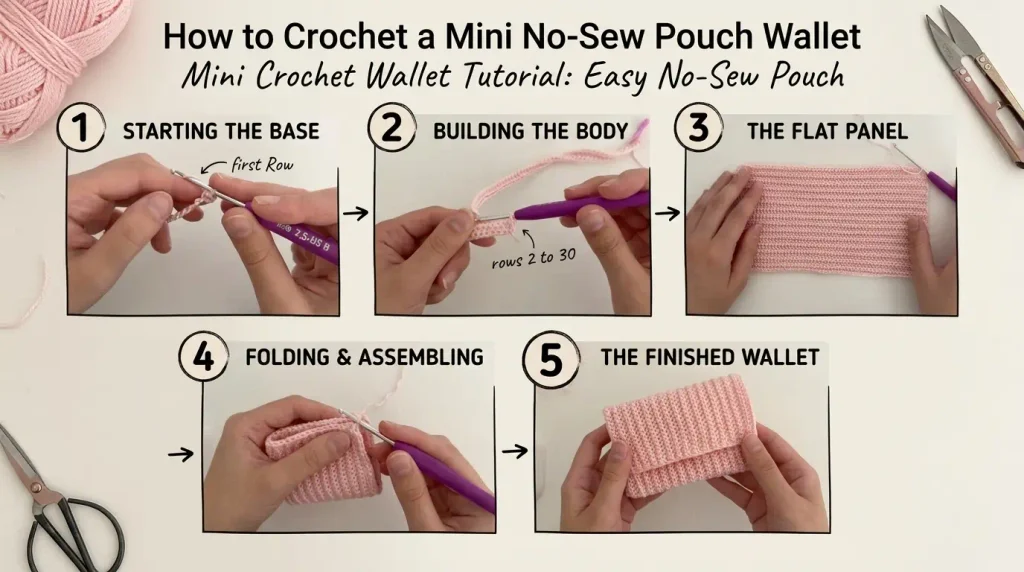
Begin your work by making a secure slip knot. Wrap the yarn around two fingers to form an intersecting shape, slide your hook underneath, and pull the working loop through to adjust it comfortably on your hook.
Once your slip knot is secure, you will create a foundation chain of sixty-one stitches. Yarn over your hook and pull through the loop carefully. Continue this repeating motion until you have counted sixty-one individual chains. The little loop remaining on your hook does not count toward your total chain count.
Working the Body Rows
The main structure of the wallet is built using rows of half double slip stitches. For the first row, turn your chain over to locate the small bumps running along the back bars rather than the front braids. Skip the very first back bar and insert your hook into the second one, yarn over, pull through the bar, and pull through the loop on your hook.
Using your thumb to gently guide the hook through the loops helps maintain a smooth rhythm. Continue this across all the chains until you reach the end, giving you sixty stitches in total.
For the remaining rows, chain one, turn your work, and crochet into the back loop only. Repeat this simple one-row process until you have completed a total of thirty rows. Checking the sizing against a standard card ensures the width fits properly before moving forward.
Folding and Joining the Sides
With your main rectangular panel finished, lay it flat and fold it to form the pocket shape. Count forty stitches from the edge on both sides and mark them with your stitch markers to keep everything aligned.
Attach your yarn and work twenty slip stitches along each side, joining the back loop of one edge to the front loop of the other edge. This creates clean, sturdy side seams that form the pockets of your accessory. Once both sides are securely joined, secure your yarn, cut the tail, and tuck any loose ends inside the wallet structure.
Adding the Border and Fasteners
To give your project a polished look, attach cream-colored yarn at a corner and work a round of single crochets all the way around the outer edge. Make small increases by placing two single crochets into the corner spaces to keep the edges flat and neat. Finish the round with a slip stitch, tie off, and weave in your final ends.
Position your snap fasteners carefully on the inner flaps, ensuring they align correctly when folded so the wallet closes smoothly without twisting.
Helpful Tips and Techniques
Maintaining consistent tension throughout your rows prevents the sides from flaring out or pulling inward. Using stitch markers on your first and last stitches helps guard against accidentally dropping or adding stitches during repetitive rows.
When weaving in your yarn tails, splitting the ply of the cotton yarn slightly with your darning needle before hiding it provides extra security and prevents ends from popping loose over time.
Choosing smooth cotton yarn allows the hook to glide easily through the back loops, making the slip stitch technique much more comfortable for your hands during longer crafting sessions.