Simple Crochet Pillow Cover Pattern for Beginners
Finished size
Each granny square: approximately 16 × 16 inches
Number of squares: 2
Number of rounds: 19
Materials
- Pink yarn
- White yarn
- Crochet hook suitable for your yarn
- Satin ribbon
- Pillow insert
- Scissors
- Yarn needle
Abbreviations
- ch = chain
- sl st = slip stitch
- dc = double crochet
- sp = space
GRANNY SQUARE — MAKE 2
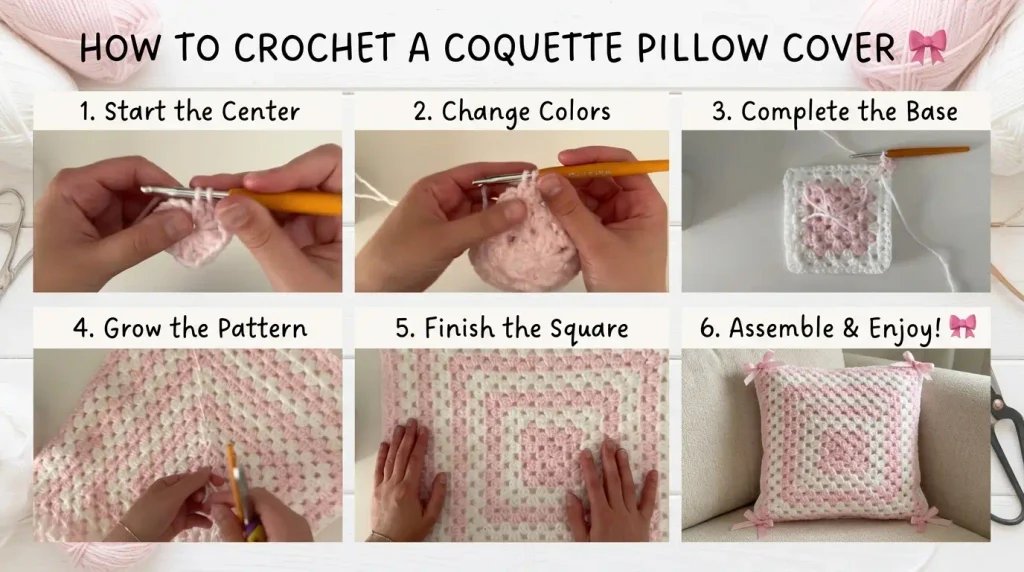
Round 1 — Pink
Make a slip knot.
Ch 4, then sl st into the first chain to form a small ring.
Ch 3 (counts as 1 dc).
In the ring:
- 2 dc
- ch 2
- 3 dc
- ch 2
- 3 dc
- ch 2
- 3 dc
- ch 1
Sl st into the top of the beginning ch-3.
You now have 4 corner spaces.
Round 2 — Pink
Ch 3, turn.
In the first corner:
- 2 dc
In the next corner:
- 3 dc
- ch 2
- 3 dc
Repeat around the square for the remaining corners.
At the starting corner, work the final 3 dc, then ch 1 and sl st into the top of the beginning ch-3.
Round 3 — Pink
Ch 3, turn.
In the first corner:
- 2 dc
In each middle space:
- 3 dc
In each corner:
- 3 dc
- ch 2
- 3 dc
Continue around.
When you reach the starting corner, work the final 3 dc.
Change to White
On the third dc, work the stitch until two loops remain on your hook. Drop the pink yarn and pull the white yarn through the remaining two loops.
Do not cut the pink yarn.
Ch 1 and sl st into the beginning ch-3.
Rounds 4–19
Continue using the same granny-square construction.
For every round:
Beginning corner:
- Ch 3
- 2 dc
Each middle space:
- 3 dc
Each corner:
- 3 dc
- ch 2
- 3 dc
At the end:
- Finish the final corner
- Ch 1
- Sl st into the top of the beginning ch-3
Turn your work and begin the next round with ch 3.
Color sequence
Follow this sequence throughout the 19 rounds:
| Rounds | Color |
|---|---|
| 1 | Pink |
| 2 | Pink |
| 3 | Pink |
| 4 | White |
| 5 | White |
| 6 | Pink |
| 7 | Pink |
| 8 | White |
| 9 | White |
| 10 | Pink |
| 11 | Pink |
| 12 | White |
| 13 | White |
| 14 | Pink |
| 15 | Pink |
| 16 | White |
| 17 | White |
| 18 | Pink |
| 19 | Pink |
The tutorial specifically states that the square has 19 rounds, with the first three rounds pink and subsequent colors changed every two rounds.
Important
When changing colors, don’t cut the unused yarn. Leave it hanging and pick it up again when that color is needed. This prevents having lots of ends to weave in.
FINISHING EACH SQUARE
After Round 19:
- Make the final double crochet.
- Ch 1.
- Sl st into the third chain of the beginning ch-3.
- Pull up a loop of yarn.
- Cut the yarn.
- Reinsert your hook into the third chain from the opposite side and pull the yarn through.
- Weave in the ends.
- Cut the unused traveling yarn.
- Make a second identical square.
JOINING THE PILLOW COVER
Place the two squares together with the right sides facing outward.
You will join:
- The entire top edge
- The entire bottom edge
Leave:
- One side open
- The opposite side open
You can place stitch markers at the corners to help identify where to stop.
Slip-stitch join
Using pink yarn:
- Insert your hook into the corner space.
- Pull through the yarn and ch 1.
- Insert the hook through the front loop of the front square and the back loop of the back square.
- Yarn over and pull through all loops on the hook.
- Repeat across the edge.
- At the opposite corner, finish with a final slip stitch.
- Ch 1, cut the yarn and weave in the end.
Repeat the same process on the opposite edge.
RIBBON CLOSURES
Once the pillow cover is assembled:
- Insert the pillow.
- Cut 6 pieces of satin ribbon.
- Place the ribbons around the openings:
- 1 at each corner
- 1 in the middle of each side
- Tie each ribbon into a small bow.
And that’s it — you have the finished pink-and-white granny-square pillow cover. The tutorial’s final design uses the ribbon bows as the decorative closures.