How To Grow Watermelon: Easy Tips for a Sweet Harvest
Nothing says summer quite like the crisp, sugary taste of a vine-ripened fruit picked straight from your own backyard. Learning How To Grow Watermelon is a rewarding project for any gardener who enjoys sunshine and warm weather. These plants thrive when provided with plenty of heat, fertile soil, and consistent moisture throughout the season.
Success starts with choosing the right spot in your garden that receives full sun for most of the day. You can begin your journey by direct-sowing seeds or using transplants once the danger of frost has passed and the ground feels warm to the touch. Providing the right environment ensures a heavy, delicious yield.
In this guide, we share essential watermelon growing tips to help you navigate the entire process. We will cover everything from selecting the best varieties for your climate to mastering pollination and pest prevention. You will also learn how to identify the perfect moment for harvest and the best ways to store your bounty for maximum freshness.
How To Grow Watermelon From the Right Variety and Planting Plan
Your journey to a sweet, juicy harvest begins with picking the perfect variety for your garden. Taking the time to plan ensures that your vines have enough space to thrive and produce high-quality fruit.
Choose watermelon varieties for your climate, garden size, and preferred harvest time
Different watermelon varieties offer unique benefits depending on your specific growing conditions. You should consider how much space you have, as some vines can stretch over ten feet long.
If you have a smaller garden, look for bush or compact types that require less room. Always check the “days to maturity” on the seed packet to ensure your growing season is long enough for the fruit to ripen fully.
Compare seeded, seedless, mini, picnic, and personal-size watermelons
Understanding the differences between types helps you decide what fits your lifestyle best. Most gardeners choose based on fruit size and whether they prefer the convenience of seedless options.
- Seeded: Traditional, flavorful, and often easier to grow for beginners.
- Seedless: Requires a seeded pollinizer plant nearby to produce fruit.
- Mini/Personal: Perfect for small households and quick consumption.
- Picnic: Large, classic melons that are ideal for sharing with family.
Use your USDA hardiness zone and local frost dates to set the schedule
Knowing when to plant watermelon is vital because these plants are extremely sensitive to cold temperatures. They thrive only when the soil is warm and the threat of frost has completely passed.
Check your local extension office for the average last frost date in your area. Aim to get your seeds or transplants into the ground once the soil temperature consistently stays above 70°F for the best results.
Prepare a Sunny, Warm Garden Site
A thriving watermelon patch starts with choosing a location that offers plenty of warmth and light. By setting the stage early, you provide your plants with the best possible environment to produce sweet, juicy fruit.
Select a location with full sun and enough room for sprawling vines
Watermelons are sun-loving plants that require at least six to eight hours of direct sunlight every day. A full sun garden ensures that your vines have the energy needed to develop large, flavorful melons throughout the season.
Keep in mind that these plants are vigorous growers. You should provide enough space for vines to spread several feet in every direction, as overcrowding can lead to poor air circulation and disease.
Improve drainage and soil fertility before planting
Healthy roots are the foundation of a productive harvest. You should aim for loose, fertile, and well-drained soil to help roots access oxygen while preventing common crown and root rot issues.
Test soil pH and amend heavy or sandy soil
Before you begin planting, test your soil to ensure it falls within the ideal pH range of 6.0 to 6.8. If your soil is too heavy with clay or too sandy, mix in organic matter like compost to improve its structure and nutrient content.
Create raised planting areas where spring soil stays cool or wet
If your garden site tends to stay cold or soggy during the spring, consider building raised beds. These structures elevate the soil, allowing it to drain excess moisture and warm up much faster than the surrounding ground.
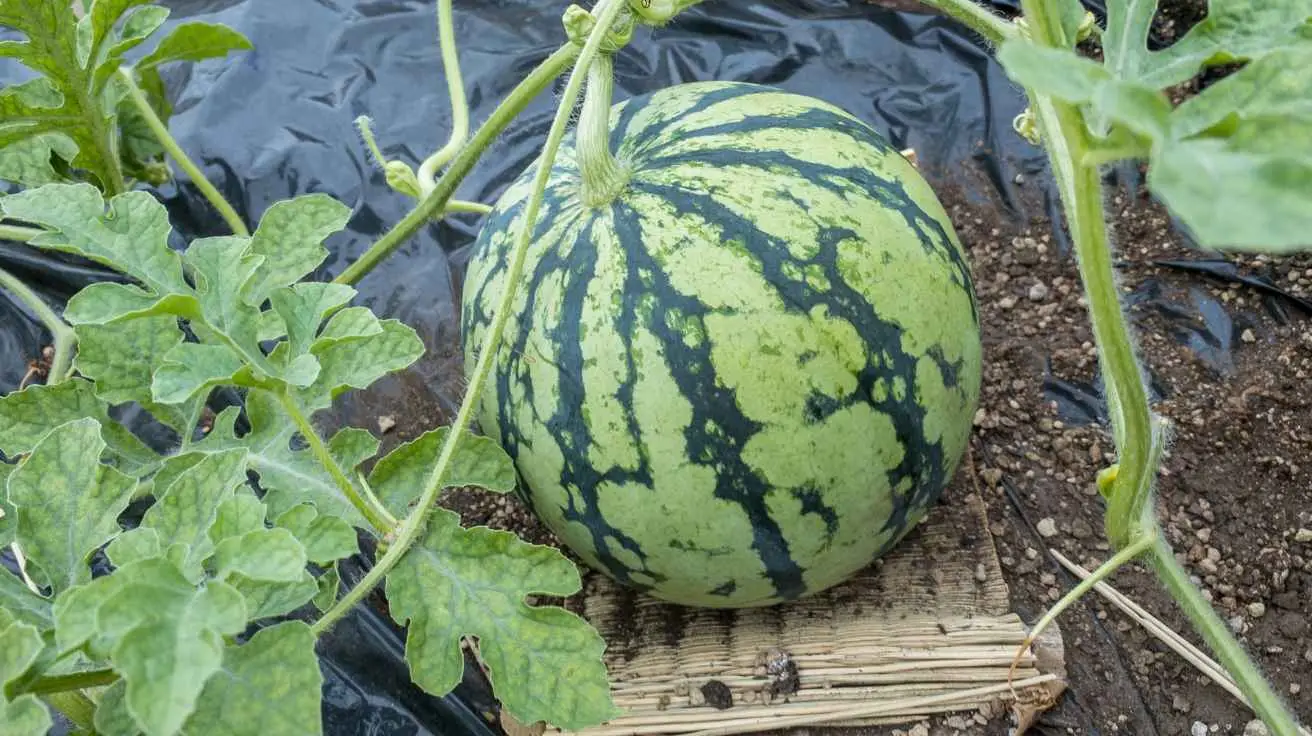
Warm the soil with black plastic, landscape fabric, or organic mulch
Watermelons thrive in heat, so warming the soil early is a smart strategy for success. You can cover your planting area with black plastic or landscape fabric to trap solar heat and suppress weeds.
Alternatively, using organic mulch helps regulate soil temperature once the weather turns hot. These simple techniques create a cozy environment that encourages rapid growth and earlier fruit production.
Start Watermelon Seeds Indoors or Sow Them Directly
Getting your garden ready for a sweet harvest begins with choosing the right planting method. You can either place seeds straight into the soil or give them a head start inside your home. Both approaches have specific requirements to ensure your vines grow strong and healthy.
Know when watermelon seeds can go directly into the garden
If you prefer to direct sow watermelon seeds, timing is the most critical factor for success. Wait until the soil has warmed to at least 70°F and all danger of frost has passed. Planting into cold, damp soil often leads to poor germination or rotting seeds.
Start seeds indoors three to four weeks before the last frost
Gardeners in regions with shorter growing seasons often find it beneficial to start watermelon seeds indoors. By beginning your seeds three to four weeks before the average last frost date, you provide the plants with extra time to mature. This method helps ensure you get a full harvest before the autumn chill arrives.
Use biodegradable pots to limit root disturbance
Watermelon roots are notoriously sensitive and do not handle being moved well. Using biodegradable pots allows you to plant the entire container directly into the garden soil. This prevents transplant shock and keeps the root system intact during the transition.
Provide warmth, bright light, and evenly moist seed-starting mix
Young plants need a cozy environment to thrive during their first few weeks. Place your pots in a warm spot and provide plenty of bright, indirect light to prevent the stems from becoming leggy. Keep the seed-starting mix consistently moist but never waterlogged to encourage steady growth.
Thin seedlings so each plant has room to develop strong roots
Once your seedlings emerge, you may notice multiple sprouts in a single pot or planting hole. It is important to thin these out so that only one vigorous plant remains in each space. This simple step ensures that your watermelon vines have enough nutrients and room to develop a robust root system.
Transplant Seedlings Without Slowing Their Growth
Successfully transitioning your seedlings to the garden is a key step in ensuring a bountiful harvest. When you decide to transplant watermelon seedlings, you must prepare them for the shift from a controlled indoor environment to the unpredictable outdoors.
Harden off young plants before moving them outdoors
Hardening off is a gradual process that exposes your plants to outdoor conditions over seven to ten days. Start by placing your trays in a sheltered, shady spot for a few hours each day. Gradually increase their exposure to direct sunlight and wind until they can handle a full day outside.

Space watermelon plants according to variety and available garden area
Proper watermelon plant spacing is essential for healthy growth and disease prevention. Compact, bush-type cultivars require less room and can often thrive in smaller garden beds. Conversely, large vining varieties need several feet of space between plants to allow for their sprawling nature.
Plant seedlings at the same depth as their containers
When you are ready to dig, ensure you place each seedling at the exact same depth it occupied in its original container. Planting too deep can lead to stem rot, while planting too shallow may cause the roots to dry out quickly. Gently firm the soil around the base to remove large air pockets.
Protect tender transplants from cool nights, wind, and sudden temperature changes
Young vines are sensitive to the elements during their first few days in the ground. Use temporary covers like cloches, row covers, or even inverted buckets to shield them from chilly nighttime temperatures. These barriers also provide a buffer against strong winds and sudden weather shifts that could damage tender leaves.
Water immediately after transplanting and check for transplant shock
Give your new transplants a thorough watering right after they are in the ground to help settle the soil. Keep a close eye on the plants for the next few days to watch for signs of wilting or stress. If you notice drooping, provide a little extra shade until the roots establish themselves in their new home.
Give Watermelon Vines Consistent Moisture
If you want to harvest sweet, heavy fruit, you must master your watermelon watering schedule. These plants require steady moisture throughout their life cycle, especially during hot, dry summer days. Providing consistent hydration ensures that your vines remain vigorous and productive from planting until harvest.
Water deeply at the roots instead of wetting the leaves
Always aim to deliver water directly to the soil line. Wetting the foliage can encourage fungal diseases like powdery mildew, which thrives in damp conditions. By keeping the leaves dry, you protect the overall health of your plants.
Adjust watering as vines grow, flowers appear, and fruit enlarges
Understanding how often to water watermelon plants changes as the season progresses. During the initial vine growth, keep the soil consistently moist but not soggy. Once flowers appear and fruit begins to enlarge, the plants need even more water to support the developing melons.
Use drip irrigation or a soaker hose to maintain steady moisture
Drip irrigation or a soaker hose is the most efficient way to manage your garden. These tools deliver water slowly and directly to the root zone, preventing evaporation. This method helps maintain the steady moisture levels that watermelons crave while keeping the surrounding area tidy.
Reduce watering gradually as ripe fruit approaches for better flavor
As your melons reach their full size and begin to ripen, you should slowly decrease the amount of water you provide. This practice helps concentrate the sugars inside the fruit, leading to a much sweeter taste. Be careful not to let the vines wilt completely, as they still need some support during this final stage.
Recognize signs of overwatering, underwatering, and poor drainage
Learning how often to water watermelon requires observing your plants closely. Wilting leaves during the heat of the day are common, but if they stay wilted in the morning, the plant is likely thirsty. Conversely, yellowing foliage, standing water, or stunted growth often point to poor drainage or overwatering. Adjust your routine based on these visual cues to keep your crop thriving.
Feed Plants for Healthy Vines and Sweet Fruit
Providing the right nutrients is the secret to growing massive, sugary watermelons in your backyard. Before you begin, it is wise to conduct a soil test to understand your garden’s specific needs. Adding mature compost to your soil before planting creates a rich foundation that supports vigorous early growth.
Apply compost or a balanced fertilizer at planting time
Incorporating organic matter or a balanced watermelon fertilizer helps young vines establish strong root systems. This initial boost provides the essential minerals required for early development. Always mix these amendments thoroughly into the top few inches of soil to ensure they are accessible to the young plants.

Shift toward phosphorus and potassium as flowers and fruit develop
As your vines begin to flower and set fruit, their nutritional requirements change significantly. You should transition to a formula higher in phosphorus and potassium to encourage fruit production. These elements are vital for developing the sweet, juicy flesh that makes homegrown melons so rewarding.
Avoid excessive nitrogen that produces leaves instead of watermelons
Be careful not to overdo the nitrogen during the mid-season. While nitrogen promotes lush green foliage, too much of it can actually discourage the plant from producing fruit. Focus on maintaining a balance so your energy goes into the melons rather than just the vines.
Use side-dressing or liquid fertilizer without damaging shallow roots
When fertilizing watermelon plants, consider using a side-dressing method or a gentle liquid feed. Watermelon roots are quite shallow and sensitive to disturbance. Applying nutrients to the surface or using a liquid solution prevents you from accidentally digging up or damaging these delicate root systems.
Keep fertilizer away from stems and water it into the soil
Always apply your chosen watermelon fertilizer several inches away from the main stem to prevent burning. Once applied, water the area thoroughly to help the nutrients soak down into the root zone. This simple step ensures that your plants receive the full benefit of your efforts throughout the growing season.
Manage Vines, Flowers, and Developing Watermelons
Proper vine management and pollination are the secrets to a bountiful harvest. As your plants begin to stretch out, you must decide how to guide their growth for the best results.
Decide whether to let vines trail across the ground or grow on a sturdy trellis
Most gardeners allow vines to sprawl across the garden floor, which is the natural way for them to grow. However, if you have limited space, using a vertical watermelon vine support system is a great alternative. You will need a very strong structure to hold the weight of the vines and the heavy fruit.
Protect small fruits with supports when using vertical growing methods
When you grow melons vertically, the fruit needs extra help to stay attached to the vine. You can create simple slings using old pantyhose or soft fabric strips tied to the trellis. This prevents the heavy melons from snapping the stems as they grow larger.
Understand male and female flowers and the role of pollinators
Successful watermelon pollination depends on the activity of bees moving between different types of blooms. Male flowers appear first and provide the necessary pollen. Female flowers are easy to identify because they have a small, swollen ovary that looks like a tiny melon at the base of the bloom.
Attract bees with flowering plants and avoid spraying during bloom
You can encourage more bees to visit your garden by planting colorful flowers nearby. It is vital to avoid using any insecticides while your plants are in bloom. These chemicals can harm the pollinators that your crop needs to produce fruit.
Hand-pollinate flowers when insect activity is low
If you notice very few bees in your garden, you may need to step in and help. Take a small, soft paintbrush and gently collect pollen from the center of a male flower. Then, carefully rub the brush inside the female flower to ensure fertilization occurs.
Place developing melons on boards, straw, or mulch to prevent rot
Melons resting directly on damp soil are prone to rot and insect damage. Placing a small board, a layer of straw, or organic mulch under each fruit keeps it dry and clean. This simple step helps the rind develop evenly and protects the bottom of the melon from moisture.
Limit overcrowding only when plants produce more fruit than they can support
Sometimes a healthy vine will try to grow more melons than it can actually ripen. If you see too many small fruits, you might choose to remove the weakest ones. This allows the plant to focus its energy on producing a few high-quality, sweet watermelons instead of many small ones.
Prevent Common Watermelon Pests and Diseases
Protecting your vines from unwanted visitors is a key step in successful fruit production. By staying observant, you can catch issues early before they compromise your entire harvest.
Identify cucumber beetles, aphids, squash bugs, and spider mites
Several insects may target your patch, and knowing the signs helps you act quickly. Common watermelon pests often leave behind specific clues that reveal their presence:
- Cucumber beetles: Look for yellow-striped or spotted insects that chew holes in leaves and flowers.
- Aphids: These tiny pests cause distorted, curled leaves and leave behind a sticky substance called honeydew.
- Squash bugs: You might notice wilting vines or clusters of bronze-colored eggs on the undersides of leaves.
- Spider mites: These pests create fine webbing between leaves, often leading to yellowing or speckled foliage.
Use row covers, handpicking, and targeted treatments for insect control
Prevention is your first line of defense against hungry insects. Using floating row covers on young plants provides a physical barrier that keeps beetles and bugs away during the vulnerable early stages of growth.
If you spot a few insects, handpicking them off the leaves is an effective, chemical-free solution. For larger infestations, apply targeted treatments like insecticidal soaps or neem oil, ensuring you follow label instructions carefully to protect beneficial pollinators.
Spot powdery mildew, downy mildew, anthracnose, and fusarium wilt
Beyond insects, various watermelon diseases can threaten the health of your vines. These fungal and bacterial issues often thrive in humid conditions or stressed plants.
Improve air circulation and keep foliage dry when possible
Fungal spores love moisture, so watering at the base of the plant is essential. Avoid overhead irrigation that wets the leaves, as this creates the perfect environment for mildew to spread.
Remove severely affected plant material and rotate planting locations
If you notice yellowing, spots, or sudden wilting, act immediately. Prune away infected leaves or vines to stop the spread, and never compost this material. Rotating your planting site each year helps break the life cycle of soilborne pathogens.
Use garden sanitation and crop rotation to reduce recurring problems
Maintaining a clean garden is vital for long-term success. Clear away weeds and debris at the end of the season to eliminate hiding spots for pests. By practicing consistent crop rotation and keeping your garden tidy, you significantly lower the risk of recurring watermelon diseases.
Tell When Watermelons Are Ripe
Knowing exactly when to harvest watermelon is the secret to enjoying the sweetest fruit from your garden. While it might seem like a guessing game, your plants provide several clear signals that indicate the fruit has reached its peak maturity.
Check the underside field spot for a creamy yellow color
The most reliable indicator of a ripe melon is the ground spot, also known as the field spot. As the fruit matures against the soil, the area in contact with the ground changes from a pale white or greenish tint to a rich, creamy yellow. If this spot remains white or light green, the melon likely needs more time to develop its full sugar content.
Look for a drying tendril and a duller rind near the stem
Examine the small, curly tendril located closest to where the watermelon stem attaches to the vine. When the fruit is ready, this tendril usually turns brown and dries up completely. Additionally, the rind of a ripe melon often loses its shiny, waxy appearance and takes on a duller, matte finish.
Use the tapping sound as one clue rather than the only ripeness test
Many gardeners tap their melons to listen for a hollow sound, but this method can be misleading. Because sound varies significantly between different cultivars, you should never rely on it as your sole indicator. Instead, treat the sound as just one piece of evidence in your overall assessment.
Track days from fruit set or the variety’s expected maturity window
Keep a garden journal to note when the fruit first sets on the vine. Most seed packets provide an expected maturity window, which serves as a helpful baseline for your harvest schedule. By combining this timeframe with your visual observations, you can narrow down the window for the perfect pick.
Compare several signs before cutting the melon from the vine
The best approach is to evaluate all these indicators together before you decide when to harvest watermelon. If the field spot is yellow, the tendril is brown, and the rind looks dull, your fruit is likely ready to enjoy. Taking a moment to verify these signs ensures you do not pick your crop too early or leave it on the vine for too long.
Harvest, Store, and Enjoy a Sweet Watermelon Crop
After months of careful tending, your garden is finally ready to provide a sweet and refreshing treat. Knowing the right techniques for gathering your crop is essential for maintaining quality. Learning how to store watermelon properly will help you enjoy your harvest for as long as possible.
Cut ripe watermelons from the vine with clean pruners
When you are ready to harvest, use a pair of sharp, clean garden pruners. Snip the stem about an inch away from the fruit rather than pulling or twisting the melon off the vine. This clean cut helps prevent damage to the rind and keeps the plant healthy.
Handle fruit carefully to prevent bruising and rind damage
Watermelons are heavy and can bruise easily if dropped or handled roughly. Always support the bottom of the melon with both hands when lifting it from the garden bed. Place the fruit gently into a basket or container to avoid any nicks or cracks in the outer skin.
Store whole melons at room temperature briefly or refrigerate them for longer freshness
You can keep an uncut, undamaged melon at room temperature for a few days if you plan to eat it quickly. If you need to keep it longer, move the fruit to a cool, dark place or the refrigerator. Understanding how to store watermelon correctly ensures the flesh stays crisp and sweet.
Refrigerate cut watermelon in a covered container
Once you slice into your melon, the clock starts ticking on its freshness. Place any leftover pieces into an airtight, covered container before putting them in the fridge. This prevents the fruit from drying out or absorbing other odors from your refrigerator.
Save seeds only from suitable open-pollinated varieties
If you want to save seeds for next year, make sure you started with an open-pollinated variety. Hybrid watermelons often do not produce fruit that matches the parent plant. Simply scoop out the mature seeds, rinse them, and let them dry completely before storage.
Use leftover vines and damaged fruit responsibly in the garden
After the harvest is complete, you can clear your garden beds. Healthy vines are excellent additions to your compost pile. If you find any damaged or overripe fruit, these can also be composted to return nutrients to your soil for the next growing season.
Keep Improving Your Watermelon Harvest Each Season
Growing delicious fruit is a journey that evolves with every passing year. You can master the art of the sweet watermelon harvest by keeping a detailed garden journal. Record specific variety names, planting dates, and local weather patterns to track what works best in your unique soil.
Note your watering schedules, pest control efforts, and the final results of each crop. These observations provide the best watermelon harvest tips for your specific garden space. You will soon see how warm soil, full sun, and steady moisture create the perfect environment for your vines.
Use your notes to refine your spacing, irrigation methods, and variety choices for the next planting cycle. Small adjustments based on past performance lead to more dependable yields. Your commitment to learning from each season ensures that your garden remains a productive source of fresh, flavorful fruit for years to come.