Crochet Penguin: A Cute and Easy Amigurumi Penguin Pattern for Beginners
A tiny crochet penguin is a lovely project for anyone who enjoys making cute handmade toys. With a round body, soft white belly, little wings, yellow beak, and tiny feet, this adorable penguin is perfect for beginners, gifts, keychains, and handmade decorations.
What Makes This Crochet Penguin So Special?
This crochet penguin is designed with a cute, round shape and a simple color combination. Its small body makes it an enjoyable project that does not require a large amount of yarn.
The penguin has a colorful head and back, a soft white belly, two little wings, a small yellow beak, and matching yellow feet. You can make it in different colors, such as pink, blue, purple, or classic black and white.
The finished penguin looks sweet and cheerful. You can make a pair of penguins in different colors or create a whole collection of tiny crochet birds.
This project is also a wonderful way to use leftover yarn from other crochet projects.
Materials Needed to Make a Crochet Penguin
Before starting, prepare all your crochet materials. Having everything ready makes the process easier and helps you enjoy each step.
Yarn: You will need soft cotton or acrylic yarn in three main colors. Choose pink, blue, or black for the main body, white or cream for the belly, and yellow for the beak and feet. You will only need small amounts of the contrast colors.
Crochet Hook: A 2.5 mm or 3 mm crochet hook works well with many lightweight yarns. Choose a hook that creates tight stitches so the stuffing does not show through.
Stuffing: Use soft polyester fiberfill to give your penguin a round and fluffy shape.
Safety Eyes: Small black safety eyes give the penguin a cute expression. You can also use black embroidery thread to sew the eyes.
Yarn Needle: A yarn needle is useful for sewing the wings, belly, feet, and other small pieces.
Stitch Marker: Use a stitch marker to mark the beginning of each round when working in continuous circles.
Scissors: Keep a small pair of scissors nearby for cutting yarn and trimming loose ends.
Crochet Stitches and Techniques You Should Know
This crochet penguin uses simple amigurumi techniques. If you already know basic crochet stitches, you can follow the steps without much difficulty.
Single crochet (sc) is the main stitch used to create the body and other small pieces. It makes a tight fabric that holds the stuffing inside.
A magic ring (MR) is used to start crocheting in a circle without leaving a hole in the center. It is especially useful for making round amigurumi shapes.
Increase (inc) means working two single crochet stitches into the same stitch. This makes the crochet piece wider.
Decrease (dec) means joining two stitches together to reduce the stitch count. Invisible decreases are useful because they create a neat finish.
Slip stitch (sl st) is used to join pieces or finish a round when needed.
You should also know how to sew small crochet pieces together and weave in yarn ends neatly.
Step 1: Crochet the Penguin’s Main Body
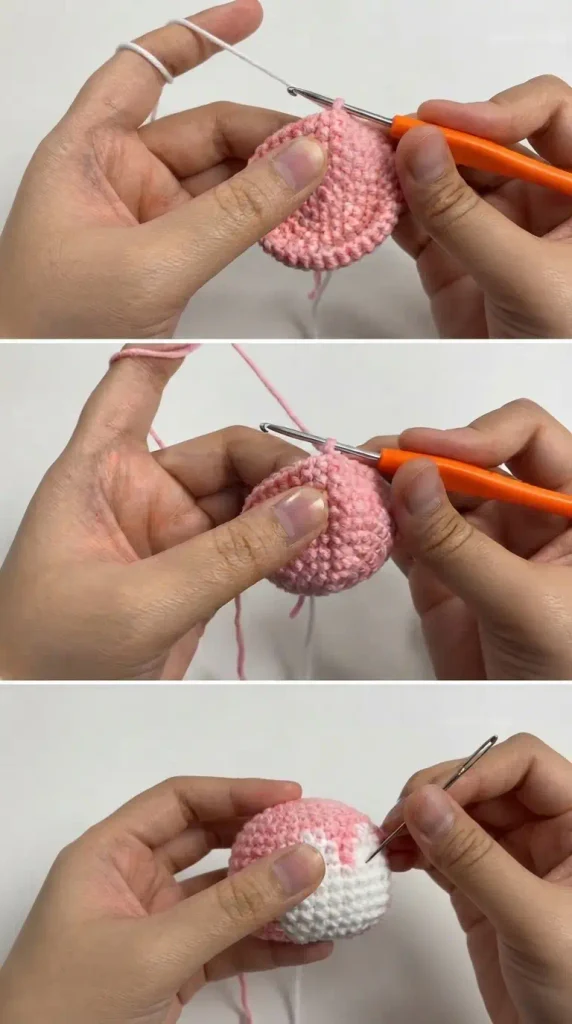
Start by making the main body using your chosen color. You can use pink, blue, or black yarn depending on the style you want.
The head and body are worked as one rounded piece, so you do not need to make separate sections and sew them together.
Begin with a magic ring and work six single crochet stitches into it. Pull the yarn tail to close the center.
For the second round, make an increase in every stitch. You will have 12 stitches.
For the third round, work one single crochet followed by an increase. Repeat this pattern around to make 18 stitches.
For the fourth round, work two single crochet stitches followed by an increase. Repeat around to make 24 stitches.
For the fifth round, work three single crochet stitches followed by an increase. Repeat around to make 30 stitches.
For the sixth round, work four single crochet stitches followed by an increase. Repeat around to make 36 stitches.
Continue crocheting six rounds of 36 single crochet stitches without increasing. This creates the rounded middle section of the penguin.
Next, begin decreasing to shape the lower part of the body. Work four single crochet stitches followed by a decrease around the round. Continue with three single crochet stitches and a decrease, then two single crochet stitches and a decrease.
Start adding fiberfill stuffing before the opening becomes too small. Add small amounts at a time and spread the stuffing evenly.
Continue decreasing until only a small opening remains. Finish the body with a neat closure.
Helpful tip: Do not overstuff the body. Too much stuffing can stretch the stitches and make the penguin lose its smooth, rounded shape.
Step 2: Make the White Penguin Belly
The white belly is one of the cutest features of this little penguin. It creates a lovely contrast against the colorful body.
Use white or cream yarn to crochet a small oval-shaped piece.
Start with a chain of six stitches. Work single crochet stitches along one side of the chain. At the end, make three single crochet stitches into the last chain to turn around the end.
Continue working single crochet stitches along the other side of the chain. Make two increases around the opposite end to create a rounded oval.
Work another round of single crochet stitches around the oval. Add increases where needed to keep the shape flat.
The belly should be wide enough to cover the front of the penguin without reaching too far around the sides.
Once you are happy with the size, fasten off and leave a long yarn tail for sewing.
Place the white belly in the center of the front of the body. Use pins to hold it in position before sewing.
Sew around the edge using a yarn needle. Keep your stitches small and even so the belly sits neatly against the body.
Helpful tip: Make sure the belly is centered before sewing. A slightly uneven belly can change the appearance of the finished penguin.
Step 3: Crochet the Two Small Wings
The penguin needs two little wings on its sides. These pieces are easy to make and give the toy its recognizable bird-like appearance.
Use the same yarn color as the main body.
Start with a magic ring and make six single crochet stitches inside it. Pull the ring closed.
Work one increase in every stitch to create 12 stitches.
Continue with one or two rounds of single crochet stitches. This creates a small rounded shape.
You can gently flatten the piece and sew the opening closed, or lightly stuff it if you want the wings to look fuller.
Make a second wing using the same instructions.
Place the wings on the left and right sides of the body. Position them slightly below the head area and near the upper part of the white belly.
Sew both wings securely using a yarn needle.
Try to keep them at the same height so your penguin looks balanced.
Helpful tip: Do not make the wings too large. Small rounded wings look especially cute on a tiny amigurumi penguin.
Step 4: Make the Tiny Yellow Beak
The little yellow beak gives your crochet penguin its sweet facial expression.
Take a small amount of yellow yarn and make a tiny triangle-shaped or oval-shaped piece.
One easy method is to start with a magic ring and crochet a few single crochet stitches into it. Add one or two increases to make a small rounded shape.
Fasten off and leave a long tail for sewing.
Place the beak in the center of the white face area, between the two eyes. Sew it carefully using a yarn needle.
You can also embroider a tiny horizontal yellow beak directly onto the body with yellow yarn.
Keep the beak small because a large beak can cover too much of the white face area.
Step 5: Add the Black Eyes
The eyes give your penguin its adorable personality.
Use two small black safety eyes and place them on either side of the beak. Make sure they are at the same height and have a little space between them.
If you are using safety eyes, attach them securely before closing the body completely, following the manufacturer’s instructions.
For toys intended for babies or young children, embroidered eyes are a safer option because small plastic parts can become choking hazards if they come loose.
Use black embroidery thread to make two small round eyes. Keep the stitches neat and secure.
You can also add tiny white embroidered highlights if you want a different facial style, although simple black eyes already look very cute.
Step 6: Crochet the Yellow Feet
The yellow feet are another small detail that makes the penguin look complete.
Use yellow yarn to make two tiny flat or rounded pieces.
Start with a magic ring and crochet a few single crochet stitches inside. Add increases to create a small rounded shape.
Work one additional round if you want slightly larger feet. Flatten the pieces gently before fastening off.
Make sure both feet are approximately the same size.
Position them at the bottom of the penguin’s body, one on each side. Sew them securely using the yarn needle.
You can leave a small part of each foot visible from the front. This creates a cute standing-penguin appearance.
Helpful tip: Keep the feet small and close together. This helps maintain the rounded shape of the body.
Step 7: Assemble and Finish Your Crochet Penguin
Now it is time to bring all the pieces together.
Check that the white belly is centered and both wings are positioned evenly. Make sure the beak is in the middle of the face and the eyes are properly aligned.
Secure all the attached pieces with small, neat stitches.
Use your yarn needle to weave in any remaining loose ends. Pull the yarn gently and hide the ends inside the body whenever possible.
Check the bottom of the penguin to make sure the feet are firmly attached.
Gently shape the body with your hands to distribute the stuffing evenly.
Your adorable little crochet penguin is now ready!
Easy Color Ideas for Your Crochet Penguin
One of the best things about this pattern is that you can experiment with different yarn colors.
Pink and White Penguin: Use soft pink yarn for the head, back, and wings. Add a white belly and yellow beak and feet. This combination creates a sweet and gentle look.
Blue and White Penguin: Choose light blue yarn for the main body and wings. Combine it with a white belly and yellow details for a fresh, cheerful appearance.
Classic Black and White Penguin: Use black yarn for the body and wings, with a white belly and yellow beak and feet. This gives your penguin a traditional look.
Pastel Rainbow Penguins: Try lavender, mint green, peach, or baby pink. Making several penguins in different pastel shades is a lovely idea for a handmade collection.
Common Mistakes to Avoid When Crocheting a Penguin
One common mistake is using a crochet hook that is too large. This can leave gaps between stitches and allow stuffing to show through. Choose a smaller hook if your stitches look too loose.
Another mistake is adding too much stuffing. A firmly stuffed body should feel soft but should not stretch the stitches. Add stuffing gradually to keep the shape even.
Uneven facial placement can also change the appearance of your penguin. Before attaching the eyes and beak, take a moment to check their positions from the front.
Do not forget to count your stitches. Missing an increase or decrease can make the body look uneven. Use a stitch marker and check each round as you work.
Finally, make sure every small piece is securely attached. This is particularly important if the penguin will be used as a toy.
Useful Tips for a Neat Crochet Penguin
Keep your yarn tension consistent throughout the project. Tight and even stitches help create a smooth body and make the finished toy look more professional.
Use invisible decreases whenever possible. They help keep the lower part of the body neat without leaving noticeable gaps.
Choose soft yarn that feels comfortable to touch. Cotton and acrylic yarn are both useful choices for small amigurumi projects.
Always check the size of your belly before sewing it onto the body. You can adjust the oval by adding or removing a round to suit your penguin.
Take your time when attaching the facial details. Small changes in eye spacing and beak placement can make a big difference to the final expression.
How to Care for Your Handmade Crochet Penguin
A handmade crochet penguin needs gentle care to keep its shape and appearance.
If the yarn label allows it, you can hand-wash the toy in cool or lukewarm water with a mild detergent. Avoid rubbing or twisting it too much.
Press out excess water gently using a clean towel. Allow the penguin to air-dry completely on a flat surface.
Avoid hanging it while wet because this can stretch the crochet stitches.
Keep your finished penguin away from sharp objects and rough surfaces that may pull the yarn or damage the stitches.
Creative Ways to Use Your Crochet Penguin
Your finished crochet penguin can be used in many different ways.
Make a small collection of colorful penguins and display them on a shelf or desk. Their cute round shapes make them lovely handmade decorations.
You can also turn a slightly larger penguin into a soft decorative toy for a bedroom or nursery. Always choose age-appropriate materials and secure construction when making toys for children.
Small versions can be used as bag decorations or keychains by attaching suitable hardware securely. Make sure the finished size and attachments are appropriate for the intended use.
Crochet penguins also make thoughtful handmade gifts for friends and family. A pair of pink and blue penguins can be especially sweet as a matching gift.
Final Thoughts
Making a crochet penguin is a fun and rewarding project, especially if you enjoy creating small amigurumi animals. Its round body, white belly, tiny wings, yellow beak, and little feet make it a charming handmade toy.
You can follow the basic steps and experiment with different colors, sizes, and facial expressions. Take your time with the shaping and sewing, and pay attention to the small details.
Whether you make one penguin as a gift or create a whole collection in different pastel colors, this little crochet project is a lovely way to enjoy your creativity and use your leftover yarn.