Crochet Earflap Hat Pattern Free – Cozy Handmade Winter Hat
Stay warm and cozy with this beautiful crochet earflap hat pattern. This hat features a soft, textured design, comfortable earflaps, and long braided ties finished with playful tassels. It is a lovely winter project for beginners and experienced crocheters alike.
What Is a Crochet Earflap Hat?
A crochet earflap hat is a warm winter hat designed to cover the head and protect the ears from cold weather. Unlike a regular beanie, it has extra sections that extend down over both ears. These sections help provide additional warmth and comfort on chilly days.
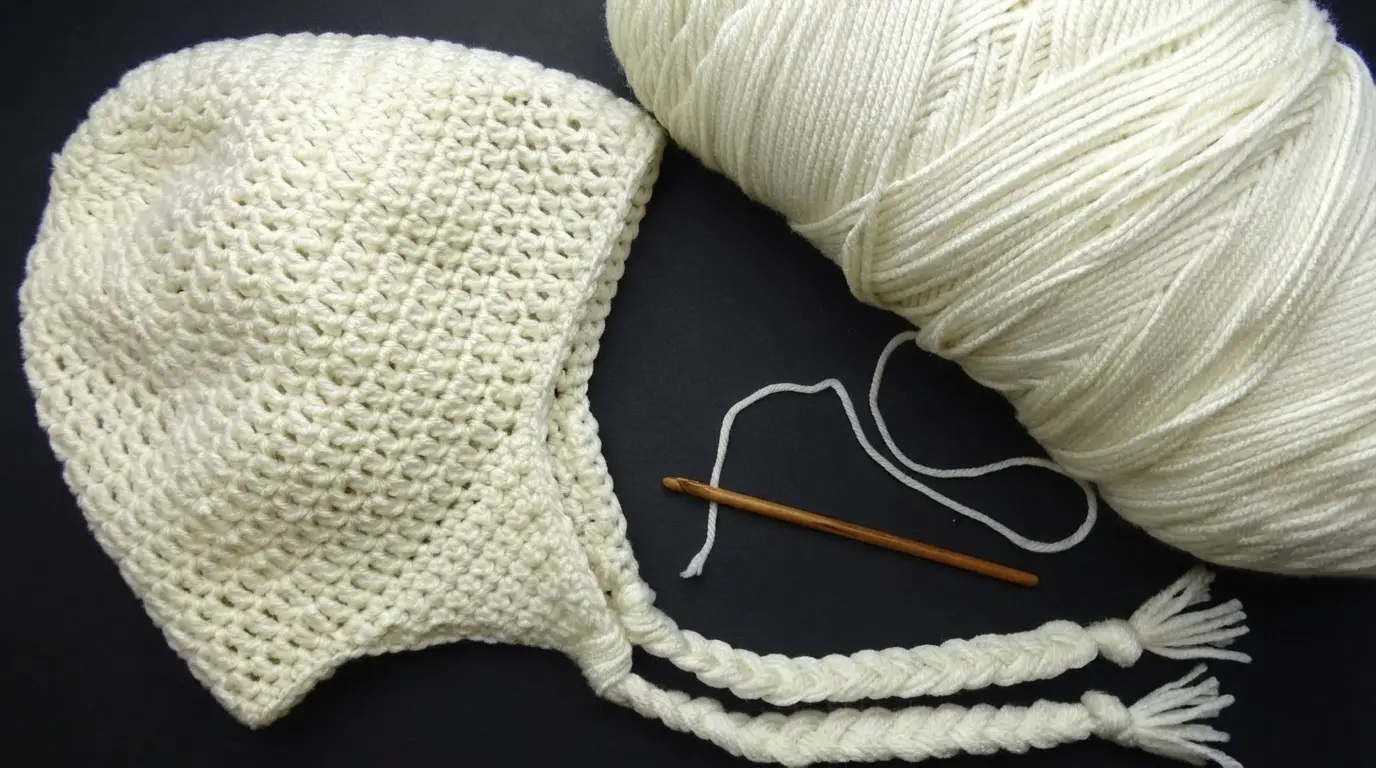
This crochet earflap hat has a simple, rounded shape with a soft, slightly textured stitch pattern. The two earflaps extend from the lower sides, and long braided ties hang from each flap. Small tassels at the ends give the hat a sweet handmade finish.
You can make this hat in cream, white, brown, gray, pink, or any color you like. It is also a thoughtful handmade gift for family and friends during the winter season.
Materials Needed
You do not need many supplies to make this crochet earflap hat. Most of the materials are easy to find at a local craft store.
Yarn: Choose a soft medium-weight yarn, also called worsted-weight or category 4 yarn. Acrylic yarn is an affordable choice, while wool or a wool blend can provide extra warmth. A soft cream yarn creates a classic winter look.
Crochet Hook: A 5 mm crochet hook is a good starting point for medium-weight yarn. You may need a different hook size to achieve the correct gauge.
Scissors: Use sharp scissors to cut the yarn when finishing the hat and making the tassels.
Yarn Needle: A yarn needle helps weave in loose ends and tidy the finished project.
Stitch Markers: These are useful for marking the beginning of rounds and keeping the earflaps evenly positioned.
Measuring Tape: Use a measuring tape to check the head circumference and hat length.
Crochet Stitches and Abbreviations
This pattern uses simple stitches that are suitable for beginners who already know how to make basic crochet stitches.
Here are the abbreviations used in the pattern:
- ch: Chain
- sl st: Slip stitch
- sc: Single crochet
- hdc: Half double crochet
- hdc2tog: Half double crochet two stitches together
- st: Stitch
- sts: Stitches
- rnd: Round
The main body uses half double crochet stitches to create a soft and slightly textured fabric. The earflaps use the same stitch with gradual decreases to create their shape.
Before You Start
This pattern is written for an average adult head circumference of approximately 21–23 inches. You can adjust the size by changing the number of increase rounds and the length of the hat.
For the best fit, measure around the widest part of the head, just above the eyebrows and ears. A finished hat should usually have a little negative ease, meaning it should be slightly smaller than the head measurement so it stays comfortably in place.
Work a small gauge swatch before beginning. Aim for approximately 14 half double crochet stitches and 10 rows in 4 inches, although your personal yarn and tension may change this measurement.
Step-by-Step Crochet Earflap Hat Pattern
Step 1: Make the Crown
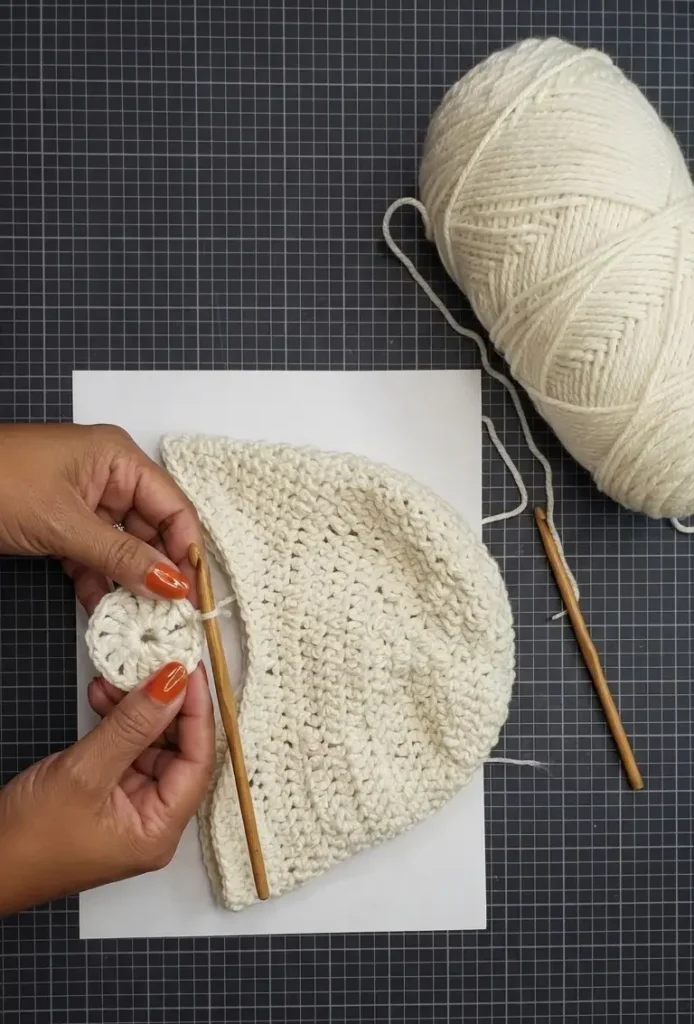
Start with a magic ring. If you find the magic ring difficult, you can chain 4 and join with a slip stitch to make a small circle.
Chain 2. Work 10 half double crochet stitches into the ring. Join with a slip stitch to the first stitch.
For the next round, chain 2 and work 2 half double crochet stitches into each stitch around. You should have 20 stitches.
For round 3, chain 2 and work 1 half double crochet in the first stitch, followed by 2 half double crochet stitches in the next stitch. Repeat this sequence around. You should have 30 stitches.
For round 4, work 1 half double crochet in each of the next 2 stitches, then 2 half double crochet stitches in the following stitch. Repeat around. You should have 40 stitches.
Continue increasing evenly in this way until the crown measures approximately 6.5–7 inches across, or until it reaches the diameter needed for your chosen size.
Keep your increases evenly spaced. If the crown begins to curl upward, it may need more increases. If it becomes wavy, you may be adding too many.
Step 2: Crochet the Main Hat Body
Once the crown reaches the correct width, stop increasing.
Chain 2 and work 1 half double crochet in every stitch around. Join each round with a slip stitch.
Continue working even rounds until the hat measures approximately 7–7.5 inches from the center of the crown to the bottom edge.
Try the hat on as you work. It should cover the top and sides of your head comfortably without feeling too tight.
For a slightly longer winter hat, you can add another round or two. For a shorter fit, stop earlier.
Keep the stitches even so the finished fabric looks neat and consistent.
Step 3: Mark the Earflap Positions
Lay the hat flat with the crown facing upward.
Find the two opposite sides of the hat where the earflaps should sit. The flaps should be positioned evenly on both sides, covering the ears when the hat is worn.
Use stitch markers to mark the starting and ending stitches for each earflap.
For an average adult size, you can begin with approximately 14 stitches for each earflap. The exact number may change depending on your hat size and stitch count.
Make sure both earflaps are positioned symmetrically. This small step makes a big difference in the final appearance.
Step 4: Crochet the First Earflap
Join the yarn at the first marked position.
Chain 2 and work 1 half double crochet into each of the next 14 stitches.
Turn your work and chain 2.
For the next row, work a half double crochet decrease at the beginning, then continue with half double crochet stitches until two stitches remain. Work another half double crochet decrease across the final two stitches.
Turn and repeat the process.
Continue decreasing one stitch at each end of every row until only a few stitches remain. Finish with a single stitch and fasten off.
The earflap should have a gently tapered shape, becoming narrower toward the bottom.
Step 5: Make the Second Earflap
Join the yarn at the second marked position.
Repeat exactly the same process used for the first earflap.
Try to keep the number of rows and decreases the same on both sides. This will help the hat look balanced and ensure that both earflaps provide similar coverage.
After completing the second earflap, check the overall shape. Both sections should extend down over the ears without pulling the main body of the hat out of shape.
Step 6: Add a Neat Bottom Border
A simple border gives the hat a more finished appearance.
Attach the yarn anywhere along the bottom edge. Chain 1 and work single crochet stitches evenly around the entire lower edge, including the earflaps.
Work carefully around the pointed ends so the border stays smooth. Avoid adding too many stitches in one place, as this can make the edge wavy.
Join with a slip stitch and fasten off.
You can add another round of single crochet if you want a slightly thicker edge.
Step 7: Make the Braided Earflap Ties
The long braided ties are a lovely feature of this hat. They help hold the hat securely in place and add a decorative touch.
Cut several strands of yarn, each approximately 30–36 inches long. Fold them in half and attach them securely to the bottom point of one earflap.
Separate the yarn strands into three equal groups. Braid the groups together, keeping the tension even as you work.
Continue braiding until the tie reaches your preferred length. Tie a secure knot at the end.
Repeat the same process on the second earflap.
Check that both braids are approximately the same length. You can make them longer or shorter depending on your preference.
Step 8: Add Small Yarn Tassels
To finish the ties, make a small tassel at the end of each braid.
Cut several equal lengths of yarn. Fold them together and attach them securely just above the knot at the end of the braid.
Wrap another short strand around the top of the tassel to create a neat rounded shape. Tie it securely and weave the loose end inside the tassel.
Trim the bottom strands evenly with scissors.
Repeat for the other side.
The tassels should look full but not too heavy. A smaller tassel works especially well with a simple, textured hat.
Step 9: Finish and Check Your Hat
Use a yarn needle to weave in all loose ends. Check the earflaps, braided ties, and tassels to make sure everything is secure.
Look over the stitches and gently stretch the hat to check its fit.
If necessary, lightly block the hat according to the yarn care instructions. Acrylic yarn should not be exposed to excessive heat, so always follow the manufacturer’s recommendations.
Your crochet earflap hat is now ready to wear!
How to Customize Your Crochet Earflap Hat
One of the best things about this pattern is that you can change the design without making the project complicated.
For a classic winter look, choose cream, ivory, or soft gray yarn. These colors look lovely with the simple stitch texture and braided ties.
If you want something playful, try pastel pink, lavender, mint green, or light blue. You can also use two different colors for the main hat and the earflaps.
Another idea is to add a fluffy pom-pom to the top of the hat. You can make it from matching yarn or choose a contrasting color for a little extra personality.
For a warmer and thicker hat, choose a soft wool blend and check your gauge before starting. Remember that thicker yarn will change the finished size, so you may need to adjust your hook and stitch count.
Helpful Tips for Beginners
Keep your stitches relaxed and consistent while crocheting. Very tight stitches can make the hat stiff and uncomfortable, while loose stitches may leave large gaps that allow cold air through.
Use a stitch marker at the beginning of every round. It is easy to lose track of the first stitch when working in joined rounds, especially when making the crown.
Measure the crown before moving on to the body. The crown width determines how comfortably the hat will fit, so it is better to check it early than discover that the finished hat is too large or too small.
Pay special attention to the earflaps. They should be the same size and positioned evenly on opposite sides of the hat. Counting your rows will help you achieve a matching pair.
When making the braids, use yarn strands of equal length and keep a similar tension throughout. This gives both ties a neat and balanced appearance.
Always secure the yarn properly when attaching the ties and tassels. These parts may receive pulling when the hat is worn, so loose knots can come undone over time.
How to Choose the Best Yarn
The yarn you choose can change the feel and appearance of your finished hat.
Acrylic yarn is a good option for everyday winter accessories. It is usually affordable, comes in many colors, and is easy to care for.
Wool yarn is another lovely choice because it provides natural warmth. However, some wool yarns can feel itchy, so choose a soft variety if the hat will be worn directly against the skin.
Cotton yarn can create a neat stitch pattern, but it usually has less elasticity and may not provide as much warmth as wool or acrylic. For a cozy winter hat, a soft medium-weight acrylic or wool blend is generally a practical choice.
How to Care for Your Crochet Earflap Hat
Proper care helps your handmade hat stay beautiful for a long time.
Check the yarn label before washing. Many acrylic yarns can be washed gently, while some wool yarns require hand washing.
Use cool or lukewarm water and a mild detergent when hand washing is recommended. Avoid twisting or squeezing the hat too hard because this can stretch the stitches and change the shape.
Lay the hat flat on a clean towel to dry. Reshape the crown, earflaps, and braids while the hat is still damp.
Store it in a clean, dry place when it is not being used. Avoid hanging it by the braided ties, as the extra weight may stretch them.
Frequently Asked Questions
Is this crochet earflap hat pattern suitable for beginners?
Yes. This pattern uses basic crochet stitches, including single crochet and half double crochet. Beginners who understand how to increase and decrease stitches should be able to follow the steps with a little practice.
How much yarn do I need?
The amount depends on the yarn weight, hook size, and finished hat size. For an average adult hat, approximately 150–200 grams of medium-weight yarn is a reasonable amount to prepare, including the ties and tassels. Larger sizes or thicker yarn may require more.
Can I make this hat for a child?
Yes. You can make a smaller version by reducing the crown diameter and the length of the hat body. Measure the child’s head before starting and adjust the earflaps to cover the ears comfortably.
Can I make the earflap ties shorter?
Of course. You can adjust the braid length to suit your preference. Shorter ties create a simple look, while longer braids give the hat a more playful winter style.
Can I use a different crochet stitch?
Yes. Half double crochet creates a soft, textured fabric, but you can use single crochet or another suitable stitch. Remember that changing the stitch will affect the gauge and finished measurements.
Final Thoughts
This crochet earflap hat pattern free is a lovely project for creating a warm, comfortable, and beautiful winter accessory. The simple rounded shape, textured stitches, tapered earflaps, braided ties, and little tassels give it a charming handmade finish.
Whether you make it for yourself, a child, or someone special, you can customize the colors and measurements to create a hat that feels just right. Grab your favorite yarn and crochet hook, follow the steps, and enjoy making your own cozy earflap hat!