Crochet Sleeves: A Beautiful Open-Mesh Sleeve Topper for Everyday Style
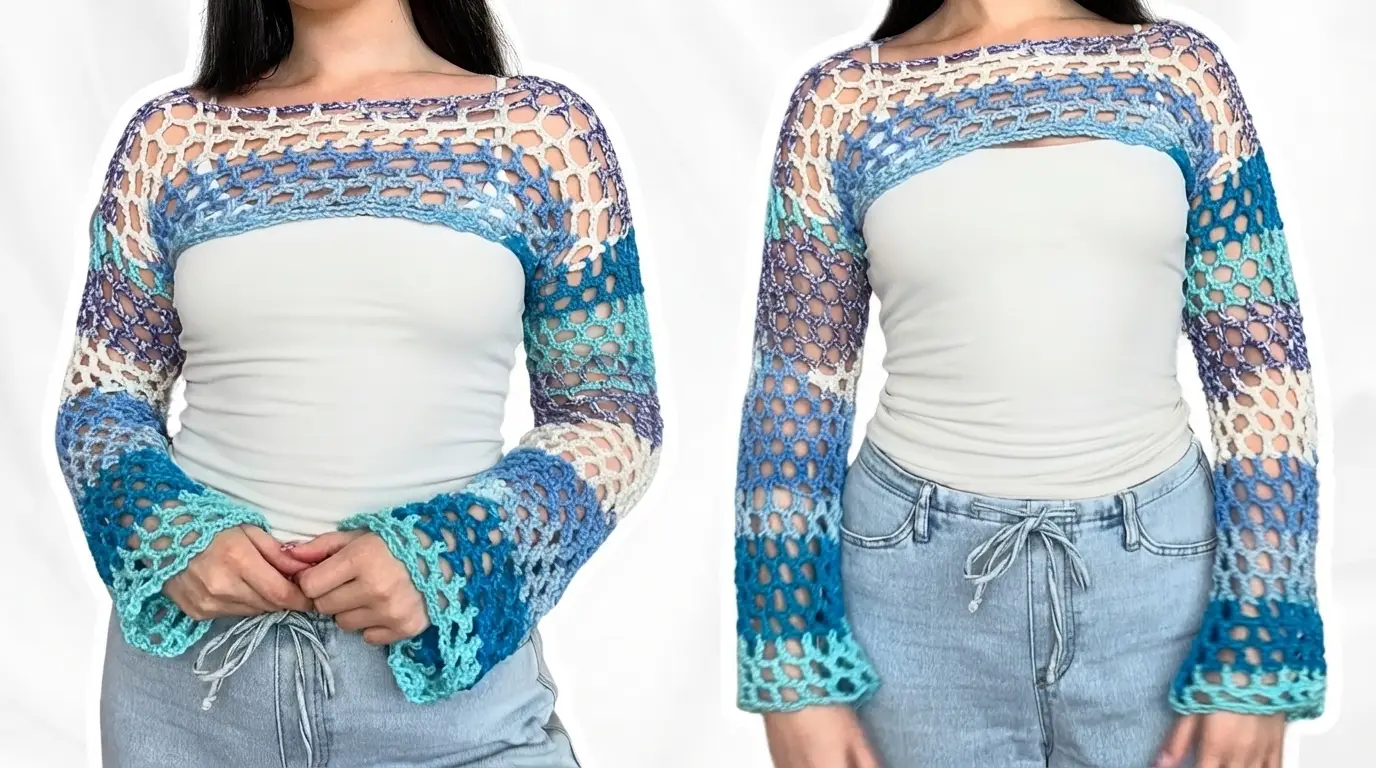
Crochet sleeves are a lovely way to add color, texture, and personality to a simple outfit. This beautiful open-mesh design features long flared sleeves, a wide shoulder neckline, and a mix of blue, turquoise, purple, and cream yarn. It is a stylish handmade layer that you can customize to your favorite colors and size.
What Are Crochet Sleeves?
Crochet sleeves are handmade sleeve coverings that can be worn over a basic top, dress, or sleeveless outfit. They are a wonderful choice when you want to add something special to everyday clothing without wearing a heavy sweater.
This design has a lightweight, open-mesh texture that allows plenty of airflow. It covers the shoulders, upper chest, back, and arms while leaving the middle of the body open. This makes it look like a delicate crochet shrug or sleeve topper.
The long sleeves have a slightly loose shape and flared cuffs. The colorful yarn creates beautiful changes between blue, turquoise, purple, and cream sections. These colors give the finished piece a playful but elegant appearance.
You can wear it with a fitted tank top, plain T-shirt, or simple dress. It is also a lovely handmade gift for someone who enjoys colorful and creative clothing.
Materials You Will Need
Before starting your crochet sleeves, prepare all the materials you need. Choosing the right yarn and hook will help you create a comfortable garment with an attractive mesh pattern.
Yarn: Choose lightweight yarn such as fingering, sport, or light DK weight. A soft cotton blend, acrylic blend, or cotton yarn can work well. Select a color-changing yarn with blue, turquoise, purple, and cream shades if you want a similar colorful appearance.
Crochet Hook: Use the hook size recommended on your yarn label as a starting point. A slightly larger hook can help create a more open mesh, but always make a small sample before deciding.
Scissors: Keep a sharp pair of scissors nearby for cutting yarn and trimming loose ends.
Yarn Needle: A blunt yarn needle is useful for joining pieces and hiding loose yarn ends.
Stitch Markers: These help you mark important places, especially the sleeve openings, shoulder sections, and joining points.
Measuring Tape: Use it to measure your arm length, upper arm, wrist, shoulder width, and desired neckline.
Crochet Techniques Used in This Design
You do not need to know many complicated stitches to make this beautiful garment. A few basic crochet techniques are enough to create a lovely open texture.
Chain Stitch (ch): This stitch creates the foundation of your work. It is also used to make the spaces in the mesh pattern.
Slip Stitch (sl st): Slip stitches are useful for joining rounds, connecting pieces, and moving across stitches without adding much height.
Single Crochet (sc): This is a simple stitch that creates a neat and slightly firm fabric. It is useful for cuffs and finishing edges.
Double Crochet (dc): Double crochet creates taller stitches and works beautifully with chain spaces to make an open lace pattern.
Mesh Stitch: This is the main technique for creating the airy appearance. It is made by combining chain stitches and crochet stitches, often using a repeated pattern of double crochet and chain spaces.
Increasing and Decreasing: These techniques help you adjust the sleeve width and create a comfortable shape around the upper arms and wrists.
Understanding the Open-Mesh Pattern
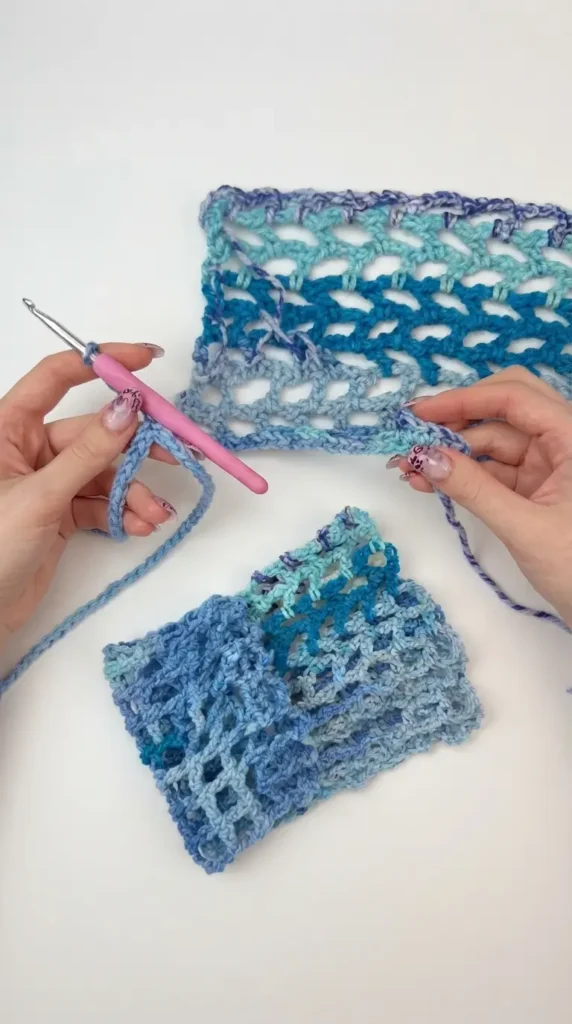
The most noticeable feature of these crochet sleeves is the open-mesh design. Instead of creating a thick fabric with closely packed stitches, the pattern uses spaces between stitches.
A simple mesh pattern can be made by repeating a double crochet stitch followed by one or more chain stitches. The next double crochet is worked into a suitable stitch or chain space from the previous row.
For example, you can begin with a foundation chain and work a row of double crochet stitches. In the next row, alternate double crochet stitches with chain spaces. Continue repeating the pattern to create an even mesh.
You can use smaller chain spaces for a tighter appearance or larger spaces for a more open design. Keep the spacing consistent throughout the garment so that the finished fabric looks balanced.
The mesh should feel soft and flexible rather than stiff. This is especially important because the sleeves need to move comfortably with your arms.
Step-by-Step Guide to Making Crochet Sleeves
This design can be made by creating two sleeves and connecting them with a wide shoulder section. The following method gives you a flexible starting point that you can adjust to your own measurements.
Step 1: Take Your Measurements
Start by measuring your arms and upper body. Good measurements help you create sleeves that fit comfortably without pulling or feeling too loose.
Measure around the widest part of your upper arm, around your wrist, and from your shoulder to your wrist. Also measure across your upper back and shoulders to determine how wide the connecting section should be.
Decide how long you want the sleeves to be. You can make them wrist-length or slightly longer if you want a relaxed, flared finish.
Write down your measurements before starting. Remember that crochet mesh stretches, so avoid making the garment too tight.
Step 2: Make a Small Crochet Sample
Before working on the full garment, create a small sample using your chosen yarn and hook.
Make a few rows of the mesh stitch and check how the fabric looks. Hold it against your arm to see whether the spaces are comfortable and whether the fabric has enough flexibility.
If the mesh looks too tight, try a larger hook. If it looks too loose and loses its shape, use a smaller hook.
Measure your sample to understand how many stitches and rows you need for your desired garment measurements. This small step can save you time later.
Step 3: Start the Sleeve Cuffs
Begin with the lower part of the first sleeve. The cuffs in this design have a loose, slightly flared appearance.
You can create a simple cuff using a few rows of single crochet or work directly in the mesh pattern for a softer finish.
If you want a more structured cuff, make a short band of single crochet stitches. Join the ends to form a ring, making sure the opening is large enough for your hand to pass through comfortably.
Work the sleeve from the cuff toward the upper arm. Alternatively, you can work from the upper arm toward the wrist and finish with a flared cuff.
Step 4: Crochet the First Sleeve
Once the cuff is ready, continue with the open-mesh pattern.
Work your double crochet and chain spaces evenly around the sleeve. Keep checking the width as you move toward the upper arm.
If you want a relaxed fit, make the sleeve slightly wider around the upper arm. You can add increases gradually by working extra stitches into selected sections.
Continue crocheting until the sleeve reaches your desired length. Try it on carefully as you work to check the fit.
The sleeve should allow your arm to bend and move freely. Avoid making the mesh too tight around the elbow or upper arm.
Step 5: Make the Second Sleeve
Repeat the same process to create the second sleeve.
Try to keep both sleeves similar in length and width. If you are using color-changing yarn, the color sections may appear in different places. This is completely fine and can make the finished garment look more interesting.
If you prefer matching sleeves, start both sleeves from similar color sections of the yarn or use separate yarn balls to control the color placement.
Step 6: Create the Shoulder Section
The shoulder section connects the two sleeves and creates the wide neckline seen in this style.
You can crochet this section as a separate rectangular mesh panel or work it directly from the upper edges of the sleeves.
For a separate panel, make a foundation chain based on your shoulder measurement. Work the same mesh pattern in rows until the panel reaches the desired depth.
The panel should extend comfortably across the shoulders and upper chest without feeling tight around the neck.
Once the panel is ready, attach one side to the first sleeve and the opposite side to the second sleeve. Use slip stitches or a yarn needle to join the pieces neatly.
Step 7: Shape the Neckline and Shoulder Edges
After joining the main sections, check the neckline. It should sit comfortably across the shoulders and should not pull backward or forward.
Work a simple finishing row around the neckline using single crochet or slip stitches. This helps make the edge look cleaner and more stable.
Avoid making the neckline border too tight. A tight edge can pull the mesh fabric out of shape and make the garment uncomfortable to wear.
Step 8: Finish the Sleeve Edges
Now check both cuffs and sleeve openings.
If the cuffs need more shape, add a few rows of mesh or single crochet. You can also create a slightly wider edge by adding increases in the final rows.
The flared cuffs are an important part of this style, so keep them soft and relaxed.
Make sure both sleeves have a similar finish. You can add a simple decorative border using the same yarn or a contrasting color.
Step 9: Weave in the Loose Ends
Use a yarn needle to hide all the loose yarn ends. Carefully weave each end through several nearby stitches without pulling the mesh too tightly.
If you have used several colors, take extra care when finishing the yarn changes. Secure the ends properly so that they do not come loose during normal wear.
Trim the remaining yarn only after checking that every end is secure.
Step 10: Check the Fit and Finish
Try on your finished crochet sleeves over a fitted top.
Check that the shoulder section sits comfortably, the neckline does not slip too much, and the sleeves reach the right length.
Move your arms forward, backward, and upward to make sure the garment does not restrict movement.
If necessary, make small adjustments to the cuffs or neckline before wearing it regularly.
How to Choose the Best Colors
Color selection can make a big difference to the final appearance of your crochet sleeves.
For a colorful design, choose a self-striping or variegated yarn that combines several shades. Blue, turquoise, purple, and cream create a beautiful combination that works well with white and light-colored clothing.
You can also make your own color combination using separate yarn balls. For example, alternate cream with light blue, turquoise, and dark purple to