Crochet Beanie Pattern Free: Easy Step-by-Step Guide for a Cozy Ribbed Hat
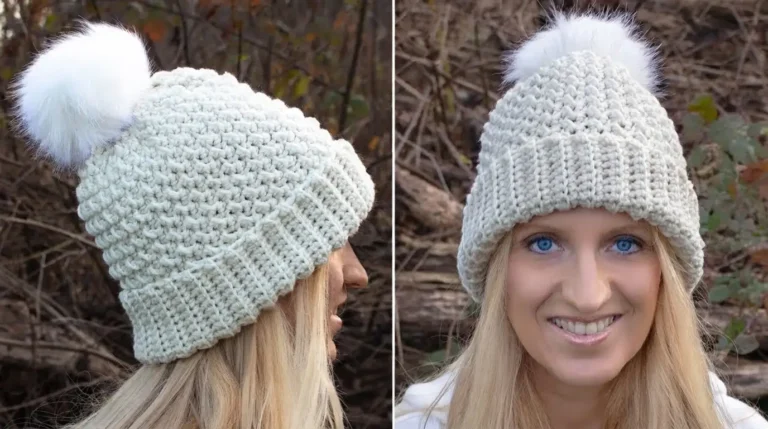
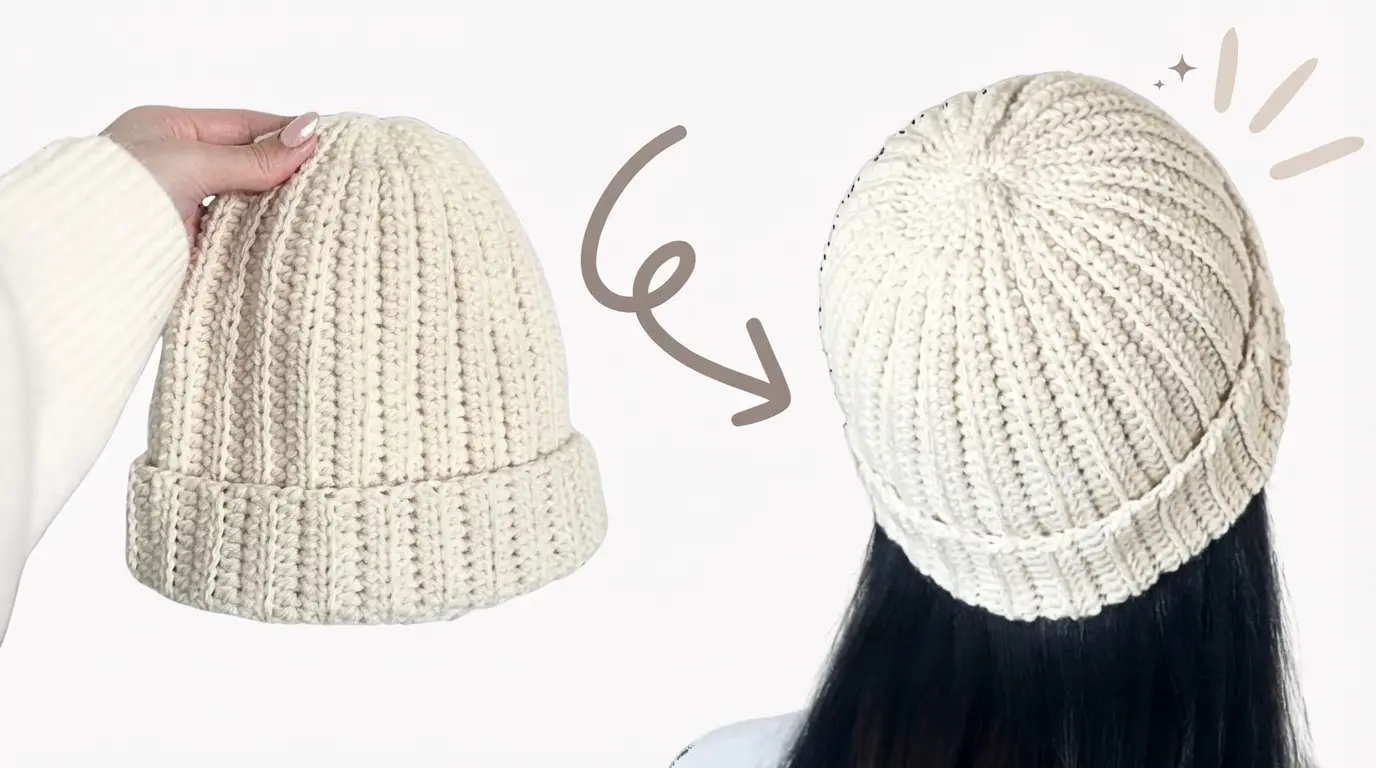
A crochet beanie is a cozy, stylish accessory that you can make at home with basic crochet skills. This free crochet beanie pattern creates a beautiful cream-colored hat with a thick folded brim, soft texture, and a comfortable fit for everyday wear.
What Makes This Crochet Beanie Special?
This crochet beanie pattern free design is perfect for anyone who loves simple, timeless handmade accessories. It features a beautiful ribbed texture that gives the hat a neat, stretchy, and comfortable finish. The thick folded brim adds extra warmth around the forehead and ears while making the beanie look stylish.
The soft, rounded top gives the hat a classic shape that works well with casual outfits, winter clothing, and everyday looks. You can make it in cream, beige, white, gray, brown, or any color that matches your wardrobe.
One of the best things about this pattern is that you do not need complicated crochet techniques. Basic stitches, simple increases, and front-post and back-post double crochet stitches are enough to create a lovely textured hat.
Materials Needed for the Free Crochet Beanie Pattern
Before starting your crochet beanie, gather all the materials you need. Choosing comfortable yarn and the correct hook size will help you achieve a neat finish.
Yarn: Use medium-weight worsted yarn in your preferred color. Acrylic, wool, or a soft acrylic-wool blend are good choices. A soft yarn will make the beanie comfortable to wear, while wool blends can provide extra warmth.
Crochet hook: A 5 mm crochet hook is a good starting point for medium-weight yarn. However, check your yarn label and adjust the hook if your stitches are too tight or too loose.
Scissors: You will need scissors to cut the yarn after finishing the beanie.
Yarn needle: A yarn needle is useful for weaving in loose ends and securing the finishing stitches.
Stitch marker: A stitch marker helps you identify the beginning of each round, especially when working around the crown.
Measuring tape: Use a measuring tape to check the head circumference and hat length.
For a classic winter look, choose a cream or ivory yarn. These shades create a soft, neutral appearance that pairs easily with different outfits.
Crochet Stitches and Techniques Used
This free crochet beanie pattern uses a few basic crochet techniques. If you already know how to make double crochet stitches, you will find most of the instructions easy to follow.
Magic ring: A magic ring creates a small, adjustable starting circle. It is useful for beginning the crown of a beanie without leaving a large hole at the top.
Chain stitch (ch): This stitch is used to create the starting chain and the turning or joining height when needed.
Slip stitch (sl st): A slip stitch helps join rounds and finish the project neatly.
Double crochet (dc): Double crochet stitches build the crown of the hat and create a comfortable fabric.
Front post double crochet (FPdc): This stitch is worked around the post of the stitch from the front. It creates a raised vertical texture.
Back post double crochet (BPdc): This stitch is worked around the post from the back. It creates a recessed texture between the raised stitches.
Increasing: Increasing means making additional stitches in one stitch to gradually expand the crown.
These techniques work together to create a rounded crown and a beautifully ribbed body.
Size and Measurements
This pattern is designed as a basic adult medium beanie. You can adjust the measurements to make a smaller or larger hat.
For an average adult head, a head circumference of approximately 21–23 inches is a useful starting point. The finished beanie should be slightly smaller than the actual head measurement because crochet fabric needs a little stretch to fit comfortably.
The crown diameter should be around 6.5–7 inches for many adult sizes, although the exact measurement depends on your yarn, hook, and stitch tension.
The total hat length can be approximately 9–10 inches before folding the brim. This provides enough fabric for a thick folded cuff.
Always measure your work as you go. Yarn thickness and personal tension can change the final size.
Free Crochet Beanie Pattern Instructions
This pattern is worked from the top down in joined rounds. First, you will create a circular crown using double crochet stitches. Then, you will build the ribbed body with front-post and back-post double crochet stitches.
The instructions below use standard US crochet terms.
Step 1: Start With a Magic Ring
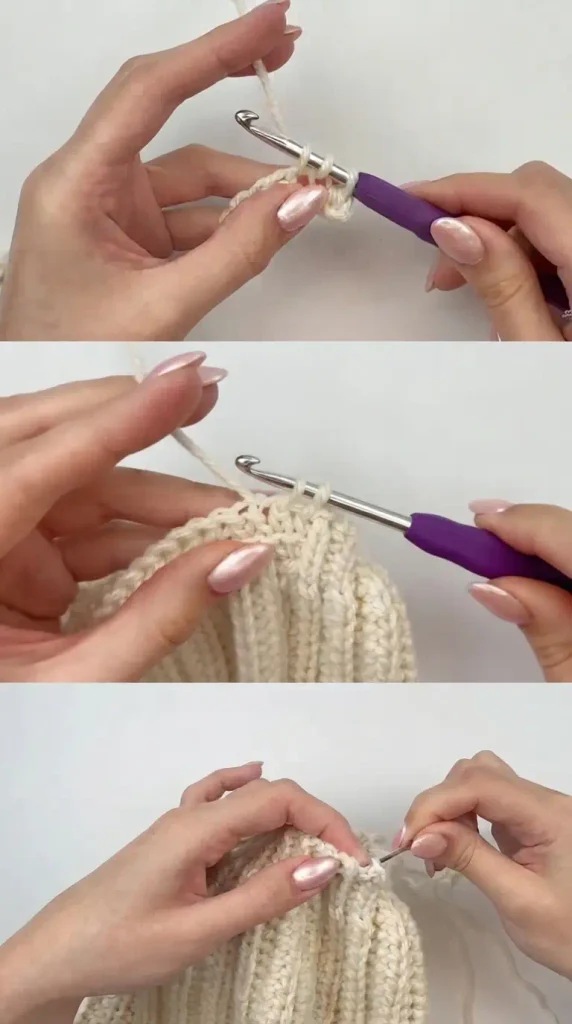
Begin by making a magic ring. Wrap the yarn around your fingers, insert your hook into the ring, and pull up a loop.
Chain 2 to prepare for the first round. Work 12 double crochet stitches into the magic ring.
Pull the yarn tail to close the center tightly. Join the round with a slip stitch to the first double crochet.
Place a stitch marker at the beginning of the round if you find it difficult to identify the starting stitch.
Your first round should create a small, neat circle. Make sure the center is closed properly so there is no large opening at the top of your beanie.
Step 2: Increase the Crown
The next step is to increase the number of stitches gradually. These increases help create a flat, rounded crown that will fit comfortably over the head.
For the second round, chain 2 and work 2 double crochet stitches into each stitch around. You should have 24 stitches.
For the third round, work 1 double crochet in the first stitch and 2 double crochet stitches in the next stitch. Repeat this pattern around to reach 36 stitches.
For the fourth round, work 1 double crochet in each of the first 2 stitches, followed by 2 double crochet stitches in the next stitch. Repeat around to reach 48 stitches.
For the fifth round, work 1 double crochet in each of the first 3 stitches, followed by 2 double crochet stitches in the next stitch. Repeat around to reach 60 stitches.
For the sixth round, work 1 double crochet in each of the first 4 stitches, followed by 2 double crochet stitches in the next stitch. Repeat around to reach 72 stitches.
Your crown should now look like a flat, circular piece. The exact number of rounds needed can vary depending on your yarn and tension, so check the diameter before moving forward.
If the circle is too small, you may need another increase round. If it becomes wavy, your increases may be too frequent or your hook may be too large.
Step 3: Create the Ribbed Texture
Once the crown reaches the desired diameter, you can begin creating the textured body of the beanie.
Start the next round with chain 2. Work one front-post double crochet around the first stitch, followed by one back-post double crochet around the next stitch.
Continue alternating between front-post and back-post double crochet stitches around the entire round.
Join the round with a slip stitch.
Repeat this pattern in every round. Always work front-post stitches around front-post stitches and back-post stitches around back-post stitches.
This creates raised vertical-looking ribs that give the beanie its attractive texture. The ribbing also provides flexibility, allowing the hat to stretch comfortably when worn.
Continue working the ribbed rounds until the beanie reaches approximately 7–8 inches from the top of the crown, or until it is close to your preferred length before adding the folded cuff.
Step 4: Make the Thick Folded Brim
The folded brim is one of the most attractive parts of this crochet beanie pattern. It creates a thicker edge around the forehead and gives the hat a cozy winter appearance.
Continue the same front-post and back-post double crochet pattern for another 2–3 inches.
You can make the brim slightly longer if you want a deeper fold. Keep your stitches consistent so the ribbed texture looks even all the way around.
Once the desired length is reached, finish the round with a slip stitch. Cut the yarn, leaving a small tail for finishing.
The bottom edge should look neat and stretchy. When you fold it upward, the ribbed fabric creates a thick cuff that sits comfortably around the head.
Step 5: Finish the Top and Bottom Edges
Use a yarn needle to weave in the loose yarn ends on the inside of the hat.
Check the crown carefully. If there are any visible gaps or loose stitches, use the yarn tail to secure them neatly.
The bottom edge should not be too tight. A comfortable opening makes it easier to put on and remove the beanie.
If you want a more polished finish, gently adjust the folded brim so it sits evenly around the entire hat.
Step 6: Shape and Check Your Beanie
Before wearing your new crochet beanie, check its shape and measurements.
Place it on a flat surface and gently arrange the crown. Make sure the top is rounded and the ribbed body is not twisted.
Try the beanie on to check whether it covers your ears comfortably. The folded brim should stay in place without feeling too tight.
If the hat feels too loose, you may need to use a smaller hook or adjust the stitch count in your next project. If it feels too tight, consider using a larger hook.
You can also gently wash and dry the finished beanie according to the yarn care instructions. Avoid stretching it too much while wet.
Helpful Tips for Making a Beautiful Crochet Beanie
Choose Soft and Comfortable Yarn
Yarn quality makes a big difference in the final result. Choose a soft yarn that feels comfortable against your forehead and ears. Acrylic yarn is affordable and easy to care for, while wool blends provide a warm and cozy feel.
If you have sensitive skin, test a small piece of the yarn against your skin before making the complete hat.
Keep Your Stitches Consistent
Try to maintain the same tension throughout the project. Uneven tension can make the crown look wavy or cause the ribbed body to become irregular.
If you are new to front-post and back-post stitches, practice them on a small sample before starting the beanie.
Check the Crown Size Before Continuing
Do not rush through the increase rounds. The crown should be wide enough to cover the top of your head without becoming too large.
Measuring the diameter before making the body can save you time and help you avoid an uncomfortable fit.
Make the Folded Brim Thick Enough
A folded brim looks best when it has enough length to turn upward comfortably. You can adjust the cuff length depending on how much coverage you want around your ears.
Avoid making the brim too tight because it may feel uncomfortable when worn for several hours.
Use a Stitch Marker
A stitch marker is especially helpful when crocheting in joined rounds. It allows you to keep track of the beginning of each round and makes it easier to count stitches.
This small tool can help prevent mistakes and keep your pattern consistent.
How to Customize Your Crochet Beanie
One of the best things about making your own crochet beanie is that you can change its appearance to match your personal style.
For a classic and simple look, use cream, ivory, beige, or soft gray yarn. These neutral colors are easy to pair with winter coats, sweaters, scarves, and casual outfits.
If you prefer something brighter, choose mustard yellow, dusty pink, lavender, or forest green. These colors can make your handmade hat stand out.
You can also change the yarn texture. A fluffy yarn creates a softer appearance, while a smooth acrylic or wool blend makes the ribbed stitches more visible.
For a more relaxed fit, increase the body length before finishing. For a shorter beanie, reduce the number of ribbed rounds.
You can also add a small pom-pom to the top if you enjoy playful winter accessories. However, the simple rounded crown looks beautiful without extra decorations.
Common Mistakes to Avoid
One common mistake is adding too many increases to the crown. This can cause the circular section to become wavy instead of lying flat. Make sure your increases are evenly distributed.
Another mistake is losing track of the stitches in the ribbed rounds. If you accidentally work a front-post stitch into a back-post stitch, the ribbing may look uneven. Check your stitches regularly.
Using the wrong hook size can also affect the final fit. A very large hook may create loose stitches, while a small hook can make the beanie stiff and difficult to stretch.
Do not forget to check the head measurement before completing the hat. A beautiful crochet beanie will not be as enjoyable to wear if it is too tight or too loose.
Finally, avoid pulling the yarn too tightly when joining rounds. Tight joins can create visible lines and make the bottom edge uncomfortable.
How to Care for Your Handmade Crochet Beanie
Proper care helps your crochet beanie stay attractive for a long time. Always check the yarn label before washing because different fibers require different care methods.
Many acrylic beanies can be washed gently by hand or in a washing machine using a suitable delicate cycle, depending on the yarn instructions. Wool yarn may require hand washing with cool water and a gentle wool-safe detergent.
After washing, gently press out excess water using a clean towel. Do not twist or wring the beanie because this can stretch the stitches and change its shape.
Lay the hat flat to dry and arrange the crown and folded brim while it is still slightly damp. Avoid hanging it because the weight of the water may stretch the fabric.
Store your finished beanie in a clean, dry place when you are not using it.
Frequently Asked Questions About Crochet Beanie Patterns
Is This Free Crochet Beanie Pattern Beginner-Friendly?
Yes, this pattern is suitable for beginners who already understand basic crochet stitches. The crown uses double crochet increases, while the body uses front-post and back-post double crochet stitches. Beginners may want to practice the post stitches before making the complete hat.
How Much Yarn Do I Need for a Crochet Beanie?
The amount depends on the yarn thickness, hook size, head measurement, and length of the finished hat. For an average adult beanie, approximately 150–200 grams of medium-weight yarn is a reasonable amount to prepare, although some projects may require less or more.
Can I Make This Crochet Beanie in Different Sizes?
Yes. You can adjust the number of crown increase rounds to change the width and adjust the ribbed body length to change the overall fit. Measure the head circumference and compare it with the finished hat as you work.
What Is the Best Yarn for a Ribbed Crochet Beanie?
Medium-weight acrylic yarn and soft wool blends are good choices. They provide warmth, flexibility, and a clear stitch texture. Choose a yarn that feels comfortable against your skin.
Can I Make This Beanie Without a Folded Brim?
Yes. You can simply stop crocheting when the hat reaches your preferred length and finish the edge. However, the folded brim gives this particular style extra thickness and a classic winter appearance.