DIY Granny Stitch Dress Guide
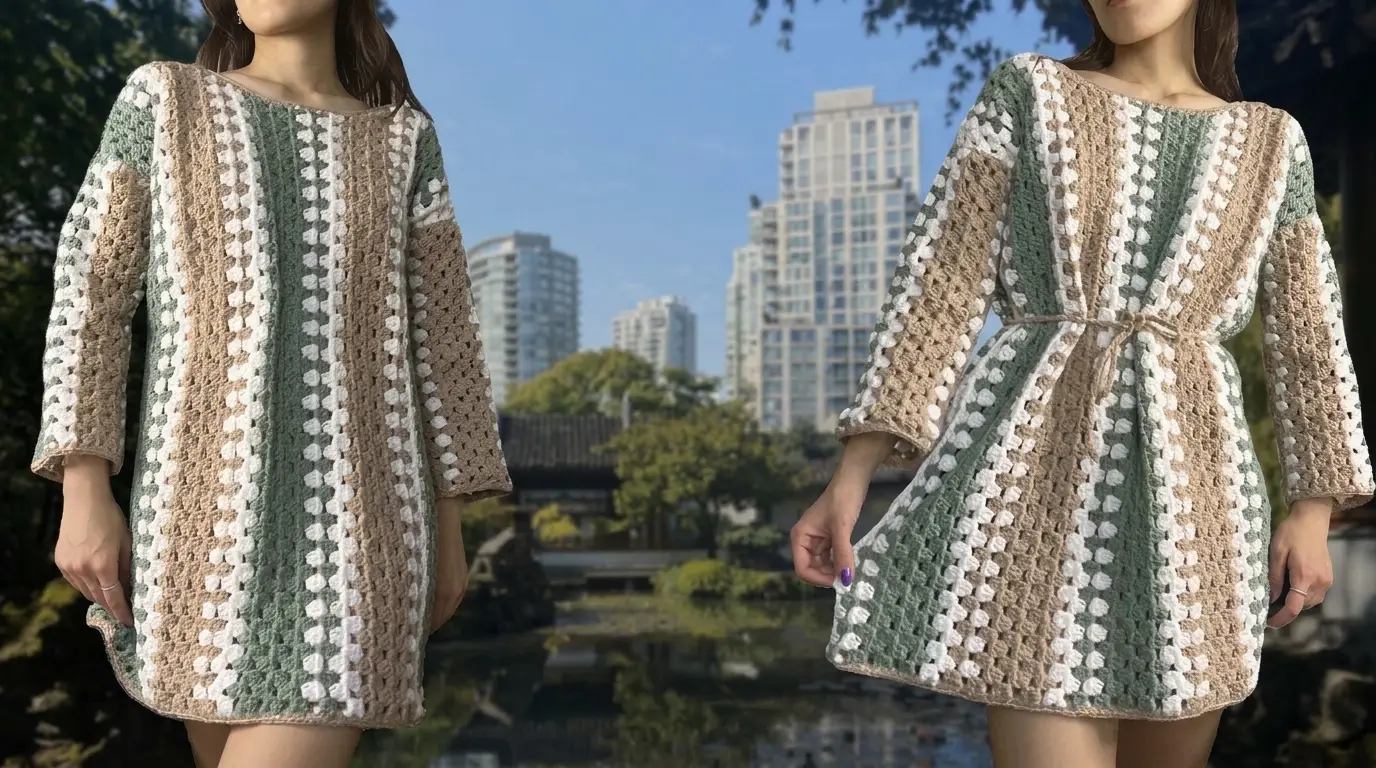
Learn how to craft a beautiful, handmade granny stitch dress featuring vertical stripes, long sleeves, and a flattering boat neckline. This complete guide walks you through every step, technique, and tip to create your own wearable masterpiece.
Introduction
Crocheting your own clothes is a fun and rewarding project. This lovely granny stitch dress features vertical stripes, cozy long sleeves, and a soft boat neckline. You can wear it loose for a relaxed fit or cinch it with a matching handmade belt.
Required Materials and Tools
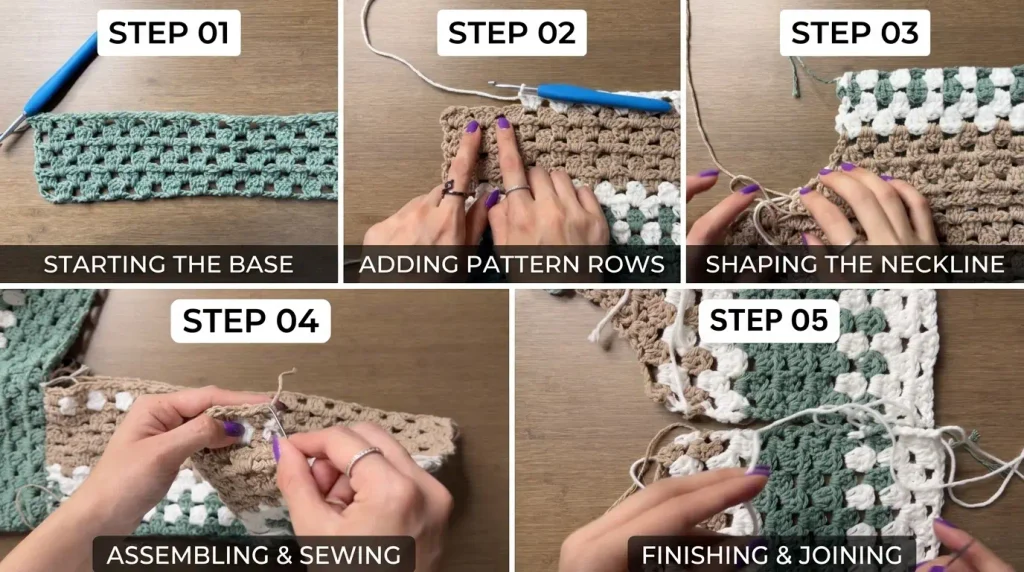
Before starting, gather all your supplies. Having the right tools ready makes the crafting process smooth and enjoyable.
- Yarn Amount: Approximately 1,000 grams of total yarn.
- Yarn Types & Colors:
- Re-Up yarn in Mineral Springs (sage green) and Surf Spray (tan/camel shade).
- Lily Sugar ‘n Cream in White (or Re-Up in Full Moon).
- Crochet Hook: 5 mm hook.
- Notions: Scissors, a tapestry or yarn needle, and stitch markers. If you do not have stitch markers, bobby pins or safety pins work just as well.
Understanding the Color Pattern Sequence
The distinct vertical stripes of this piece are created by working long rows from top to bottom and following a repeating color rhythm.
The color pattern consists of repeating blocks separated by crisp white accents:
- 6 rows in tan yarn.
- 1 row in white yarn.
- 1 row in tan yarn.
- 2 rows in white yarn.
- 6 rows in green yarn.
- 1 row in white yarn.
- 1 row in green yarn.
- 2 rows in white yarn.
You will repeat this entire sequence across the width of each panel to create a balanced, striped design.
Mastering the Basic Granny Stitch Foundation
The main fabric uses traditional granny stitch clusters, which consist of groups of three double crochets worked into spaces between clusters of the previous row.
Making a Slip Knot and Foundation Chain
Start by placing the yarn over your hand with a long tail. Wrap it around two fingers to form an X. Pass your hook under the first loop, grab the second loop, and pull it through. Tighten the loop on your hook.
Chain the length you want for your dress. The total chain count must be a multiple of four. For a standard mini-to-mid length, make 116 chains (about 67 centimeters). Then, place your thumb on the 116th chain and chain six more turning chains.
Working Row 1
- Double crochet into the 7th chain from the hook (where your thumb is). Work under the back loop of the chain to keep the stitches small and neat.
- Put two more double crochets into that same chain space to complete your first 3-double crochet cluster.
- Chain one, skip three chains, and work three double crochets into the next chain.
- Repeat this pattern across the entire foundation chain: chain one, skip three, three double crochets in the next chain.
- When three chains remain, chain one and place a single double crochet into the very last chain.
Rows 2 and 3 (The Core Repeating Pattern)
- Row 2: Chain three (counts as a double crochet) and turn. Work two double crochets into the very first space. Chain one, then work three double crochets into every space across. Finish by chaining one and making three double crochets in the final space.
- Row 3: Chain four (counts as one double crochet plus chain-one space) and turn. Skip the first cluster and place three double crochets in the next space. Repeat three double crochets and chain one in each space across. To finish with a straight edge, chain one and make one double crochet in the space between the turning chain and the first double crochet of the previous row.
Alternate between Row 2 and Row 3 repeats to keep the side edges perfectly straight.
Changing Colors Seamlessly
To switch colors cleanly at the end of a row, complete the final double crochet up to the last loop. Hook the new yarn color and pull it directly through the loop on your hook. Tighten the previous yarn color and ensure the new yarn tail is long enough to weave in later. Cut the old yarn and tie a simple double knot with the two tail ends to secure them.
Shaping the Front Panel and Neckline
Work the front panel until you complete 16 full rows of alternating granny stitch pattern. Always stop after an even-numbered row before starting the neckline shaping.
Neckline Decreases
- Row 17: Chain four and turn. Work three double crochets into the first space. Continue across, but leave the last two spaces unworked. Do not chain one after your final cluster; instead, place one double crochet directly into the next space to create a smooth diagonal slant.
- Row 18: Chain two and turn. Work three double crochets into the first chain-one space (skipping the immediate space), then continue the granny stitch pattern across.
- Row 19: Chain four and turn. Work across the row, ending with three double crochets in the second-to-last space, followed by one double crochet into the final space without chaining one.
- Row 20: Chain two and turn, working granny clusters in each space across.
Middle Straight Section
After completing four decrease rows, work straight rows without decreases to form the center of the neckline. For Row 21, chain four, turn, and work three double crochets in each space. Ensure you include a chain-one space before the final double crochet to stop decreasing and keep the edge straight. Repeat alternating straight rows (repeats of Rows 2 and 3) for 11 rows across the neck opening.
Neckline Increases
Once the center section is complete, mirror the decreases with four increase rows.
- Row 32: Chain four and turn. Work three double crochets into the first space to build space for the next row. Work across as normal.
- Row 33: Work across the row. Chain one and add three double crochets into the chain-four space at the end to expand the row.
- Row 34: Chain four and turn. Put three double crochets into the top V-loop of the very first double crochet stitch to expand the edge outward.
- Row 35: Repeat Row 33 to finalize four increase rows.
Restoring Full Width
To restore the missing clusters on Row 36, calculate the chains needed: multiply the skipped spaces (2) by 4, then add 3 (11 chains total). Chain 11, turn, and work two double crochets in the 4th chain from the hook to create a full cluster. Continue the standard granny stitch pattern across the row. Continue until you complete 51 total rows, matching the starting side. Fasten off, leaving a long yarn tail (twice the width of the shoulder) for seaming.
Crafting the Back Panel
The back panel is worked the same way as the front panel, but with a shallower neckline.
Start with 116 chains plus six turning chains, and work 16 standard rows. On Row 17, skip only one space instead of two spaces for a subtle drop. Complete four decrease rows, 11 straight rows, four increase rows, and chain 7 on Row 36 to rebuild the full width. Complete 51 total rows and fasten off.
Crocheting the Sleeves
The sleeves are worked sideways from wrist to shoulder in straight rows.
- Make a slip knot and chain 56 (or any multiple of four for your desired length, about 33.5 centimeters). Add six turning chains.
- Work three double crochets into the 7th chain from the hook and follow the standard granny stitch pattern across.
- Alternate Row 2 and Row 3 repeats for 28 rows to achieve the required sleeve circumference.
- Fasten off, leaving a yarn tail twice the length of the edge to attach the sleeve to the main body later. Repeat all steps for the second sleeve.
Assembling the Garment
Lay the front and back panels flat with right sides facing out, ensuring all color stripes align perfectly.
Shoulder Seams
Thread your yarn needle with the long tail left from the front panel. Use the invisible mattress stitch by passing the needle under two side loops on one panel from bottom to top, then under two side loops on the opposite panel. Gently tug every few stitches to close the seam completely. Repeat on the other shoulder.
Sleeve Attachment
Fold each sleeve panel in half to locate its exact center point. Align this center point with the shoulder seam. Use stitch markers to hold the sleeve corners flat against the front and back body panels (about six clusters down from the shoulder on each side). Mattress stitch the sleeve edge to the body panels, keeping the stitches smooth and unstretched.
Side and Underarm Seams
Fold the dress flat so the front and back match. Use a whip stitch or mattress stitch to sew from the wrist down to the underarm, then continue down the sides from the underarm to the bottom hem. Use matching yarn colors (such as tan yarn for tan sections and green yarn for green sections) to keep the seams invisible.
Finishing Edges and Weaving Loose Ends
Clean edges and neatly tucked yarn ends give your project a professional look.
Attach yarn at the bottom sleeve seam with a slip knot pulled through the edge. Chain one and work two single crochets into the side of each row around the cuff. As you crochet, hold loose yarn tails along the edge and stitch right over them to lock them in place. When you reach a group of tails, tug them gently so they lie flat inside the stitches. Slip stitch into the first single crochet to join, fasten off, and trim any remaining tail ends close to the fabric. Repeat this simple single crochet border around the bottom hem and neckline.
Crafting a Matching Waist Belt
If you prefer a fitted silhouette over a boxy shape, create an easy waist belt.
Chain a length of yarn that comfortably wraps around your waist with enough length left over to tie a bow (about 150 to 180 centimeters). Turn and work one slip stitch or single crochet into each chain across. Fasten off and weave in both ends. Thread the belt through the open spaces of the granny stitch clusters at your natural waistline, then pull and tie it to cinch the dress.
Handy Crochet Tips and Practical Advice
Choosing the right yarn tension is key to getting a soft, flattering drape. If your stitches feel too tight or stiff, switch to a slightly larger hook so the fabric moves easily and comfortably.
Always check your stripe count and stitch placement before seaming. Taking time to align each color row with stitch markers saves you from having to undo stitches later.
When weaving in loose yarn tails around color changes, carry them along for at least two to three inches under your single crochet border. This keeps your ends secure, even after multiple washes.
Always steam or wet-block your finished panels lightly before sewing them together. Blocking flattens curling edges and aligns the granny clusters, making seaming much easier and giving your dress an even finish.