Crochet Winter Hat Pattern – Cozy Textured Beanie with a Fluffy Pom-Pom
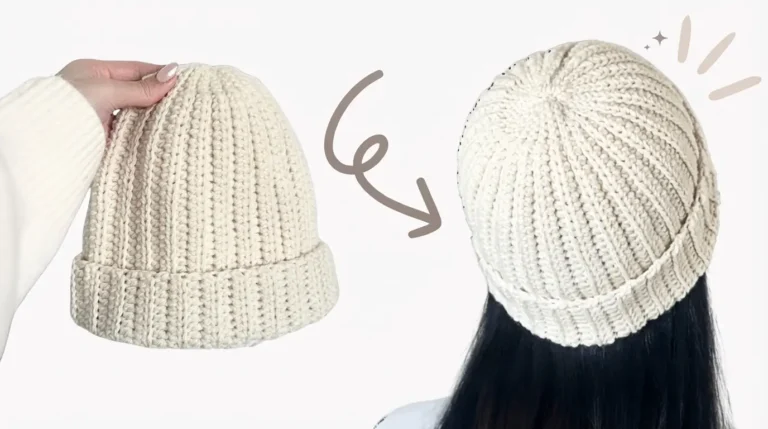
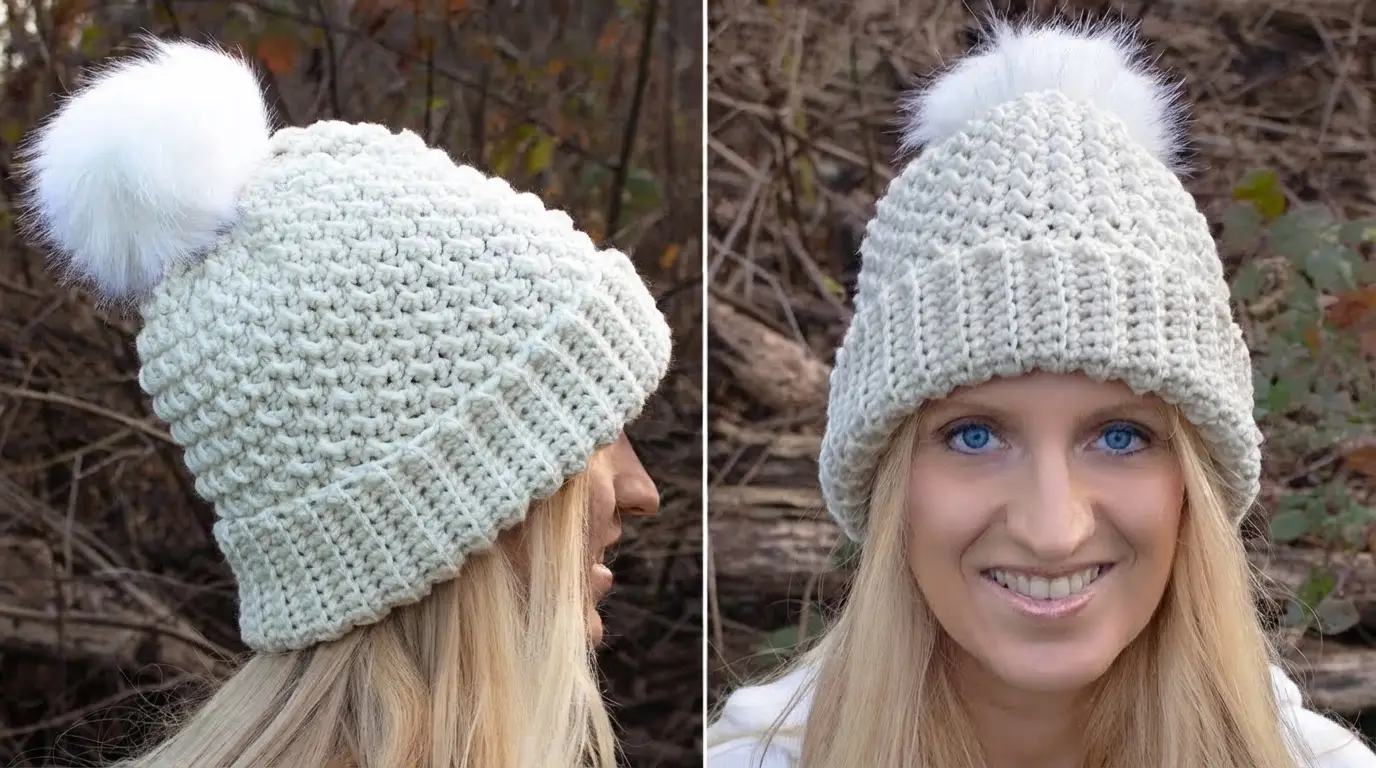
Stay warm and stylish during cold days with this cozy crochet winter hat pattern. This beautiful beanie features a thick ribbed brim, a soft textured body, and a fluffy pom-pom on top. It is a lovely handmade project for everyday winter wear or gifting.
Why You Will Love This Crochet Winter Hat Pattern
A warm crochet hat is one of the most useful accessories you can make during the colder months. This crochet winter hat pattern combines a simple shape with beautiful texture, making it both practical and stylish.
The hat has a wide ribbed brim that folds upward for a snug and comfortable fit. The main body features raised horizontal rows that give it a thick, cozy appearance. A large fluffy pom-pom adds a playful finishing touch.
The soft, light-colored yarn gives the hat a clean and classic look. You can make it in white, cream, beige, gray, pink, or any color that matches your winter wardrobe.
This project is suitable for confident beginners who already know basic crochet stitches. Once you understand how to make the ribbed band and textured body, the rest of the project becomes easier.
Materials You Will Need
Bulky or chunky yarn: Choose a soft, warm yarn in a bulky or chunky weight. Wool, acrylic, or a wool-acrylic blend can work well. A light cream or white shade gives the hat a beautiful winter look. Check the yarn label for its recommended hook size.
Crochet hook: Use a hook size that works comfortably with your chosen yarn. A 5.5 mm or 6 mm hook is a useful starting point for many bulky yarns, but check your gauge before beginning.
Yarn needle: You will need this to sew the hat seam, weave in loose ends, and attach the pom-pom if it is separate.
Stitch marker: A stitch marker helps you keep track of the beginning of each round.
Scissors: Use scissors to cut the yarn neatly when finishing the project.
Fluffy pom-pom: Choose a large white faux-fur pom-pom or make your own yarn pom-pom. A removable pom-pom is a practical option because it can be taken off before washing.
Crochet Stitches and Techniques
Before starting, it is helpful to understand the stitches used in this pattern. The design uses simple crochet techniques to create a thick fabric and a stretchy brim.
Chain stitch (ch): This is the foundation stitch used to begin the ribbed band.
Slip stitch (sl st): A slip stitch joins the ends of the brim and helps finish the work neatly.
Single crochet (sc): This stitch creates a firm fabric and is useful for making the ribbed band.
Half double crochet (hdc): This stitch is taller than single crochet and gives the hat body a soft, slightly raised texture.
Back loop only (BLO): Instead of inserting your hook under both loops of a stitch, work into the back loop only. This creates flexible ribbing.
Decreasing: Decreases help shape the top of the hat so that it becomes narrower toward the crown.
The pattern uses US crochet terminology.
Size and Gauge
This pattern can be adjusted for different head sizes. The following measurements are useful starting points.
| Size | Approximate head circumference |
|---|---|
| Child | 18–20 inches |
| Teen | 20–21 inches |
| Adult | 21–23 inches |
| Large adult | 23–24 inches |
The finished hat should stretch comfortably around the head without feeling too tight.
For gauge, make a small sample using your selected yarn and hook. Measure the number of stitches and rows in a 4-inch square. Your exact stitch count will depend on the yarn, hook, and tension you use.
Remember that a crochet hat needs some negative ease. This means the finished circumference should usually be slightly smaller than the wearer’s head measurement so that it stays in place.
Step 1: Make the Ribbed Brim
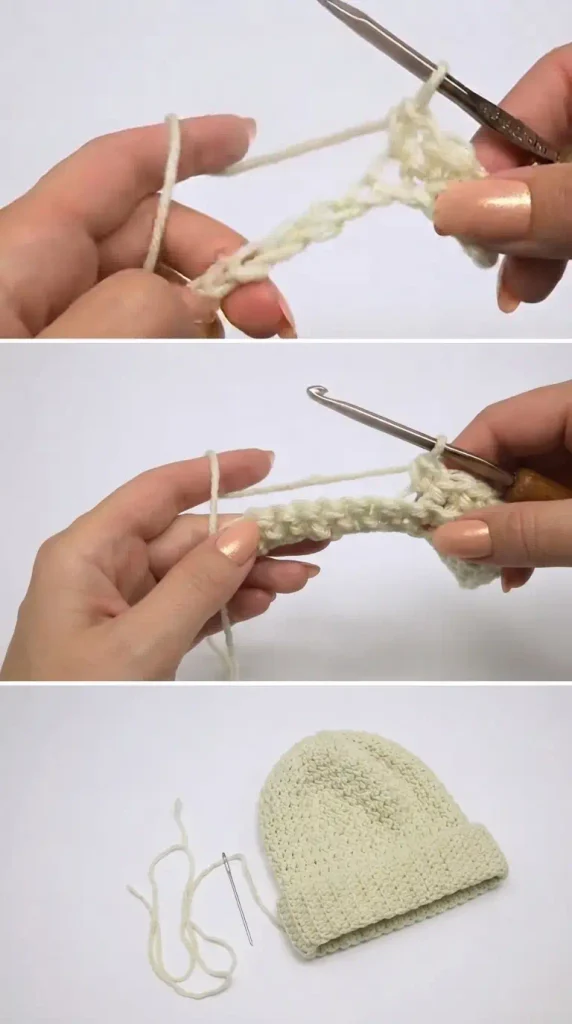
Start by making the ribbed band at the bottom of the hat. This part gives the beanie a comfortable fit and creates the folded edge.
Begin with a foundation chain long enough to make the desired height of your brim. For a wide folded brim, you can start with approximately 15–18 chains, including the turning chain if needed.
Work a single crochet stitch into the second chain from the hook and continue across the row.
At the end of the row, chain one and turn your work. Make single crochet stitches across the row, working into the back loop only.
Continue repeating this process until the band is long enough to fit around the wearer’s head with a little stretch.
For an average adult, the band may measure approximately 18–21 inches before joining, depending on the yarn and desired stretch. Always compare it with the actual head measurement.
Once the band reaches the required length, fold it so that the short ends meet. Join the ends using slip stitches or a yarn needle. This creates a circular band.
Make sure the ribbing is not twisted before joining. A twisted band can make the finished hat uncomfortable to wear.
Step 2: Start the Textured Hat Body
Now that the brim is ready, begin working on the main body of the hat.
Attach your yarn to the upper edge of the ribbed band. Work half double crochet stitches evenly around the opening.
Place a stitch marker at the beginning of the round so you can easily recognize where each round starts.
Join the round with a slip stitch if you are working joined rounds. Take care not to pull the stitches too tightly.
For the textured effect, work the half double crochet stitches through the back loop only. This creates small horizontal ridges across the fabric.
Continue working around the band, keeping your stitch count consistent. The number of stitches should be enough to make the hat sit comfortably around the head.
The texture will become more noticeable as you add more rounds. Use the same stitch technique throughout the body to keep the fabric looking even.
Step 3: Build the Height of the Hat
Continue making half double crochet rounds through the back loop only.
Each round adds more height to the beanie and creates another textured line. Keep your tension relaxed and consistent. If you crochet too tightly, the hat may lose some of its natural stretch.
Try the hat on occasionally to check the fit. The body should cover the head comfortably and reach the area where you want the crown shaping to begin.
For an average adult, the total height before crown decreases will depend on the desired finished length and the depth of the folded brim. A slightly slouchy style needs more height than a close-fitting beanie.
The wide ribbed brim should remain visible at the bottom. You can fold it upward to create the cozy look of a classic winter hat.
Step 4: Shape the Crown
When the hat reaches the desired height, it is time to shape the top.
Start decreasing stitches gradually so the opening becomes smaller.
For a simple decrease, work two half double crochet stitches together. Insert the hook into the next stitch, yarn over and pull up a loop. Insert the hook into the following stitch, yarn over and pull up another loop. Yarn over and pull through all the loops on the hook.
Repeat this decrease at evenly spaced points around the round.
Continue with another round of half double crochet stitches, then work another decrease round. As the opening becomes smaller, decrease more frequently when needed to bring the top together smoothly.
The exact number of decreases depends on your starting stitch count. Keep checking the shape as you work. The crown should narrow evenly rather than form a pointed top.
When only a small opening remains, cut the yarn, leaving a long tail. Thread the tail through a yarn needle and pass it through the remaining stitches. Pull gently to close the opening.
Secure the yarn firmly on the inside of the hat.
Step 5: Attach the Fluffy Pom-Pom
A fluffy pom-pom is the finishing detail that makes this winter beanie extra special.
Choose a large faux-fur pom-pom in white or another matching shade. You can also use a handmade yarn pom-pom if you prefer a fully crocheted finish.
Find the center of the crown and position the pom-pom there.
If your pom-pom has a small elastic loop or attachment cord, follow its instructions to secure it through the top of the hat. If it has ties, pass them through the crochet stitches and knot them securely on the inside.
Make sure the pom-pom is firmly attached before wearing the hat.
A removable pom-pom is especially useful for winter hats. You can detach it before washing the beanie and attach it again afterward.
Step 6: Finish and Shape Your Crochet Winter Hat
Your crochet winter hat is almost ready. Before wearing it, take a few minutes to finish the small details.
Use a yarn needle to weave in all loose yarn ends. Make sure the ends are secured inside the hat so they do not come loose during use.
Check the seam around the ribbed band and the crown. If you notice any gaps, use your yarn needle to close them neatly.
Fold the ribbed brim upward to create the wide cuff. Adjust the fold so it sits evenly around the entire hat.
You can gently shape the hat with your hands to make the textured rows look neat.
If your yarn needs blocking, follow the care instructions on its label. Avoid using too much heat, especially with acrylic yarn, because high temperatures can damage the fibers.
Tips for Making a Beautiful Crochet Winter Hat
Choose soft yarn. Since a winter hat sits directly against your head, soft yarn is important. Choose a material that feels comfortable against your skin and provides enough warmth for your local climate.
Check your tension. Try to keep your stitches even throughout the project. Very tight stitches can make the hat stiff, while very loose stitches may create unwanted gaps.
Measure before shaping. Do not depend only on the number of rounds. Yarn thickness and personal tension can change the finished size. Measure the hat as you work to get a comfortable fit.
Use a stitch marker. Textured crochet can make it difficult to see the beginning of each round. A stitch marker will help you avoid losing track of your stitches.
Make the brim stretchy. The ribbed band should fit comfortably around the head. Avoid pulling the joining stitches too tightly, as this can reduce the stretch.
Secure the pom-pom properly. A large fluffy pom-pom can move around when worn. Attach it securely so it stays in place.
Try different colors. Cream and white create a classic winter style, but pastel shades and earthy colors also look lovely with this textured design.
How to Customize Your Crochet Winter Hat
One of the best things about making your own winter hat is that you can change small details to create a style you love.
For a classic look, choose cream, ivory, or white yarn and add a large fluffy pom-pom. These colors work beautifully with winter coats and scarves.
If you prefer a colorful accessory, try dusty pink, lavender, light blue, or sage green. You can also use two colors by making the brim in one shade and the main body in another.
The brim can be made wider or narrower depending on how much folded fabric you want. A wider brim gives the hat a chunky appearance, while a smaller brim creates a simpler shape.
You can also leave off the pom-pom for a more minimal style. The textured stitches and ribbed band will still make the hat look attractive.
How to Care for Your Crochet Winter Hat
Proper care helps your handmade hat stay soft and beautiful for a long time.
Always check the yarn label before washing. Different fibers need different care methods. Many acrylic yarns can be washed gently, while some wool yarns require hand washing.
If hand washing is recommended, use cool or lukewarm water with a small amount of gentle detergent. Avoid rubbing or twisting the hat because this can stretch the stitches.
Rinse carefully and press out extra water using a clean towel. Lay the hat flat to dry and reshape it while it is still damp.
Do not hang a wet crochet hat, as the weight of the water can stretch the fabric.
Remove a detachable pom-pom before washing it if its care instructions are different from those of the hat.
Frequently Asked Questions
Is this crochet winter hat pattern suitable for beginners?
Yes, confident beginners can make this hat if they know how to chain, single crochet, half double crochet, slip stitch, and decrease. The textured body uses a repeated stitch pattern, so it becomes easier after the first few rounds.
What yarn is best for a crochet winter hat?
Bulky acrylic, wool, and wool-blend yarns are all useful choices. Acrylic is often affordable and easy to care for, while wool provides natural warmth. Choose a soft yarn that feels comfortable against your skin.
How long does it take to crochet this hat?
The time depends on your experience, yarn thickness, and the size you are making. A crocheter who is familiar with the stitches may finish it in a few hours, while a beginner may need more time.
Can I make this hat without a pom-pom?
Absolutely. The pom-pom is an optional decoration. You can leave the crown plain for a simple beanie or add a handmade yarn pom-pom instead.
How do I make the hat fit a larger head?
Measure the head circumference before starting. Make the ribbed band long enough to stretch comfortably around the head, and adjust the number of stitches in the body to match the band.