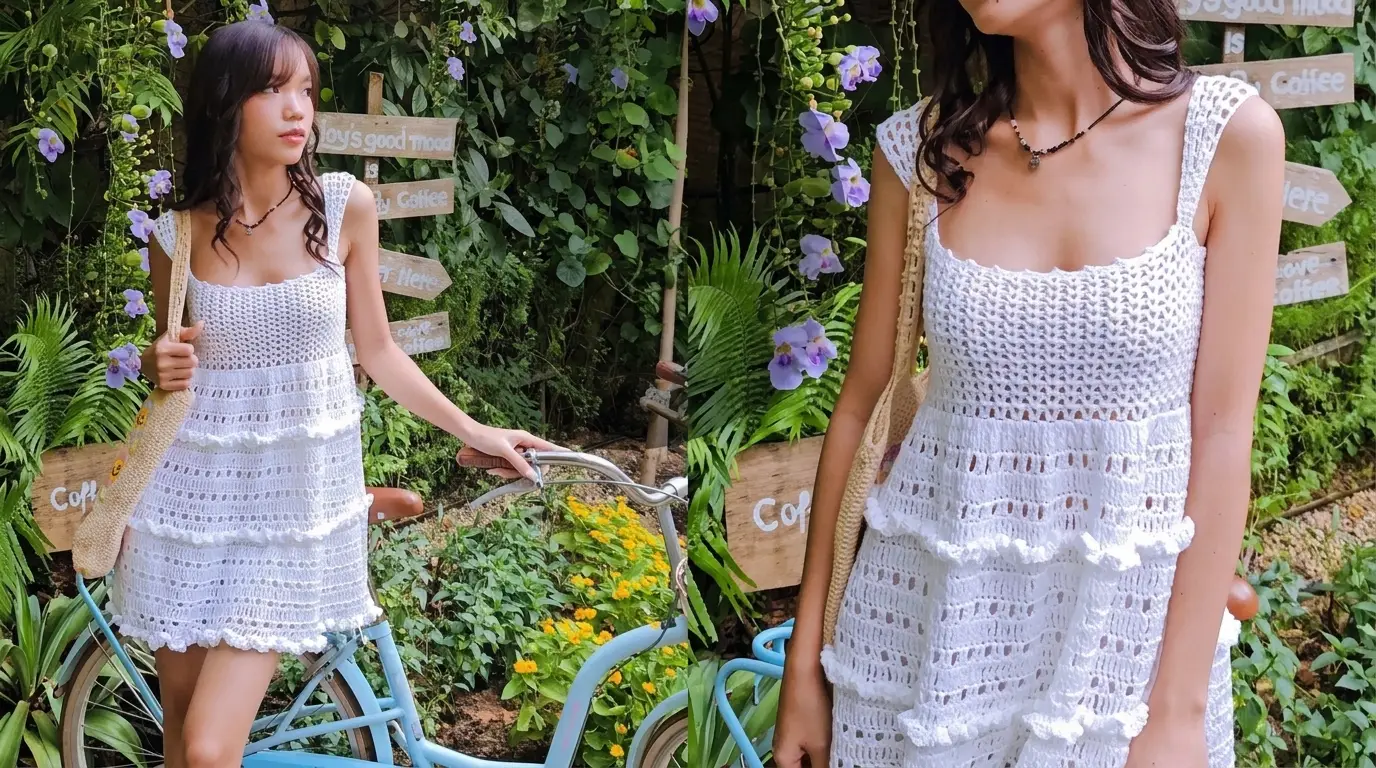
Ultimate Guide to Crafting a White Crochet Mini Dress
Welcome to the ultimate step-by-step guide on creating a stunning, delicate crochet mini dress! This easy pattern is beginner-friendly, highly customizable, and designed to fit a wide range of body types seamlessly.
Materials and Crochet Abbreviations
To get started on this project, gather yarn in your favorite shade alongside a matching crochet hook.
Key abbreviations used in this pattern include:
- ch: chain
- sl st: slip stitch
- sc: single crochet
- hdc: half double crochet
- dc: double crochet
- tr: treble or triple crochet
Bust Part Measurements and Foundation
Creating a garment that fits comfortably begins with customized measurements. Start by taking a foundation chain measurement across the front bust, reaching from underneath one underarm across to the other.
For a standard size extra small or small, start by making a slip knot and crocheting a foundation chain in multiples of five until you reach 75 chains, which measures approximately 14.5 inches. To scale up for larger sizes, simply add chains in multiples of five until you achieve your desired width. Once you reach your target width, add four additional chains, bringing the total to 79 chains.
Crafting the Bust Section
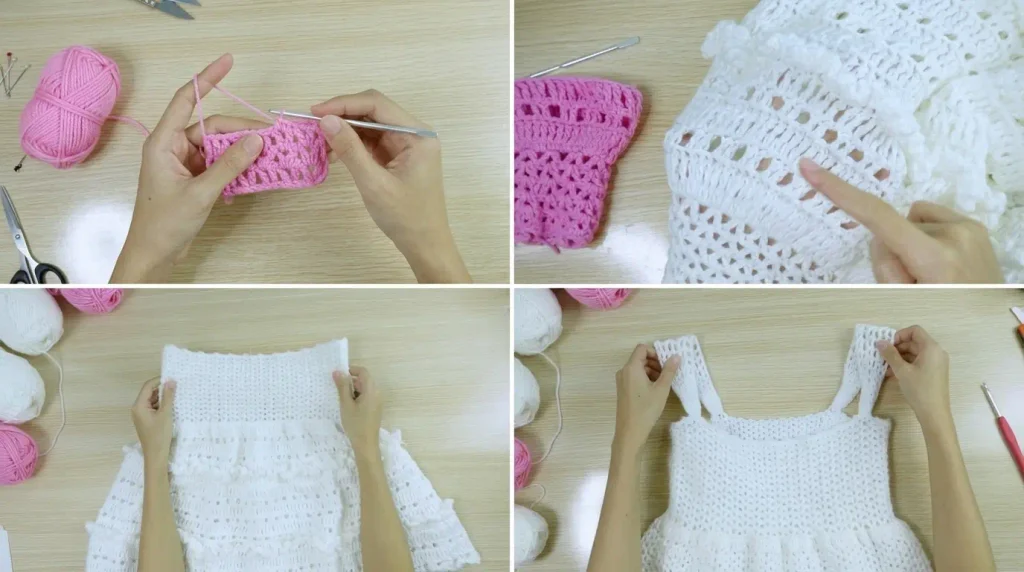
To begin Row 1, skip four chains and work a double crochet into the fifth chain from the hook. Chain one, then place another double crochet into the exact same loop to complete your first V-stitch. Skip two chains, then work a V-stitch (double crochet, chain one, double crochet) into the next chain. Repeat this V-stitch pattern across the foundation chain until two chains remain. Skip one chain and work a double crochet into the final chain.
For Row 2, chain three (which counts as a stitch), turn your work, and skip two stitches. Work a V-stitch directly into the chain-one space of the previous row’s V-stitch. Continue placing V-stitches into each chain-one space across the row, finishing with a double crochet into the turning chain from the previous row.
Repeat Row 2 through Row 14 until the bust section reaches about 5 inches in height from under-bust to chest. Feel free to add more rows if you prefer extra coverage over the chest area.
Adding the Decorative Border
Row 15 introduces a delicate picot edging along the top border. Chain one and turn your work, then make a single crochet in the first loop. Work single crochets into each of the next four stitches and chain spaces for a total of five single crochets.
To form the picot detail, chain three, then make a slip stitch into the third chain from your hook. Continue across the row by alternating five single crochet stitches with one picot detail, finishing across the entire top edge.
Constructing the Back Panel
Turn your piece sideways to begin working along the vertical edge of the bust panel. Chain one, then work single crochets evenly along the side by placing single crochets into each large and small loop across the edge.
To ensure proper stretch across the back, transition to the moss stitch using a relaxed tension or a slightly larger hook size. For Row 2, chain one, turn, and make a single crochet in the first loop. Chain one, skip one stitch, and single crochet into the next. Repeat this sequence across.
For Row 3, chain one, turn, and add another loose chain. Skip the single crochet stitch and place your single crochet directly into the chain-one space. Repeat across, ending with a single crochet in the final stitch. Alternate these moss stitch rows until you reach Row 46, which measures roughly 10 inches unstretched.
Because the moss stitch pattern is inherently stretchy, the back panel will comfortably expand around your body during wear. If you prefer a looser fit around the chest, you can extend the back panel to match the full length of the front panel.
Assembling the Bodice
Align the front bust panel and back panel with the wrong sides facing outward. Insert your hook through the corner loops of both sides, yarn over, and join them together using single crochet stitches across the joining seam.
Work single crochets through both layers along the edge to secure the sides. Once complete, flip the piece right-side out to reveal a clean, seamless finish.
Shaping the Ruffled Dress Body
Now transition to the lower body of the dress to build flared, cascading layers.
For Row 1 of the body section, join your yarn and chain four. Work an increase by making two treble crochets into the same loop. Continue making two treble crochets into every loop along the back section and into every chain space across the front panel. If you desire an even fuller silhouette, you can place three or four treble crochets into each loop. Join the end of the row with a slip stitch to the first treble crochet.
For Row 2, chain three, turn, and double crochet in the first loop and the next loop. Chain one, skip one stitch, and work double crochets in the next two stitches. Repeat this pattern (chain one, skip one, two double crochets) around the row, ending with a slip stitch.
For Row 3, chain four, turn, and work treble crochets into every stitch and chain space around the entire circumference. Join with a slip stitch.
Repeat the sequence of Row 2 (double crochet pattern) and Row 3 (treble crochet pattern) through Row 5.
Working Surface Ruffle Details
To create raised structural ruffles along the dress body, transition to working in back loops only for Row 6. Chain three, turn, and yarn over to make a half double crochet into the back loop of the first stitch. Chain two, then place another half double crochet in the same back loop.
Chain two, skip to the next back loop, and work a half double crochet, chain two, and another half double crochet into the same loop. Repeat this increasing half-double-crochet structure across every back loop around the dress. Slip stitch to join, chain one, and fasten off the yarn.
Flip the dress over to expose the remaining unworked front loops from Row 6. Reattach your yarn to these front loops to continue building the dress body underneath the newly created surface ruffle.
For Rows 7 and 8, chain four and work solid treble crochets into each remaining front loop around. For Rows 9 through 14, alternate between double crochet grid rows and treble crochet rows.
For Row 15, repeat the surface ruffle technique from Row 6 using back-loop placements. Reattach yarn to the unworked front loops for Row 16, adding gradual volume by working four treble crochets followed by an increase (two treble crochets in one loop) around the row. Continue with standard treble and double crochet alternating rows from Row 17 through Row 24, completing a final surface ruffle on Row 25. The completed body section will measure around 16.5 inches from the under-bust line.
Strap Measurement and Final Assembly
To position the shoulder straps accurately, fold the bodice evenly to locate the front center and mark it. Measure 22 single crochet stitches outward from the center mark on both sides, placing secondary markers at the 23rd stitches. This leaves an approximate 9-inch chest gap between the two strap placement markers. Along the back panel, count nine moss stitch rows inward from each side seam and mark the 10th row, creating a 5-inch underarm gap on each side.
To construct the right shoulder strap, attach yarn to the front panel four stitches away from the chest marker. Chain in multiples of two until reaching your desired strap length (such as 40 chains), then add one final chain for an odd total count of 41 chains. Anchor the chain to the marked back panel stitch with a slip stitch.
Turn your work to begin Row 1 of the strap. Single crochet in the next chain, chain one, skip one chain, and single crochet into the next. Repeat this sequence until you have four single crochet stitches. Next, transition the strap height by working two half-double-crochet units (half double crochet, chain one, skip one).
Continue along the main section of the strap using double crochets (double crochet, chain one, skip one) until 12 chains remain. Mirror the height transition by making two half-double-crochet units, followed by four single crochet units. Slip stitch into the front bust panel to secure the end of the row.
For Row 2, turn your work and build back across the strap structure by working single crochets into previous single crochets, half double crochets into half double crochets, and double crochets into double crochets across the center stretch. Secure the row to the front panel, fasten off all loose ends, and repeat the process on the left side to complete the second strap.
Practical Crafting Tips and Advice
Selecting the right undergarments can dramatically enhance the appearance of airy, open-work crochet designs. Choosing seamless, neutral-toned base pieces creates a clean silhouette underneath delicate stitch textures.
Taking accurate measurements directly against your body as you go is key to achieving a tailored fit. Since handmade fabrics naturally stretch over time, building a slightly snug back panel ensures the dress maintains its shape during wear.
When working surface ruffles, keeping a relaxed yarn tension prevents the underlying fabric from puckering or pulling. Smooth, even stitches allow the tiered layers to drape gracefully around the body.