Crochet Slippers: A Simple and Cozy Step-by-Step Guide
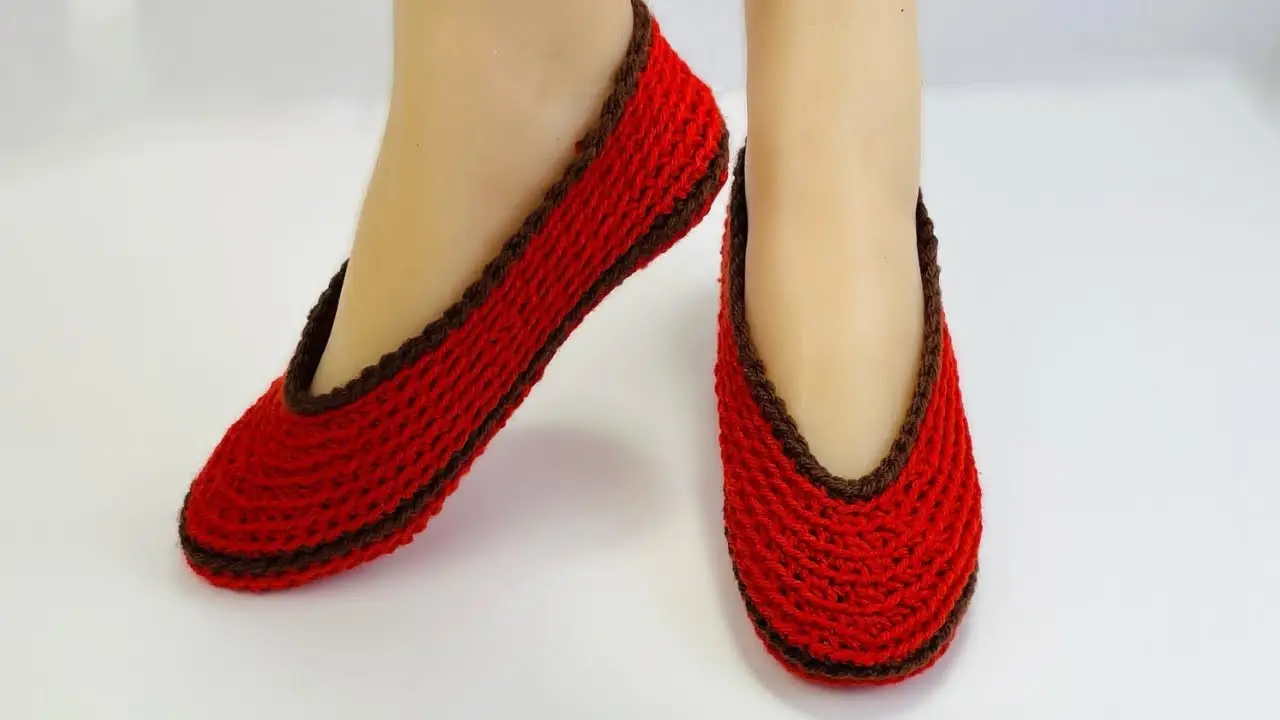
Crochet slippers are a lovely way to keep your feet warm while adding a handmade touch to your everyday comfort. These easy slip-on slippers feature a bright red body, a rounded toe, and neat dark brown edges, making them both cozy and stylish.
Why Make Crochet Slippers?
Crochet slippers are one of the most useful projects you can make with yarn. They are comfortable, lightweight, and perfect for wearing around the house. Unlike bulky shoes, these slippers have a simple shape that allows your feet to move freely while keeping them warm.
The beautiful combination of red and dark brown yarn gives these slippers a classic handmade look. The main body is made with red yarn, while the darker shade creates a neat border around the opening and the bottom edge. The rounded front gives the slippers a soft shape, and the low-cut design makes them easy to put on and take off.
Another great thing about crochet slippers is that you can adjust them to fit your feet. You can make them for yourself, prepare a pair as a thoughtful gift, or create different sizes for your family.
Materials Needed for Crochet Slippers
Choosing the right materials is important because slippers need to be comfortable, strong, and suitable for regular use.
For the main body, medium-weight yarn is a good choice. Acrylic yarn is affordable, easy to find, and available in many colors. Wool or wool-blend yarn can provide extra warmth, while cotton blends may feel more breathable. Choose a yarn that feels soft against your skin and is not too slippery.
For a similar color combination, use bright red yarn for the main part and dark brown yarn for the edging. You can also choose black, cream, grey, or another color that matches your personal style.
A crochet hook that matches your yarn is needed. A hook around 4 mm to 5 mm may work with many medium-weight yarns, but always check the yarn label and make a small test piece first.
You will also need a yarn needle for sewing and hiding loose ends, a pair of scissors, and a measuring tape. Stitch markers are useful for keeping track of the beginning of each round, especially when working around the toe and sole.
If you want the slippers to have better grip, prepare a suitable non-slip fabric paint or a ready-made slipper sole. This is especially useful when wearing crochet slippers on smooth indoor floors.
Understanding the Crochet Slipper Design
These slippers have a simple slip-on shape with a rounded front and an open top. The red yarn creates most of the slipper, while the dark brown yarn adds a decorative finish.
The toe area is rounded rather than pointed, giving enough room for the front of your foot. The sides gently follow the shape of the foot, and the opening sits comfortably around the top of the foot without covering the ankle.
The bottom needs to be firm enough to support your foot. The upper section should be slightly flexible so that you can put the slippers on easily.
For this style, you can begin by making an oval-shaped base and then build the upper part around it. The exact number of stitches and rounds will depend on your foot measurements, yarn thickness, and crochet tension.
Important Crochet Stitches and Techniques
You do not need advanced crochet skills to make a basic pair of slippers. Knowing a few simple stitches will help you complete the project.
The chain stitch is used to create the starting foundation. You will usually begin with a short chain when making an oval-shaped base.
Single crochet is a useful stitch for making a firm and closely worked fabric. It is especially helpful for the sole because it creates a stronger surface than many taller stitches.
Half double crochet is another good option. It creates a slightly taller fabric while keeping the texture fairly dense. You can use it for the upper section if you want a soft but sturdy finish.
Slip stitches are useful for joining rounds, moving across stitches, and creating neat edges. They are also helpful when attaching the contrasting border.
Increasing means working more than one stitch into a stitch or designated space. This helps create the rounded shape around the toe. Decreasing joins stitches together and helps shape the slipper as it moves toward the foot opening.
Before starting, practice these stitches with your chosen yarn. Keeping your stitches even will make the finished slippers look much neater.
Step 1: Measure Your Feet
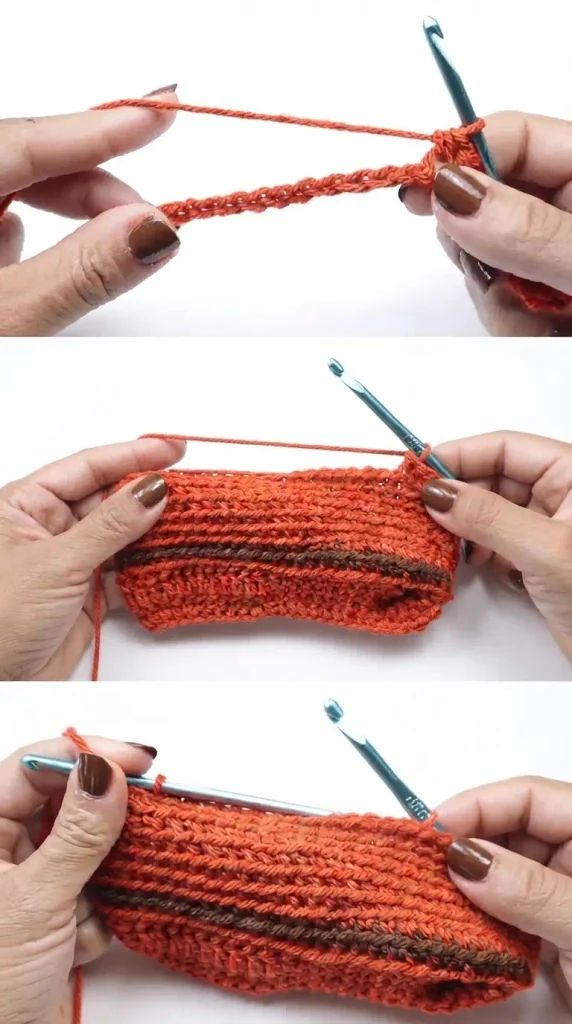
Start by measuring both feet while standing comfortably. Measure from the back of your heel to the tip of your longest toe. Also measure the widest part of your foot.
Use these measurements to decide how long and wide the slipper should be. It is important not to make the sole too small because the finished crochet fabric may feel tight when worn.
Remember that crochet fabric can stretch slightly with use. A comfortable fit should hold the foot gently without squeezing the toes or slipping off the heel.
If you are making slippers as a gift, try to get the correct shoe size or foot measurements before starting.
Step 2: Make a Small Crochet Test
Before making the sole, crochet a small sample using your selected yarn and hook. This helps you understand how tightly or loosely your stitches work together.
Measure the sample and check whether the fabric feels comfortable. If the stitches are too loose, try a smaller hook. If the fabric feels too stiff, use a slightly larger hook.
A firm fabric is important for slippers because it needs to handle regular movement. However, it should not be so tight that the slipper becomes uncomfortable.
Once you are happy with the sample, you can begin the actual project.
Step 3: Crochet the Oval Sole
Start with a foundation chain that is suitable for the length of your foot. The chain forms the center of the oval sole.
Work single crochet stitches along one side of the chain. When you reach the end, place several stitches into the last chain to create a rounded turn.
Continue crocheting along the opposite side of the foundation chain. Work around the other end in the same way to complete the oval shape.
For the next round, add increases around both ends of the oval. These increases help the base become wider without creating sharp corners.
Continue adding rounds until the sole reaches the required length and width. Check the shape regularly by comparing it with your foot measurements.
Try to keep the sole flat. If it starts curling upward, you may need more increases. If it becomes wavy, there may be too many increases.
You can use red yarn for the sole to keep the entire slipper in the same main color.
Step 4: Build the Upper Part
Once the oval base is ready, start working around its outer edge to create the upper section.
Work one round of stitches around the sole. To help the sides turn upward, crochet through the back loops of the stitches in this first round. This creates a clear edge between the bottom and the sides.
Continue working around the slipper without increasing as much as you did for the toe. This allows the sides to rise and form a shallow shoe shape.
Use single crochet or half double crochet stitches to build the upper part. Keep the stitch tension even so that both sides have the same height.
As you work, check the shape against your foot. The toe should have enough room, while the sides should gently cover the lower part of your foot.
Step 5: Shape the Toe and Foot Opening
The rounded toe is an important part of this slipper design. Continue working evenly around the front so that it keeps its smooth shape.
As you move toward the middle and back sections, pay attention to the opening. You want enough space to slide your foot inside, but the slipper should not feel loose.
You can shape the opening by changing the number of stitches worked across the upper section and leaving the required area open. Depending on your chosen construction, decreases can also help bring the sides closer around the foot.
Try the slipper on carefully while working. If the front feels too tight, you may need additional stitches or a little more room in the toe area. If the opening feels too wide, adjust the side shaping.
Make sure the slipper is comfortable before finishing the final round.
Step 6: Add the Dark Brown Border
The dark brown border gives these crochet slippers their attractive finished look. It creates a clear outline around the opening and adds contrast to the red yarn.
Join the brown yarn near the back or side of the opening. Work slip stitches or single crochet stitches evenly around the edge.
Avoid pulling the yarn too tightly because this can make the opening smaller and uncomfortable. The border should lie flat while keeping its natural shape.
You can also add a narrow brown edging around the bottom of the slipper. Work carefully around the sole to create a neat outline.
For a more polished finish, make sure the brown border has an even thickness on both slippers.
Step 7: Make the Second Slipper
After completing the first slipper, repeat the same steps to make the second one.
Use the same hook, yarn, stitch pattern, and number of rounds. Try to keep your tension consistent so that both slippers have matching shapes and sizes.
It is helpful to count the stitches and rounds from the first slipper as you work on the second. Small differences can make one slipper feel tighter or look larger than the other.
Place both slippers side by side when finished. Check that the toes, openings, and borders look similar.
Step 8: Finish and Secure the Loose Ends
Use a yarn needle to weave in all loose yarn ends. Pass the yarn through several stitches on the inside of the slipper so that it stays secure.
Trim any extra yarn carefully without cutting the crochet fabric.
Check the entire slipper for loose stitches or gaps. Pay special attention to the toe, heel, and areas where the yarn colors change.
If the slippers look slightly uneven, gently shape them with your hands. You can also use light blocking if the yarn label allows it. Avoid applying too much heat, especially when working with acrylic yarn.
How to Make Crochet Slippers More Comfortable
Comfort is just as important as appearance. A slipper may look beautiful, but it needs to fit well and stay in place while walking.
Choose soft yarn that does not irritate your skin. If your feet get warm easily, a breathable yarn blend may be a better choice than thick wool.
Make the sole slightly firm so that it does not stretch too much during use. If the slipper feels loose, adding a few decreases around the opening may help improve the fit.
For better support, you can sew a suitable fabric or slipper sole onto the bottom. Another option is to apply small dots of non-slip fabric paint according to the product instructions. Allow the coating to dry completely before wearing the slippers.
Remember that ordinary crochet fabric can be slippery on polished tiles and wooden floors. Always check the grip before walking around in your finished pair.
Tips for Making Neat Crochet Slippers
One of the best ways to improve your results is to keep checking the size while crocheting. Do not wait until the entire slipper is finished to discover that it is too small or too large.
Use stitch markers at the beginning of rounds. This makes it easier to count stitches and prevents mistakes when working in a continuous circle.
Keep your tension consistent, especially when making the oval sole. Uneven tension can cause the base to twist or lose its shape.
When changing from red to brown yarn, make the color change neatly and hide the yarn ends inside the fabric. This will help the slippers look clean and professionally finished.
If you are a beginner, start with simple single crochet stitches. Once you understand the shape, you can experiment with other stitches and decorative patterns.
How to Customize Your Crochet Slippers
You can easily change the look of these slippers by choosing different yarn colors. Red and brown create a warm traditional style, but pastel shades can give them a softer appearance.
For a simple everyday pair, try grey with black edging or cream with dark brown edging. You can also make colorful slippers using leftover yarn, as long as the yarn thickness is similar throughout the project.
If you want a warmer pair, choose a thicker yarn and adjust the hook size. Keep in mind that thicker yarn will change the finished measurements, so check the fit as you work.
You can also add a small crochet flower or bow near the front. Keep decorations securely attached and avoid placing anything bulky where it may press against your toes.
How to Care for Handmade Crochet Slippers
Proper care helps crochet slippers stay in good condition for a longer time.
Always check the yarn label before washing. Many acrylic yarns can be washed gently, while some wool yarns require special care.
If the yarn allows machine washing, place the slippers inside a laundry bag and use a gentle cycle. Otherwise, hand wash them with mild detergent and cool water.
Do not twist or squeeze the slippers too hard. Press out extra water gently with a clean towel and leave them to dry flat.
Avoid hanging wet slippers because their shape may stretch. Keep them away from direct high heat, especially if they contain acrylic yarn or glued non-slip materials.