Crochet Sun Hat Pattern: A Beautiful Handmade Hat for Sunny Days
A crochet sun hat is a lovely handmade accessory that combines style, comfort, and usefulness. With its rounded crown, wide brim, and pretty openwork details, this hat is perfect for sunny days, beach trips, holidays, and everyday outdoor wear.
Introduction to the Crochet Sun Hat Pattern
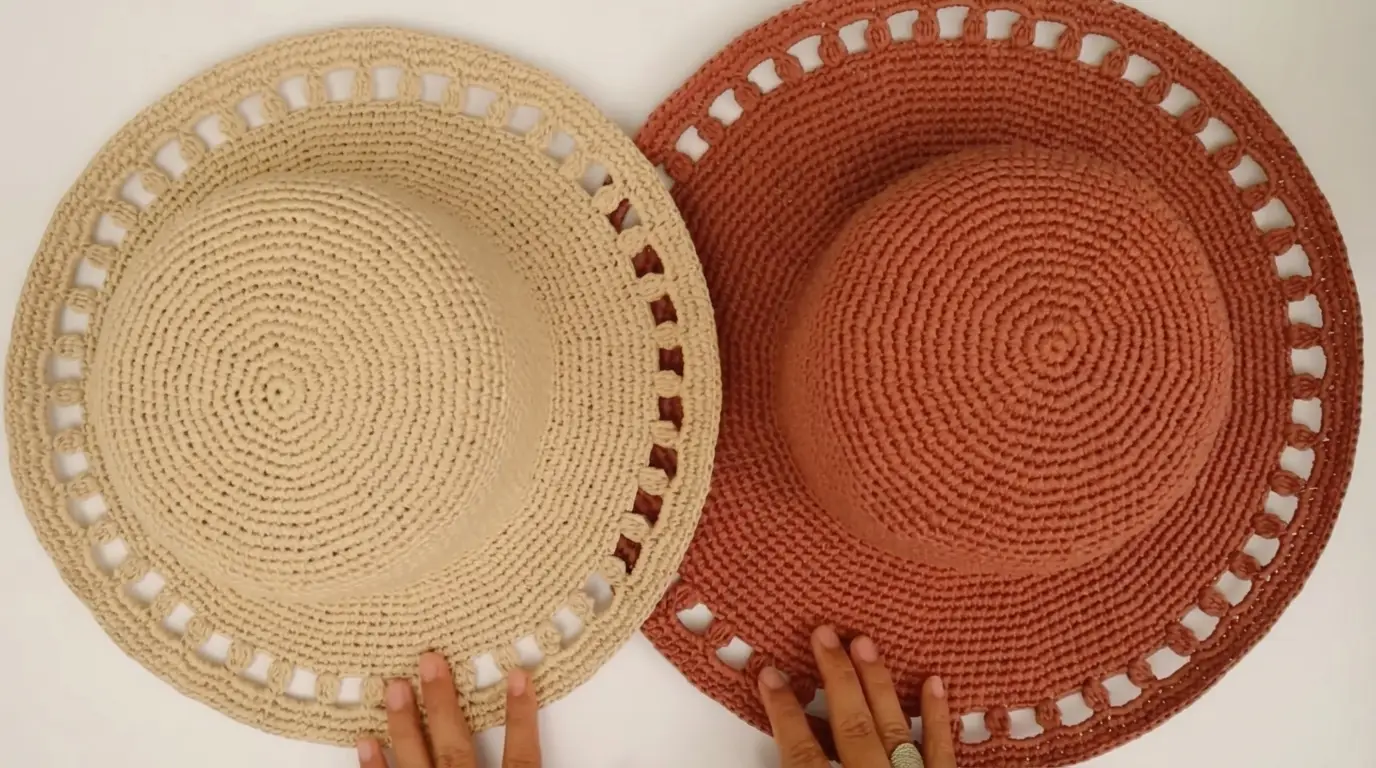
If you enjoy making useful crochet projects, this crochet sun hat is a wonderful pattern to try. It features a neat, rounded crown, a comfortable hat body, and a wide brim with decorative open spaces around the edge. The simple stitches create a beautiful texture, while the openwork border gives the finished hat a delicate look.
This pattern is suitable for crocheters who understand basic stitches and want to make something both practical and attractive. You can choose a natural cream shade, warm terracotta, or any colour that matches your personal style.
Materials Needed for the Crochet Sun Hat
Choosing the right materials is important because a sun hat needs to hold its shape while remaining comfortable to wear. Cotton yarn is a good choice for this project because it is breathable, easy to work with, and suitable for warm weather.
Yarn: Choose medium-weight cotton yarn or another suitable cotton blend. Cotton gives the hat a neat finish and helps it maintain its shape. The exact amount will depend on the hat size, yarn thickness, and brim width. Having an extra ball available is always helpful.
Crochet hook: A 3.5 mm to 4.5 mm crochet hook is a useful starting range for medium-weight cotton yarn. Always check your tension and adjust the hook size if your stitches are too loose or too tight.
Scissors: Use sharp scissors to cut the yarn neatly when finishing your work.
Yarn needle: A yarn needle is useful for hiding loose ends and securing the finishing stitches.
Stitch marker: This helps you keep track of the beginning of each round, especially when working in continuous rounds.
Measuring tape: Use a measuring tape to check the head circumference, crown diameter, and hat depth as you work.
Crochet Techniques Used in This Pattern
This sun hat uses basic crochet techniques that are easy to learn with a little practice. The main part is worked in rounds, starting from the centre of the crown and gradually increasing to create a flat circular shape.
The single crochet stitch is used to create a firm and closely packed fabric. It gives the hat a neat texture and helps it hold its shape.
The increase stitch is another important technique. It means working two stitches into the same stitch. Evenly spaced increases allow the crown to grow into a flat circle instead of forming a small bowl.
Chain stitches and skipped stitches are used to make the decorative openwork section around the brim. These create small spaces that add a pretty finishing detail.
Slip stitches are useful for joining rounds and finishing the project neatly. You should also know how to make a magic ring, although a small chain loop can be used as an alternative.
For this pattern, US crochet terms are used.
Understanding the Hat Construction
The crochet sun hat is made in three main sections: the crown, the hat body, and the brim.
The crown is the circular top section. It starts at the centre and grows outward through regular increases. Once the crown reaches the correct diameter, you stop increasing and begin working straight rounds.
The hat body forms the sides of the hat. It is worked without additional increases, allowing the fabric to grow downward and create a rounded shape that sits comfortably on the head.
The brim is made by increasing stitches around the lower edge of the hat. This makes the fabric spread outward and creates the wide shape needed for a sun hat. A decorative openwork round adds extra detail near the outer edge.
Step 1: Start Making the Crochet Crown
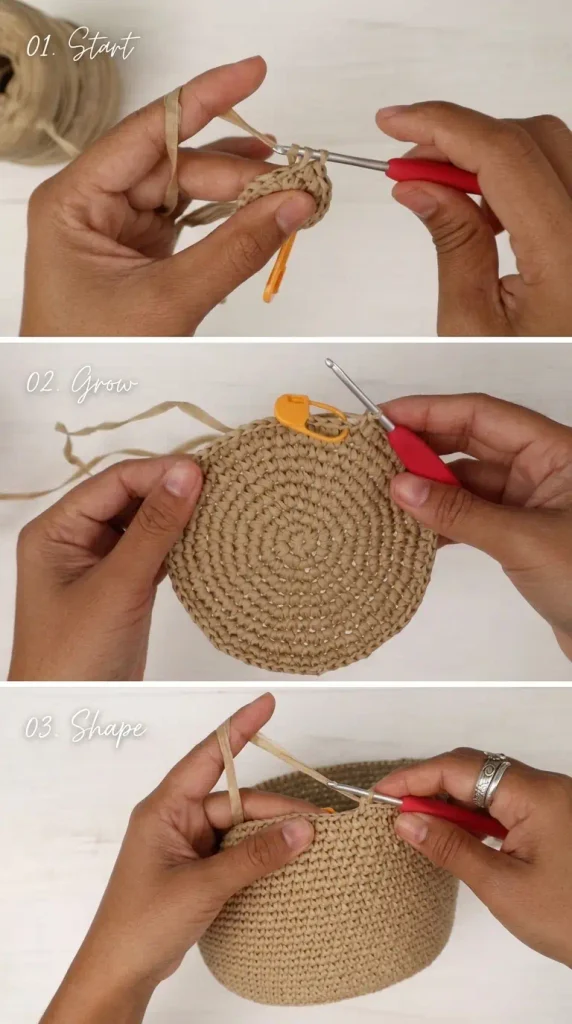
Begin with a magic ring. Work 8 single crochet stitches into the ring and pull the yarn tail to close the centre tightly. Place a stitch marker in the first stitch so you can easily identify the beginning of the round.
For the second round, work 2 single crochet stitches into every stitch. You will have 16 stitches.
For the third round, work 1 single crochet in the first stitch and 2 single crochet stitches in the next stitch. Repeat this pattern around the circle.
Continue increasing evenly in each round. In general, add 8 stitches per round by spacing the increases around the circle. This helps the crown remain flat as it grows.
Keep checking the shape while crocheting. If the circle starts curling upward like a bowl, it may need more increases. If the edge becomes wavy, there may be too many increases or your tension may be too loose.
Continue until the crown measures approximately 6.5 to 7 inches across for a typical adult starting size. This is a guide rather than a fixed measurement. Your head size and yarn thickness may require adjustments.
Step 2: Create the Rounded Hat Body
Once the crown reaches the desired diameter, stop increasing. Continue working one single crochet stitch into each stitch around.
Repeat this process for several rounds to build the sides of the hat. The fabric will gradually turn downward, forming the rounded shape of the hat body.
For an adult hat, a body depth of approximately 4 to 5 inches from the centre top to the lower edge is a useful starting point. However, the best measurement depends on the desired fit and how much of the forehead you want the hat to cover.
Try the hat on occasionally to check its fit. It should sit comfortably without feeling too tight or slipping easily over your head.
Keep your stitches consistent throughout this section. Even stitches create a smooth surface and make the finished hat look more professional.
Step 3: Start the Wide Crochet Brim
The wide brim is one of the most attractive parts of this sun hat. It gives the design its lovely summer appearance while providing extra coverage around the face.
To begin, work an increase round along the lower edge of the hat. A simple method is to work 6 or 7 single crochet stitches, followed by 2 single crochet stitches in the next stitch. Repeat this pattern around.
In the next round, work one single crochet stitch into each stitch without increasing. Continue alternating increase rounds with plain rounds to gradually widen the brim.
The exact number of increases depends on how wide and firm you want the brim to be. If you prefer a slightly wavy, decorative brim, you can increase more frequently. If you want a flatter brim, use fewer increases.
Keep the brim evenly spread as you work. Avoid adding too many increases in one place because this can create unwanted ripples.
Continue until the brim reaches your preferred width. Around 3 to 4 inches is a useful starting point for a wide adult sun hat.
Step 4: Add the Decorative Openwork Border
The openwork border gives the hat a special finishing detail. It creates small rectangular spaces around the brim and makes the design look lighter and more decorative.
After completing the main brim section, work a decorative chain round.
For a simple version, repeat the following pattern around: chain 3, skip 2 stitches, and work 1 single crochet stitch into the next stitch.
Continue the pattern evenly around the brim. You will begin to see small open spaces forming between the stitches.
For the following round, work 3 single crochet stitches into each chain space. This helps create a neat border while keeping the openwork section secure.
You can adjust the number of chain stitches and skipped stitches to make the openings smaller or larger. Try to keep the same spacing throughout the round so the border looks balanced.
Make sure you do not pull the chain stitches too tightly. Loose and even chains help create clear openings and prevent the brim from becoming too stiff.
Step 5: Finish the Outer Edge
A neat outer edge makes a big difference to the final appearance of your crochet sun hat.
After completing the decorative section, work a finishing round of single crochet stitches around the brim. This creates a clean edge and helps keep the decorative openings in place.
If you want a slightly more detailed finish, you can use slip stitches or another simple edging technique. However, a single crochet border is a good option when you want the hat to look clean and simple.
Join the final round neatly, cut the yarn, and pull the end through the last loop. Use a yarn needle to weave in all loose ends on the inside of the hat.
Check the entire brim for uneven stitches or loose loops before considering the project finished.
Choosing the Right Colours for Your Sun Hat
Colour selection can completely change the appearance of a handmade crochet hat.
Cream, beige, and natural cotton shades create a soft and classic look. These colours are easy to match with summer dresses, casual outfits, and beachwear.
Terracotta and rust shades give the hat a warm, earthy appearance. They are beautiful choices if you prefer something a little different from traditional neutral colours.
You can also experiment with soft pink, light brown, white, mustard, or pale green. A single colour gives the crochet texture a simple and elegant appearance, while two colours can make the decorative border stand out.
For your first hat, using one colour throughout is a good idea. It allows you to focus on the stitches, shape, and overall construction.
Tips for Getting the Best Results
Check your tension regularly. Consistent tension helps the crown stay flat and gives the hat an even texture. If your stitches become too tight, try relaxing your grip on the yarn.
Measure as you work. Do not depend only on the number of rounds. Yarn thickness and crochet tension can change the finished measurements.
Use breathable yarn. Cotton yarn is a practical choice for warm-weather accessories. It creates a comfortable fabric and is generally easy to care for.
Keep increases evenly spaced. Uneven increases can make the crown or brim look bumpy. Using a stitch marker can help you keep track of your rounds.
Check the brim shape. Lay the hat on a flat surface occasionally. The brim should spread evenly without curling too much or becoming excessively wavy.
Avoid pulling the openwork chains too tightly. The decorative spaces should remain clear and even. Tight chains can make the border look crowded.
Try the hat on before finishing. This gives you a chance to adjust the depth and fit before weaving in all the yarn ends.
How to Adjust the Hat Size
One of the best things about making your own crochet sun hat is that you can adjust the measurements to suit different head sizes.
For a smaller hat, make the crown slightly narrower and reduce the number of body rounds if needed. For a larger hat, continue increasing the crown until it reaches the required diameter.
The head circumference is the most useful measurement when planning the size. A comfortable hat should not feel too tight around the head. Remember that the finished fabric may have a little flexibility depending on the yarn and stitch tension.
You should also consider the depth of the hat. Some people prefer a deeper body that covers more of the head, while others like a shorter and more fitted style.
The brim width is another measurement you can change. A narrower brim creates a simple everyday hat, while a wider brim gives a more dramatic summer look.
Caring for Your Handmade Crochet Sun Hat
Proper care helps your handmade hat stay beautiful for longer.
Always check the yarn label for washing instructions. Many cotton yarns can be hand-washed or machine-washed, but the recommended care method depends on the specific yarn.
When hand-washing, use cool or lukewarm water and a gentle detergent. Avoid twisting or squeezing the hat too hard because this may affect its shape.
After washing, gently press out excess water with a clean towel. Place the hat on a flat surface and reshape the crown and brim while it is still damp. Allow it to dry completely before storing or wearing it.
Store the hat in a clean, dry place. Avoid crushing the brim under heavy items, as this can create unwanted folds.
Styling Ideas for a Crochet Sun Hat
A handmade crochet sun hat is easy to style with different summer outfits.
Wear it with a light cotton dress for a relaxed and feminine look. It also pairs beautifully with shorts, a simple top, and comfortable sandals.
For beach days, combine it with a swimsuit cover-up or a loose summer shirt. The wide brim adds extra coverage around the face, making it a useful accessory for outdoor activities.
Natural-coloured hats are especially easy to style because they work well with many different clothing shades. A terracotta hat can also add a warm pop of colour to a simple outfit.
You can keep the design plain or add a small crochet flower, ribbon, or decorative band around the crown. Make sure any added decoration is securely attached and does not make the hat uncomfortable.
Common Mistakes to Avoid
One common mistake is adding too many increases when making the crown. This can cause the circular section to become wavy instead of flat. Check the shape after every few rounds and adjust your increase spacing when necessary.
Another mistake is stopping the crown too early. If the top section is too small, the hat may not fit properly even if you make the body deeper. Always check the crown diameter before moving on.
Some crocheters also make the brim too tight. This can cause it to curl upward instead of spreading outward. Use suitable increases and check the shape regularly.
Finally, avoid leaving loose yarn ends unsecured. A neatly finished hat should have all yarn ends woven in carefully so they do not come undone during use.
Final Thoughts
This crochet sun hat is a beautiful project for anyone who enjoys making handmade accessories. Its rounded crown, textured body, wide brim, and decorative openwork border create a lovely combination of simple crochet techniques and attractive details.
You can make it in different colours, adjust the size, and change the brim width to suit your preferences. With patience, consistent stitches, and careful finishing, you can create a comfortable handmade hat that is perfect for sunny days.
Whether you make one for yourself, give it as a handmade gift, or create several in different colours, this crochet sun hat is a lovely addition to your collection of crochet projects.