DIY Crochet Earrings Pattern for Beginners
Discover how to create stunning, lightweight leaf-shaped crochet earrings with this beginner-friendly guide. These stylish accessories combine simple stitches with natural wooden beads for a chic, handmade touch.
Materials Needed
To create your own pair of earrings, you will need a few simple supplies:
- Yarn: Size two scrap yarn works wonderfully for a clear stitch definition. If you prefer smaller earrings, you can easily use a finer yarn size.
- Crochet Hook: A 1.5 mm crochet hook is ideal for working with size two yarn.
- Notions: A yarn needle (smaller sizes are preferred for weaving in tight ends), a pair of scissors, two earring hooks, and two small wooden beads.
Choosing the right yarn weight is the easiest way to customize your finished project. Thicker yarn creates a larger, bolder leaf, while embroidery floss or lightweight thread produces delicate, dainty earrings.
Step-by-Step Crochet Instructions
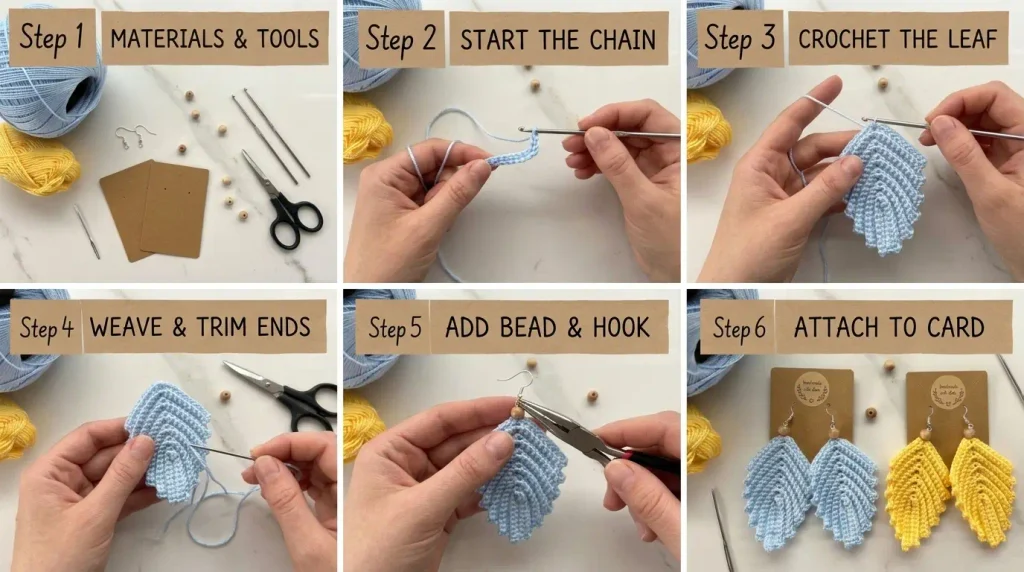
Creating the leaf shape relies on a continuous row-by-row increase technique that forms distinct ridges and clean outer edges.
Begin by making a slip knot and chaining 12 stitches on your hook. Skip the first chain from the hook and work one single crochet into the next 10 chains. In the final remaining chain, work three single crochets into the exact same stitch to create the rounded tip of the leaf. As you work your way back down the opposite side of the starting chain, work one single crochet into the next nine chains, crocheting directly over your starting tail to secure it neatly. Trim any excess tail yarn close to the stitches.
Chain one and turn your work. For this entire pattern, you will work exclusively in the back loop only of each “V” shaped chain. This technique creates the signature ribbed texture visible across the front of the leaf. Work 10 single crochets into the back loops along the side, then work three single crochets into the top center stitch. Continue down the other side by working nine single crochets into the back loops.
Chain one, turn, and repeat this exact row structure: 10 single crochets in the back loops up to the top, three single crochets in the center top stitch, and nine single crochets down the side. Keep repeating this row until you count a total of seven distinct ridges or corner bumps along both outer edges. Once you reach seven corners on each side, chain one, leave a short tail of yarn, and cut your working yarn. Thread your yarn needle and weave the tail securely through the back of the stitches so it remains completely hidden.
Attaching Beads and Earring Hardware
Adding the hardware transforms your crocheted piece into wearable jewelry. Take a short strand of leftover yarn and insert your crochet hook into the center top loop of the leaf. Pull up a small loop, then thread that loop through your wooden bead. Next, open the loop of your earring hook slightly, slip the yarn loop onto the finding, and close the metal loop securely. Pull firmly on the yarn tails to draw the wooden bead snug against the top of the leaf, weave the remaining ends cleanly through the back stitches, and trim any excess. Repeat the entire process to craft a matching second earring.
Crocheting over your beginning yarn tail as you go saves significant time during finishing. It keeps your workspace tidy and prevents loose threads from unraveling later.
Taking time to check both sides of your work before trimming yarn ends ensures that no stray knots or tails poke through to the front of your finished leaf.
Displaying your handmade earrings on small pieces of kraft cardstock adds a polished, professional touch if you plan on gifting them or selling them at craft fairs.