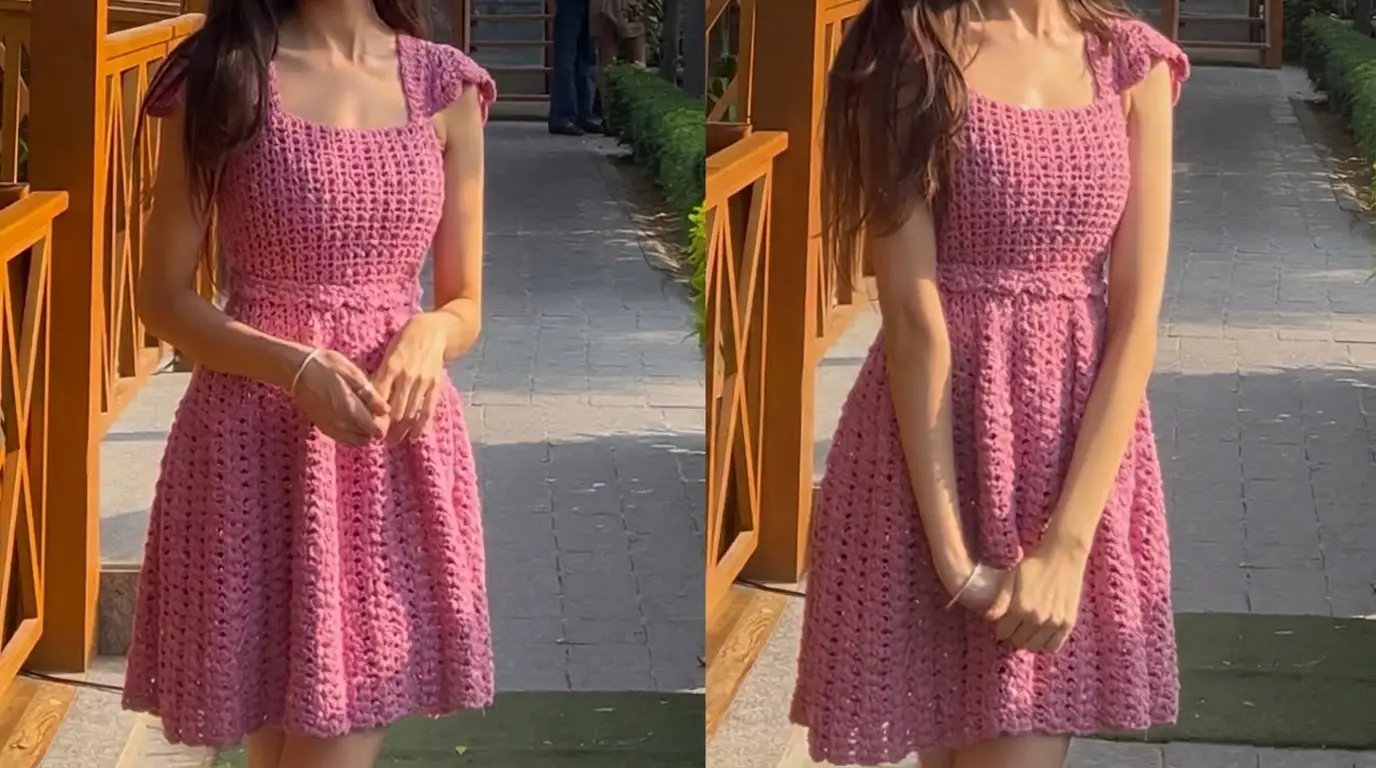
How to Crochet a Stunning Birthday Dress
Celebrate your special day in a handmade piece that truly shines. This gorgeous crochet birthday dress features a structured square-neck bodice, delicate flutter sleeves, a playful flare skirt, and a matching ruffled belt for the ultimate birthday look.
Materials Required
To make this dress, you need the following items:
- Yarn or Thread: Fine embroidery thread with tiny embedded sequins. You can split one large cone into three separate balls to combine three strands together for the right weight. Alternatively, use a single strand of standard 4-ply yarn or combine two strands of 3-ply yarn to match the thickness.
- Crochet Hook: A single 4 mm crochet hook is used for every section of the entire dress.
- Tapestry Needle: For sewing the front and back panels, straps, and sleeves together.
- Optional Zipper: A side zipper if you prefer a precision fit that makes dressing easy.
Crafting the Bodice Top
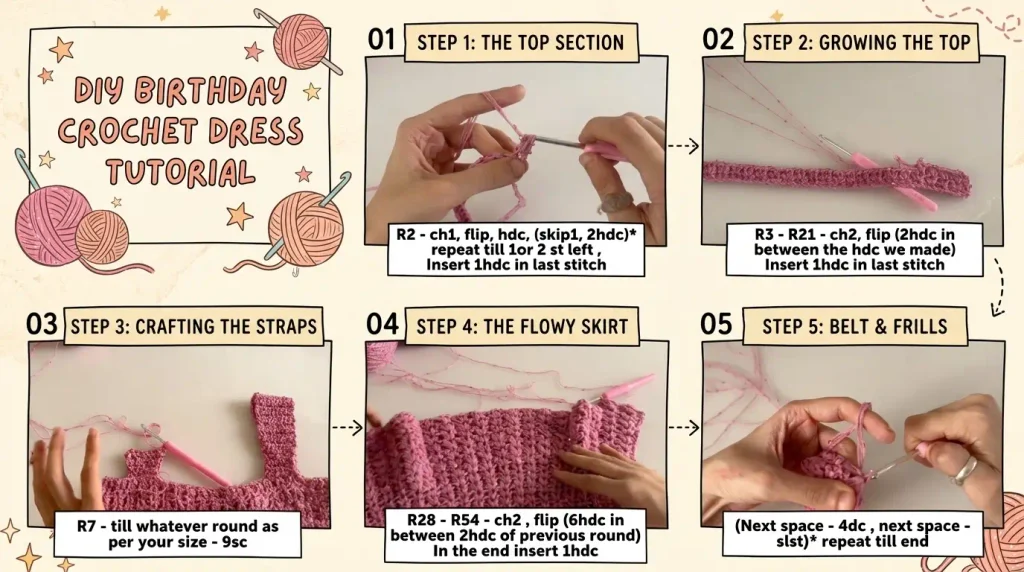
The dress constructed in two main panels: a front piece and a back piece. Each panel starts at the top of the bust line and works downward.
To begin, make a slip knot and crochet a foundation chain that covers half of your full bust measurement. For a standard medium fit, 50 chains offer ideal coverage across the front.
Row 1 starts with one single crochet into each chain across, resulting in 49 total single crochets.
Row 2 establishes the main stitch pattern. Chain one and turn. Place one half double crochet into the first stitch. Skip the next stitch, then place two half double crochets into the following stitch. Repeat the pattern of skipping one stitch and placing two half double crochets into the next stitch all the way across. End the row with a single half double crochet in the final stitch.
For Row 3 onwards, chain two (which counts as your first half double crochet) and turn. Work two half double crochets directly into the space between the pairs of half double crochets from the row below. End each row with a single half double crochet in the last stitch. Repeat this row pattern for 20 rounds (21 total rows including the base single crochet row) until the bodice reaches just under the bustline.
Crocheting the Flowy Skirt
Once the bodice is complete, you will immediately transition into the skirt without cutting the thread. The skirt creates its beautiful flared silhouette through stitch expansion.
For the upper flare section, chain two and turn. Instead of working two half double crochets into the spaces between the previous clusters, work four half double crochets into each space across the row. End the row with a single half double crochet at the end. Repeat this 4-half-double-crochet cluster pattern for a total of seven rows.
To increase the flare for the main length of the skirt, chain two and turn. Now, work six half double crochets into the center of each 4-stitch cluster from the previous row. Continue working rows of 6-half-double-crochet clusters until the dress reaches your desired length. A total of 26 rows in this pattern provides a flattering knee-length drape.
Repeat this entire process from the bodice down to create an identical second panel for the back of the dress.
Joining the Dress Panels
Place the front and back panels together with the right sides facing each other. Using a tapestry needle and a strand of your working yarn, whip-stitch the side seams together from the top edge down to the hemline.
If you made the bodice fitted to your exact waist and bust measurements without stretch, leave one upper side seam open and sew in a flexible side zipper to make slipping into the dress simple.
Shaping and Attaching Shoulder Straps
To add structured straps, mark where you want the straps to sit on the top front edge of the dress.
Attach your yarn at the mark and work five single crochets across the edge. Chain one and turn. Work an increase (two single crochets) in the first stitch, three single crochets across, and an increase in the last stitch to reach seven stitches.
Work seven single crochets across for three rows. On the next row, increase in the first and last stitches to reach nine stitches.
Continue making rows of nine single crochets until the strap reaches approximately 4.5 inches in height. Work four additional rows of nine single crochets.
Now begin tapering the strap for the shoulder point. Work a decrease across the first two stitches, five single crochets, and a decrease across the last two stitches to reduce back to seven stitches. Work three rows of seven single crochets.
On the next row, decrease at both ends again to return to five stitches. Continue working rows of five single crochets until the strap is long enough to curve comfortably over your shoulder. Sew the back edge of the strap securely to the top back panel of the dress. Repeat for the second strap.
Making the Flutter Sleeves
The flutter sleeves are worked separately as curved semicircular motifs and sewn onto the shoulder straps.
To begin a sleeve, make a slip knot and chain six. Join with a slip stitch to the first chain to form a center ring. Chain three (counts as a double crochet), then place seven double crochets into the ring.
Row 2: Chain three and turn. Work one double crochet, chain one, and one double crochet into the space between each double crochet across the arch. You will have seven of these V-shaped clusters.
Row 3: Chain three and turn. Work one double crochet, chain one, and one double crochet into the center of each two-double-crochet cluster from the row below (skipping the chain spaces). Finish with a double crochet in the top of the turning chain.
Row 4: Chain three and turn. Work two double crochets, chain one, and two double crochets into each cluster space across.
Row 5: Chain three and turn. Repeat the previous pattern of two double crochets, chain one, and two double crochets in each cluster space.
Rows 6 and 7: Increase the cluster size by working three double crochets, chain one, and three double crochets in each space across.
Row 8: Work four double crochets, chain one, and four double crochets in each space across.
Once complete, lay the finished sleeve flat along the outer curve of the shoulder strap and sew them together using a tapestry needle. Repeat for the second sleeve.
Creating the Accent Ruffled Belt
The matching waist belt cinches the waistline and adds detail to the silhouette.
Start by making a foundation chain of 120 chains (or enough to comfortably wrap around your waist with excess to tie).
Row 1: Place a half double crochet in the first chain, then repeat the pattern of skipping one chain and placing two half double crochets into the next chain across the entire length.
Row 2: Chain two and turn. Work two half double crochets into the space between each cluster across.
To create the ruffled border along both long edges of the belt, attach your yarn to the very first end space. Chain one, then work four double crochets into the next space between clusters. Slip stitch into the following space. Repeat the pattern of four double crochets in one space and a slip stitch in the next space all the way down the edge to form a scalloped frill. Fasten off and repeat this ruffled edging along the opposite long edge of the belt.
Helpful Crafting Advice
When working with fine threads that contain embedded sequins, keep your tension loose. Tight loops cause the sequins to catch on your hook, which can snag the fine threads and interrupt your rhythm. Allowing your loops to rest comfortably on the hook shaft ensures effortless stitching.
Combining multiple thin strands of thread gives fine yarn the body and weight needed for structural garments. If you are re-winding yarn into multiple working balls, keep your pull threads organized in small containers side by side so the strands feed evenly without twisting together as you crochet.
When working repetitive cluster stitches for the body of a garment, check your stitch count at the end of every few rows. It is very easy to miss the final stitch at the edge of a row, which can accidentally alter the straight sides of your bodice or change the flare rate of your skirt.
Always block your finished crochet dress pieces lightly with steam or water before wearing. Blocking settles fine stitches, allows sequined threads to drape naturally, and gives the ruffled sleeves and skirt a clean finish.